PROGRAM NUMBER 4
ONCE DAILY WEEKLY

TIMER RECORDING

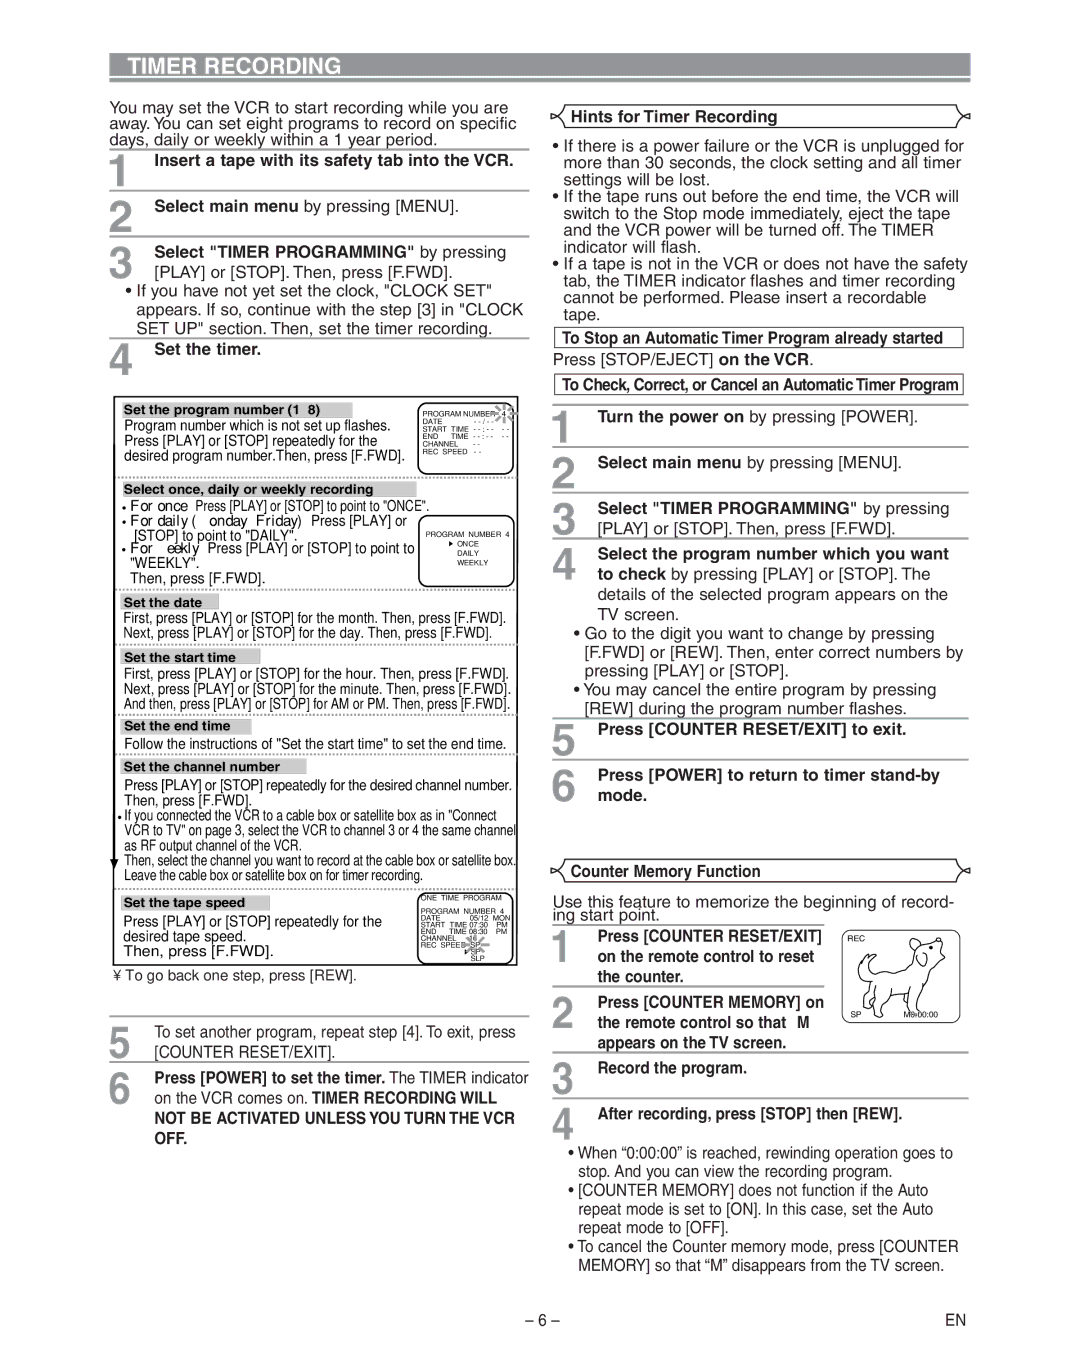
You may set the VCR to start recording while you are away. You can set eight programs to record on specific days, daily or weekly within a 1 year period.

1

Insert a tape with its safety tab into the VCR.


2

Select main menu by pressing [MENU].

3

Select "TIMER PROGRAMMING" by pressing

[PLAY] or [STOP]. Then, press [F.FWD].

If you have not yet set the clock, "CLOCK SET" appears. If so, continue with the step [3] in "CLOCK SET UP" section. Then, set the timer recording.

4 Set the timer.

Set the program number (1~8)


PROGRAM NUMBER

4

Program number which is not set up flashes.

DATE

- - / - -


START TIME - - : - -

- -

Press [PLAY] or [STOP] repeatedly for the

END TIME - - : - -

- -

CHANNEL

- -


desired program number.Then, press [F.FWD].

REC SPEED

- -


Select once, daily or weekly recording

For once: Press [PLAY] or [STOP] to point to "ONCE".

For daily (Monday~Friday): Press [PLAY] or

[STOP] to point to "DAILY".

For weekly: Press [PLAY] or [STOP] to point to "WEEKLY".

Then, press [F.FWD].

Set the date

First, press [PLAY] or [STOP] for the month. Then, press [F.FWD]. Next, press [PLAY] or [STOP] for the day. Then, press [F.FWD].

Set the start time

First, press [PLAY] or [STOP] for the hour. Then, press [F.FWD]. Next, press [PLAY] or [STOP] for the minute. Then, press [F.FWD]. And then, press [PLAY] or [STOP] for AM or PM. Then, press [F.FWD].

Set the end time

Follow the instructions of "Set the start time" to set the end time.

Set the channel number

Press [PLAY] or [STOP] repeatedly for the desired channel number. Then, press [F.FWD].

If you connected the VCR to a cable box or satellite box as in "Connect VCR to TV" on page 3, select the VCR to channel 3 or 4 the same channel as RF output channel of the VCR.

Then, select the channel you want to record at the cable box or satellite box. Leave the cable box or satellite box on for timer recording.

Set the tape speed


ONE TIME PROGRAM


PROGRAM NUMBER 4

Press [PLAY] or [STOP] repeatedly for the

DATE

05/12 MON

START TIME 07:30

PM

desired tape speed.

END TIME 08:30

PM

CHANNEL

16


Then, press [F.FWD].

REC SPEED SP


SP


SLP


• To go back one step, press [REW].

5

To set another program, repeat step [4]. To exit, press

[COUNTER RESET/EXIT].

6

Press [POWER] to set the timer. The TIMER indicator

on the VCR comes on. TIMER RECORDING WILL

NOT BE ACTIVATED UNLESS YOU TURN THE VCR OFF.

Hints for Timer Recording

If there is a power failure or the VCR is unplugged for more than 30 seconds, the clock setting and all timer settings will be lost.

If the tape runs out before the end time, the VCR will switch to the Stop mode immediately, eject the tape and the VCR power will be turned off. The TIMER indicator will flash.

If a tape is not in the VCR or does not have the safety tab, the TIMER indicator flashes and timer recording cannot be performed. Please insert a recordable tape.

To Stop an Automatic Timer Program already started Press [STOP/EJECT] on the VCR.

To Check, Correct, or Cancel an Automatic Timer Program

1

Turn the power on by pressing [POWER].


2

Select main menu by pressing [MENU].


3

Select "TIMER PROGRAMMING" by pressing

[PLAY] or [STOP]. Then, press [F.FWD].

4

Select the program number which you want

to check by pressing [PLAY] or [STOP]. The

details of the selected program appears on the TV screen.

Go to the digit you want to change by pressing [F.FWD] or [REW]. Then, enter correct numbers by pressing [PLAY] or [STOP].

You may cancel the entire program by pressing [REW] during the program number flashes.

5

Press [COUNTER RESET/EXIT] to exit.

6

Press [POWER] to return to timer stand-by

mode.

Counter Memory Function

Use this feature to memorize the beginning of record- ing start point.

1

Press [COUNTER RESET/EXIT] REC


on the remote control to reset


2

the counter.


Press [COUNTER MEMORY] on

SP

M0:00:00

the remote control so that “M”


3

appears on the TV screen.


Record the program.


4

After recording, press [STOP] then [REW].


When “0:00:00” is reached, rewinding operation goes to stop. And you can view the recording program.

[COUNTER MEMORY] does not function if the Auto repeat mode is set to [ON]. In this case, set the Auto repeat mode to [OFF].

To cancel the Counter memory mode, press [COUNTER MEMORY] so that “M” disappears from the TV screen.

– 6 –

EN

Page 6
Image 6
Hitachi VT-FX795A owner manual Timer Recording

VT-FX795A specifications

The Hitachi VT-FX795A is a sophisticated VHS video cassette recorder that was developed during the peak of the VCR era. Known for its reliability and feature-rich design, this versatile unit combines functionality with user-friendly operation, making it a sought-after choice for home entertainment enthusiasts.

One of the key features of the Hitachi VT-FX795A is its Ability to play and record in various VHS formats, including standard play (SP), long play (LP), and extended play (EP). This flexibility allows users to tailor their viewing experience, maximizing recording time while maintaining acceptable playback quality. The built-in high-speed dubbing feature facilitates quick copying of tapes, making it easier to create duplicates.

The VT-FX795A is equipped with advanced video head technology, which enhances image clarity and reduces distortion. This is especially appreciated during playback, as it delivers crisp visuals and vibrant colors that can rival some modern standards. In addition, the unit incorporates a high-quality audio system, ensuring that sound fidelity is matched with visual excellence, providing a complete entertainment experience.

Convenience is another hallmark of the Hitachi VT-FX795A. The user interface is designed to be intuitive, with clearly labeled buttons and an easy-to-navigate menu system. The unit supports programmable recording, allowing users to schedule recordings effortlessly. This feature is particularly beneficial for capturing shows when away from home.

The VT-FX795A also features a front-loading mechanism, which makes inserting and ejecting tape hassle-free. This user-centric design aspect reflects Hitachi's commitment to providing seamless functionality. The unit's compact design allows it to fit neatly into home entertainment systems, while its robust construction ensures longevity.

Connectivity options on the Hitachi VT-FX795A include AV inputs and outputs, facilitating straightforward connections to other devices such as TVs, camcorders, or external audio systems, further enhancing its versatility. Additionally, the unit was designed to work seamlessly with standard RF connections, making it compatible with a wide range of broadcast sources.

In summary, the Hitachi VT-FX795A remains a notable example of classic VCR technology. With its multifaceted recording capabilities, top-tier image and sound quality, intuitive design, and extensive connectivity options, it continues to hold a place in the hearts of users who appreciate the nostalgia and practicality of VHS recording in a digital age.