CAUTION CONTINUED
•The electrical cord of this product cannot be replaced. If it sus- tains damage, you must stop using this product immediately and return it to the HoMedics Service Center for repair. (See the warranty section for HoMedics address.)
•Disconnect the appliance from outlet before putting hands into water.
Assembly and Instructions for Use
1. | Unpack the product. Wipe off dust with a damp cloth. |
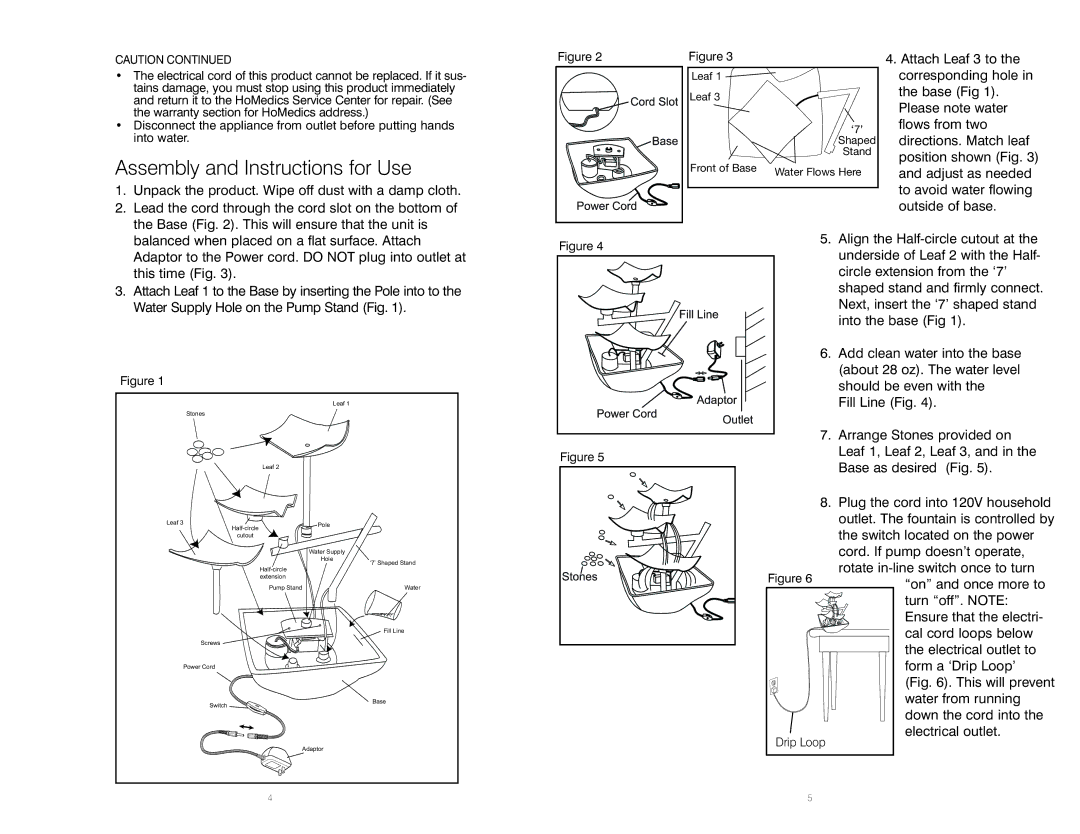
2. | Lead the cord through the cord slot on the bottom of |
| the Base (Fig. 2). This will ensure that the unit is |
Figure 2 | Figure 3 |
Leaf 1 |
|
Leaf 3 |
|
| ‘7’ |
| Shaped |
| Stand |
Front of Base | Water Flows Here |
|
4.Attach Leaf 3 to the corresponding hole in the base (Fig 1). Please note water flows from two directions. Match leaf position shown (Fig. 3) and adjust as needed to avoid water flowing outside of base.
balanced when placed on a flat surface. Attach |
Adaptor to the Power cord. DO NOT plug into outlet at |
this time (Fig. 3). |
3. Attach Leaf 1 to the Base by inserting the Pole into to the |
Water Supply Hole on the Pump Stand (Fig. 1). |
Figure 1
Leaf 1
| Stones |
|
|
| Leaf 2 |
Leaf 3 | Pole | |
| ||
|
| |
| cutout |
|
| Water Supply |
|
| Hole | ‘7’ Shaped Stand |
| ||
|
| |
extension |
|
|
Pump Stand |
| Water |
|
| Fill Line |
Screws
Power Cord
Switch | Base |
| |
| Adaptor |
Figure 4 | 5. Align the | |
underside of Leaf 2 with the Half- | ||
| ||
| circle extension from the ‘7’ | |
| shaped stand and firmly connect. | |
| Next, insert the ‘7’ shaped stand | |
| into the base (Fig 1). | |
| 6. Add clean water into the base | |
| (about 28 oz). The water level | |
| should be even with the | |
| Fill Line (Fig. 4). |
7. Arrange Stones provided on
Figure 5Leaf 1, Leaf 2, Leaf 3, and in the Base as desired (Fig. 5).
8. Plug the cord into 120V household outlet. The fountain is controlled by the switch located on the power cord. If pump doesn’t operate, rotate in-line switch once to turn
Figure 6 | “on” and once more to |
| |
| turn “off”. NOTE: |
| Ensure that the electri- |
| cal cord loops below |
| the electrical outlet to |
| form a ‘Drip Loop’ |
| (Fig. 6). This will prevent |
| water from running |
| down the cord into the |
Drip Loop | electrical outlet. |
|
4 | 5 |