Maintenance
• To clean the pump:
Unplug from electrical outlet. Disassemble the fountain and remove the 2 screws at the top of the Pump Stand using a Phillips head screwdriver (Fig. 1). Grasp the Water Supply Hole and gently lift the Pump Stand to gain access to the Pump. Remove the Pump Stand at the Water Supply Connector (Fig. 7). Use a small brush or stream of water to remove any debris (Fig. 8).
• To keep water clean:
Periodically change water and clean the product according to the water condition. Keeping the water clean prevents the water from becoming sticky and forming
• To clean off hard water deposits on the base or rocks:
Soak the container and rocks in a mixture of vinegar and water to clean and remove any mineral
• Keeping the water at an optimum level:
Add water periodically to keep water level at an optimum level to avoid shortening the life of the pump.
NOTE: Never let the pump run dry, as this will shorten the life of the pump.
• Fountain Storage
Unplug the fountain from the electrical outlet, empty the water, and store rocks and fountain in a dry, cool place.
Caution:
All servicing of this fountain must be performed by authorized HoMedics service personnel only.
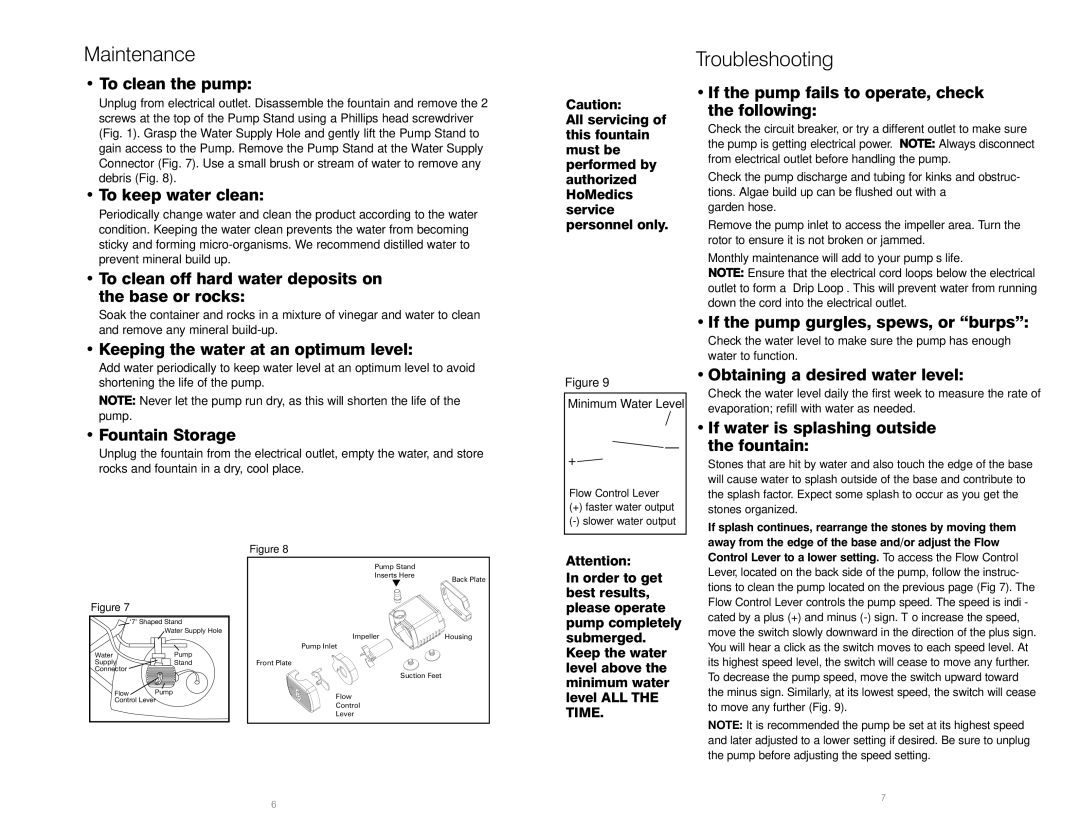
Figure 9
Minimum Water Level
![]() –
–
+![]()
![]()
![]()
Flow Control Lever
(+) faster water output |
Troubleshooting
• If the pump fails to operate, check the following:
Check the circuit breaker, or try a different outlet to make sure the pump is getting electrical power. NOTE: Always disconnect from electrical outlet before handling the pump.
Check the pump discharge and tubing for kinks and obstruc- tions. Algae build up can be flushed out with a
garden hose.
Remove the pump inlet to access the impeller area. Turn the rotor to ensure it is not broken or jammed.
Monthly maintenance will add to your pump’s life.
NOTE: Ensure that the electrical cord loops below the electrical outlet to form a ‘Drip Loop’. This will prevent water from running down the cord into the electrical outlet.
• If the pump gurgles, spews, or “burps”:
Check the water level to make sure the pump has enough water to function.
• Obtaining a desired water level:
Check the water level daily the first week to measure the rate of evaporation; refill with water as needed.
• If water is splashing outside the fountain:
Stones that are hit by water and also touch the edge of the base will cause water to splash outside of the base and contribute to the splash factor. Expect some splash to occur as you get the stones organized.
Figure 7
| ‘7’ Shaped Stand |
| Water Supply Hole |
Water | Pump |
Supply | Stand |
Connector |
|
Flow | Pump |
Control Lever | |
Figure 8
Pump Stand |
|
Inserts Here | Back Plate |
| |
Impeller | Housing |
Pump Inlet |
|
Front Plate |
|
Suction Feet |
|
Flow |
|
Control |
|
Lever |
|
Attention:
In order to get best results, please operate pump completely submerged. Keep the water level above the minimum water level ALL THE TIME.
If splash continues, rearrange the stones by moving them away from the edge of the base and/or adjust the Flow Control Lever to a lower setting. To access the Flow Control Lever, located on the back side of the pump, follow the instruc- tions to clean the pump located on the previous page (Fig 7). The Flow Control Lever controls the pump speed. The speed is indi- cated by a plus (+) and minus
NOTE: It is recommended the pump be set at its highest speed and later adjusted to a lower setting if desired. Be sure to unplug the pump before adjusting the speed setting.
6
7