Honeywell VR8304 installation instructions Perform Gas Leak Test, Adjust the Pilot Burner Flame

Models: VR8304

1 8
Download 8 pages 25.54 Kb
Page 6
Image 6

VR8304 INTERMITTENT PILOT COMBINATION GAS CONTROL

Perform Gas Leak Test

WARNING

Fire or explosion hazard. Can cause property damage, severe injury, or death.

Check for gas leaks with a rich soap and water solution any time work is done on a gas control.

Gas leak test

1.Paint all pipe connections upstream of the gas con- trol with a rich soap and water solution. Bubbles indicate a gas leak.

2.If a gas leak is detected, tighten the pipe connection.

3.Stand clear while lighting the main burner to prevent injury caused from hidden gas leaks, which could cause flashback in the appliance vestibule. Light the main burner.

4.With the main burner in operation, paint all pipe joints (including adapters) and the gas control inlet and outlet with a rich soap and water solution.

5.If another gas leak is detected, tighten adapter screws, joints, and pipe connections.

6.Replace the part if the gas leak cannot be stopped.

Adjust the Pilot Burner Flame

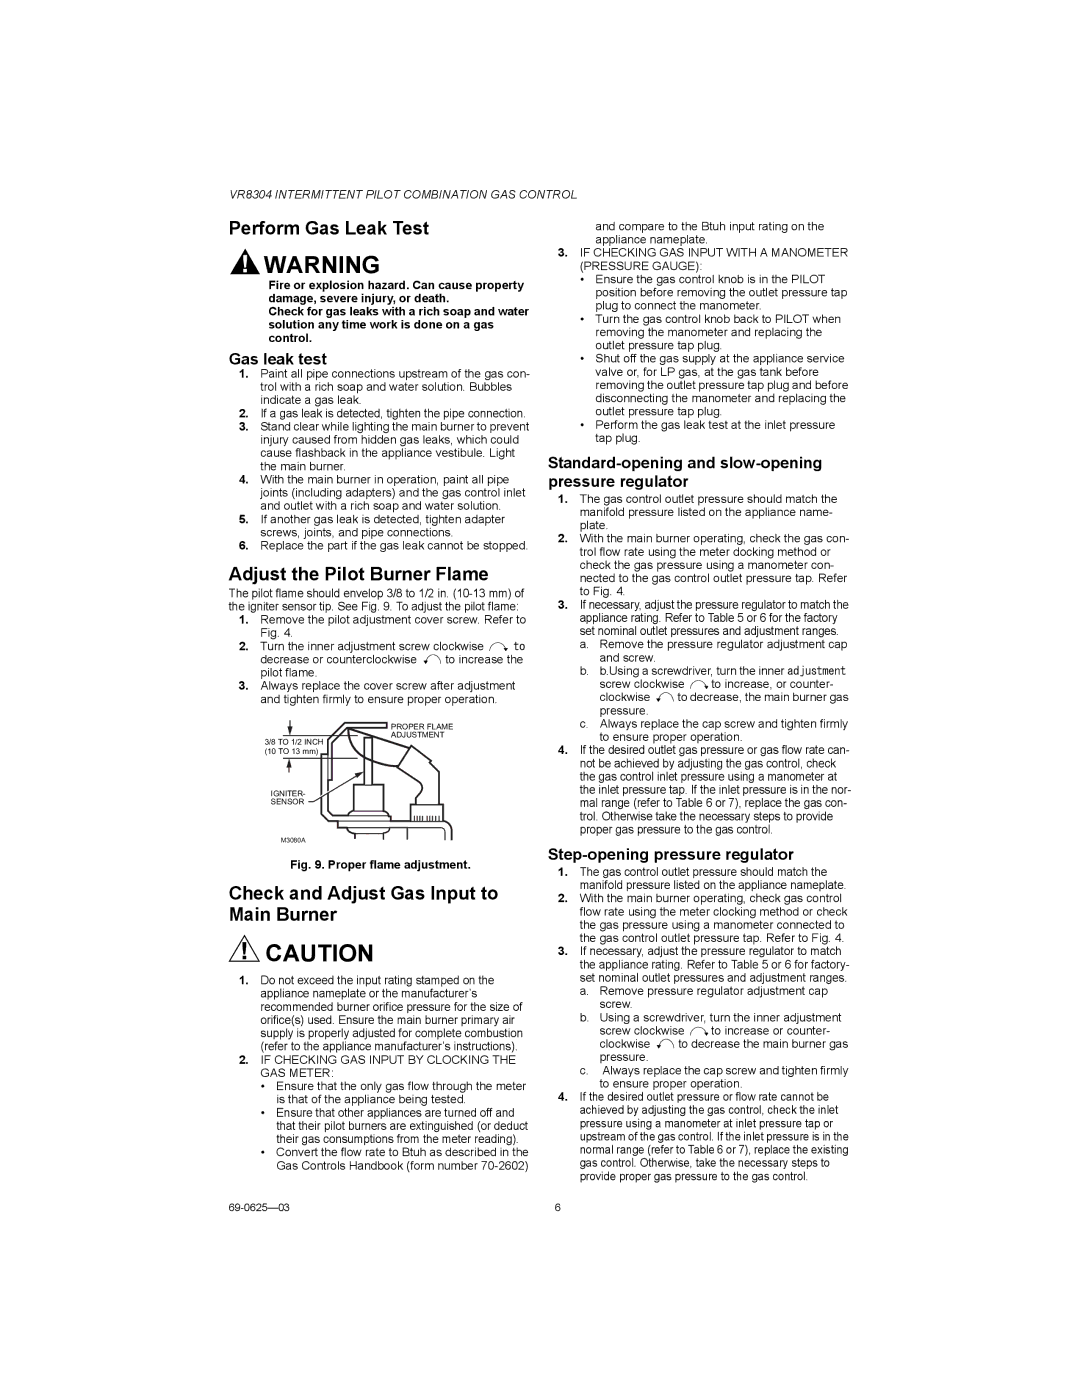
The pilot flame should envelop 3/8 to 1/2 in. (10-13 mm) of the igniter sensor tip. See Fig. 9. To adjust the pilot flame:

1.Remove the pilot adjustment cover screw. Refer to Fig. 4.

2.Turn the inner adjustment screw clockwise to

decrease or counterclockwise to increase the pilot flame.

3.Always replace the cover screw after adjustment and tighten firmly to ensure proper operation.

PROPER FLAME

ADJUSTMENT

3/8 TO 1/2 INCH (10 TO 13 mm)

IGNITER-

SENSOR

M3080A

and compare to the Btuh input rating on the appliance nameplate.

3.IF CHECKING GAS INPUT WITH A MANOMETER (PRESSURE GAUGE):

Ensure the gas control knob is in the PILOT position before removing the outlet pressure tap plug to connect the manometer.

Turn the gas control knob back to PILOT when removing the manometer and replacing the outlet pressure tap plug.

Shut off the gas supply at the appliance service valve or, for LP gas, at the gas tank before removing the outlet pressure tap plug and before disconnecting the manometer and replacing the outlet pressure tap plug.

Perform the gas leak test at the inlet pressure tap plug.

Standard-opening and slow-opening pressure regulator

1.The gas control outlet pressure should match the manifold pressure listed on the appliance name- plate.

2.With the main burner operating, check the gas con- trol flow rate using the meter docking method or check the gas pressure using a manometer con- nected to the gas control outlet pressure tap. Refer to Fig. 4.

3.If necessary, adjust the pressure regulator to match the appliance rating. Refer to Table 5 or 6 for the factory set nominal outlet pressures and adjustment ranges.

a.Remove the pressure regulator adjustment cap and screw.

b.b.Using a screwdriver, turn the inner adjustment

screw clockwise to increase, or counter-

clockwise to decrease, the main burner gas pressure.

c.Always replace the cap screw and tighten firmly to ensure proper operation.

4.If the desired outlet gas pressure or gas flow rate can- not be achieved by adjusting the gas control, check the gas control inlet pressure using a manometer at the inlet pressure tap. If the inlet pressure is in the nor- mal range (refer to Table 6 or 7), replace the gas con- trol. Otherwise take the necessary steps to provide proper gas pressure to the gas control.

Fig. 9. Proper flame adjustment.

Check and Adjust Gas Input to Main Burner

CAUTION

1.Do not exceed the input rating stamped on the appliance nameplate or the manufacturer’s recommended burner orifice pressure for the size of orifice(s) used. Ensure the main burner primary air supply is properly adjusted for complete combustion (refer to the appliance manufacturer’s instructions).

2.IF CHECKING GAS INPUT BY CLOCKING THE GAS METER:

Ensure that the only gas flow through the meter is that of the appliance being tested.

Ensure that other appliances are turned off and that their pilot burners are extinguished (or deduct their gas consumptions from the meter reading).

Convert the flow rate to Btuh as described in the Gas Controls Handbook (form number 70-2602)

Step-opening pressure regulator

1.The gas control outlet pressure should match the manifold pressure listed on the appliance nameplate.

2.With the main burner operating, check gas control flow rate using the meter clocking method or check the gas pressure using a manometer connected to the gas control outlet pressure tap. Refer to Fig. 4.

3.If necessary, adjust the pressure regulator to match the appliance rating. Refer to Table 5 or 6 for factory- set nominal outlet pressures and adjustment ranges.

a.Remove pressure regulator adjustment cap screw.

b.Using a screwdriver, turn the inner adjustment

screw clockwise to increase or counter-

clockwise to decrease the main burner gas pressure.

c.Always replace the cap screw and tighten firmly to ensure proper operation.

4.If the desired outlet pressure or flow rate cannot be achieved by adjusting the gas control, check the inlet pressure using a manometer at inlet pressure tap or upstream of the gas control. If the inlet pressure is in the normal range (refer to Table 6 or 7), replace the existing gas control. Otherwise, take the necessary steps to provide proper gas pressure to the gas control.

69-0625—03

6

Page 6
Image 6
Honeywell VR8304 Perform Gas Leak Test, Adjust the Pilot Burner Flame, Check and Adjust Gas Input to Main Burner

VR8304 specifications

The Honeywell VR8304 is a sophisticated and reliable gas valve designed for use in residential and commercial heating applications. This integrated system is primarily used in conjunction with gas-fired appliances such as furnaces, boilers, and water heaters, offering improved efficiency and performance.

One of the standout features of the VR8304 is its dual combination of safety and comfort, thanks to its electronic ignition and safety shutoff mechanisms. This gas valve is equipped with a built-in pilot safety system that ensures safe operation. In the event of a failure in the ignition system, the VR8304 automatically shuts off the gas flow, preventing any potential hazards.

The unit is designed for compatibility with natural gas or propane, making it versatile for various heating needs. It utilizes a robust solenoid-operated design, which enhances its responsiveness. The VR8304 also boasts a high heat capacity, allowing it to efficiently handle significant gas flow for both heating and domestic hot water applications.

One of the technological advancements found in the VR8304 is its adaptive control features. The valve can adjust the gas flow rate depending on the demand, which not only optimizes fuel efficiency but also enhances the comfort of the environment by maintaining consistent temperature levels.

Installation of the VR8304 is straightforward due to its compact size and intuitive design. It fits standard piping configuration, reducing the need for complex adjustments or modifications during installation. Furthermore, its durable construction ensures long-lasting performance, with resistance to common issues such as corrosion and wear.

Another important characteristic of the Honeywell VR8304 is its low operating pressure combined with extended operating range. This ensures effective operation across various environmental conditions and helps maintain system integrity over time.

Finally, the Honeywell VR8304 is backed by robust customer support and service options, ensuring users have access to assistance and information to maximize their system's efficiency and safety. In conclusion, the Honeywell VR8304 stands out as a highly efficient, durable, and versatile gas valve for any heating application. Its innovative features and technologies provide both safety and performance, making it a top choice among HVAC professionals and homeowners alike.