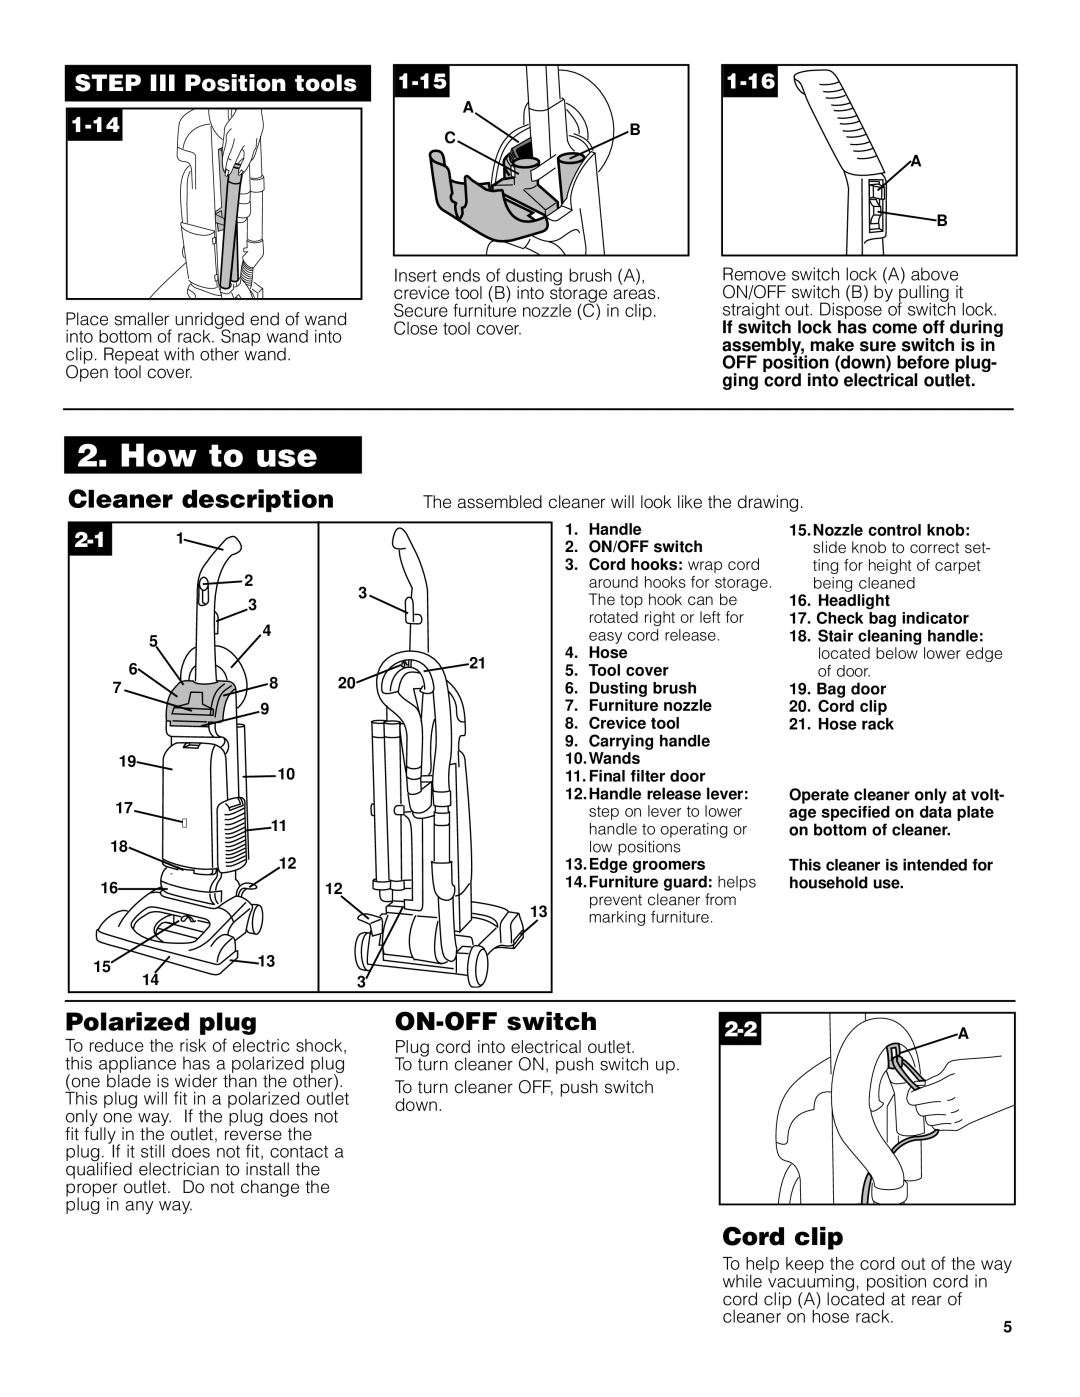
STEP III Position tools
Place smaller unridged end of wand into bottom of rack. Snap wand into clip. Repeat with other wand.
Open tool cover.
| |
| A |
C | B |
|
Insert ends of dusting brush (A), crevice tool (B) into storage areas. Secure furniture nozzle (C) in clip. Close tool cover.
A |
B |
Remove switch lock (A) above ON/OFF switch (B) by pulling it straight out. Dispose of switch lock.
If switch lock has come off during assembly, make sure switch is in OFF position (down) before plug- ging cord into electrical outlet.
2. How to use
Cleaner description | The assembled cleaner will look like the drawing. |
![]() 2
2
3
3
1. | Handle |
2. | ON/OFF switch |
3. | Cord hooks: wrap cord |
| around hooks for storage. |
| The top hook can be |
| rotated right or left for |
15. Nozzle control knob: |
slide knob to correct set- |
ting for height of carpet |
being cleaned |
16. Headlight |
17. Check bag indicator |
5
6
4
![]() 21
21
| easy cord release. |
4. | Hose |
5. | Tool cover |
18. Stair cleaning handle: |
located below lower edge |
of door. |
7![]() 8
8
9
19
10
17
![]() 11
11
18
12
16
15 ![]()
![]() 13
13
14
20
12
13
3
6. | Dusting brush |
7. | Furniture nozzle |
8. | Crevice tool |
9. | Carrying handle |
10. Wands | |
11. Final filter door | |
12. Handle release lever: | |
| step on lever to lower |
| handle to operating or |
| low positions |
13. Edge groomers | |
14. Furniture guard: helps | |
| prevent cleaner from |
| marking furniture. |
19. Bag door | |
20. | Cord clip |
21. | Hose rack |
Operate cleaner only at volt- age specified on data plate on bottom of cleaner.
This cleaner is intended for household use.
Polarized plug
To reduce the risk of electric shock, this appliance has a polarized plug (one blade is wider than the other). This plug will fit in a polarized outlet only one way. If the plug does not fit fully in the outlet, reverse the plug. If it still does not fit, contact a qualified electrician to install the proper outlet. Do not change the plug in any way.
ON-OFF switch
Plug cord into electrical outlet.
To turn cleaner ON, push switch up.
To turn cleaner OFF, push switch down.
A |
Cord clip
To help keep the cord out of the way while vacuuming, position cord in cord clip (A) located at rear of
cleaner on hose rack.
5
