INTRODUCTION IMPORTANT
PRECAUTIONS
ASSEMBLY
BEFORE
YOU BEGIN
TREADMILL
OPERATION
CONDITIONING TROUBLESHOOTING LIMITED
GUIDELINES & MAINTENANCE WARRANTY
12
TENSIONINGTHE RUNNING BELT
The running belt has been properly adjusted at the factory before it was shipped. At times the belt can move
CAUTION: Running belt should NOT be moving during tensioning.
If you can feel a slipping sensation when running on the treadmill, the running belt must be tightened. In most cases, the belt has stretched from use, causing the belt to slip. This is a normal and common adjustment. To eliminate this slipping, turn the treadmill off and tension both the rear roller bolts using the supplied Allen wrench, turning them 1/4 TURN to the right as shown. Turn the treadmill on and check for slipping. Repeat if necessary, but NEVER TURN the roller bolts more than 1/4 turn at a time. Belt is properly tensioned when the slipping sensation is gone.
Belt is too far to the right side |
Belt is too far to the left side |
CENTERING THE RUNNING BELT
The running belt has been properly adjusted at the factory before it was shipped. At times the belt can move
CAUTION: Do not run belt faster than 1/2 mph while centering. Keep fingers, hair and clothing away from belt at all times.
If the running belt is too far to the right side:
With the treadmill running at 1/2 mph, turn the right adjustment bolt clockwise 1/4 turn at a time (using the supplied Allen wrench). Check the belt alignment. Allow belt to run a full cycle to gauge if more adjustment is needed. Repeat if necessary, until the belt remains centered during use.
If the running belt is too far to the left side:
With the treadmill running at 1/2 mph, turn the right adjustment bolt
TREADMILL OPERATION
J | INCLINE 1 | 2 | 3 | 4 | 5 | 6 | 7 | 8 | 9 10 % |
| 1.3T |
| SPEED | 1 | 2 | 3 4 | 5 | 6 | 7 | 8 9 10 MPH | K | |
|
|
|
|
|
|
|
|
|
|
|
|
|
|
|
|
|
|
|
|
| ||
|
|
|
|
|
|
|
|
|
|
| T I M E |
|
|
|
|
|
|
|
|
| D I S TA N C E |
|
|
|
|
|
|
|
|
|
|
|
| S P E E D |
|
|
|
|
|
|
|
|
| P U L S E |
|
A |
|
|
|
|
|
|
|
|
|
| I N C L I N E |
|
|
|
|
|
|
|
|
| C A L O R I E S | A |
|
|
|
|
|
|
|
|
|
|
|
|
|
|
|
|
|
|
|
|
| ||
|
|
|
|
|
|
|
|
|
|
|
|
|
|
|
|
|
|
|
|
|
| I |
C | S TA R T |
| 1 MPH |
| 2 MPH |
| 3 MPH | 4 MPH | 5 MPH | 6 MPH | 7 MPH | 8 MPH |
| 9 MPH | 10 MPH | PRESS |
| |||||
| QUICK START |
|
|
|
|
| ||||||||||||||||
|
|
|
|
| ENTER |
| ||||||||||||||||
|
|
|
|
|
|
|
|
|
|
|
|
|
|
|
| TO SET |
| |||||
| E N T E R |
|
|
|
|
|
|
|
|
| S T O P |
|
|
|
|
|
|
|
| SPEED |
| |
D |
|
| I N C L I N E |
|
|
|
|
|
|
|
| S P E E D |
|
|
|
| ||||||
| CHANGE DISPLAY |
|
|
|
|
|
| HOLD TO RESET |
|
|
|
|
|
| MAGNETIC KEY |
| ||||||
|
|
|
|
|
|
|
|
|
|
|
|
|
|
|
|
|
|
|
|
|
| |
|
|
| E |
|
|
|
|
| F |
|
| B |
| G |
|
|
|
|
|
| H |
|
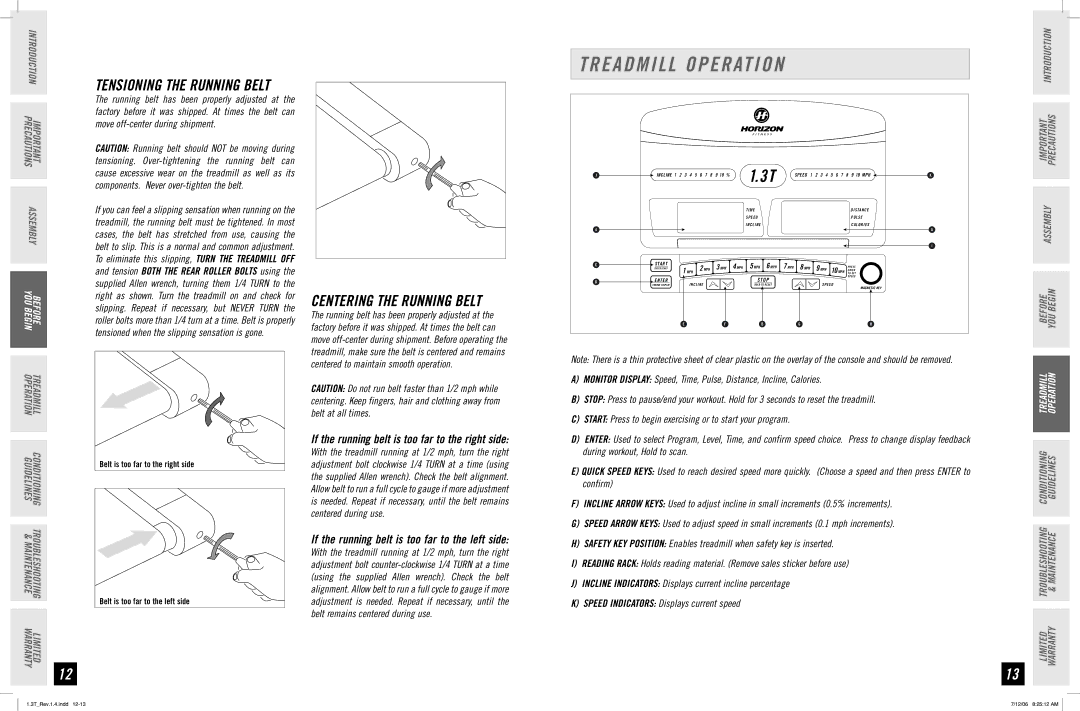
Note: There is a thin protective sheet of clear plastic on the overlay of the console and should be removed.
A)Monitor Display: Speed, Time, Pulse, Distance, Incline, Calories.
B)Stop: Press to pause/end your workout. Hold for 3 seconds to reset the treadmill.
C)Start: Press to begin exercising or to start your program.
D)ENTER: Used to select Program, Level, Time, and confirm speed choice. Press to change display feedback during workout, Hold to scan.
E)QUICK Speed Keys: Used to reach desired speed more quickly. (Choose a speed and then press ENTER to confirm)
F)Incline ARROW Keys: Used to adjust incline in small increments (0.5% increments).
G)Speed ARROW Keys: Used to adjust speed in small increments (0.1 mph increments).
H)Safety Key Position: Enables treadmill when safety key is inserted.
I)Reading Rack: Holds reading material. (Remove sales sticker before use)
j)INCLINE INDICATORS: Displays current incline percentage
K)speed INDICATORS: Displays current speed
13
IMPORTANT PRECAUTIONS INTRODUCTION
ASSEMBLY
BEFORE YOU BEGIN
TREADMILL OPERATION
LIMITED TROUBLESHOOTING CONDITIONING WARRANTY & MAINTENANCE GUIDELINES
1.3T_Rev.1.4.indd | 7/12/06 8:25:12 AM |