INTRODUCTION IMPORTANT PRECAUTIONS
ASSEMBLY
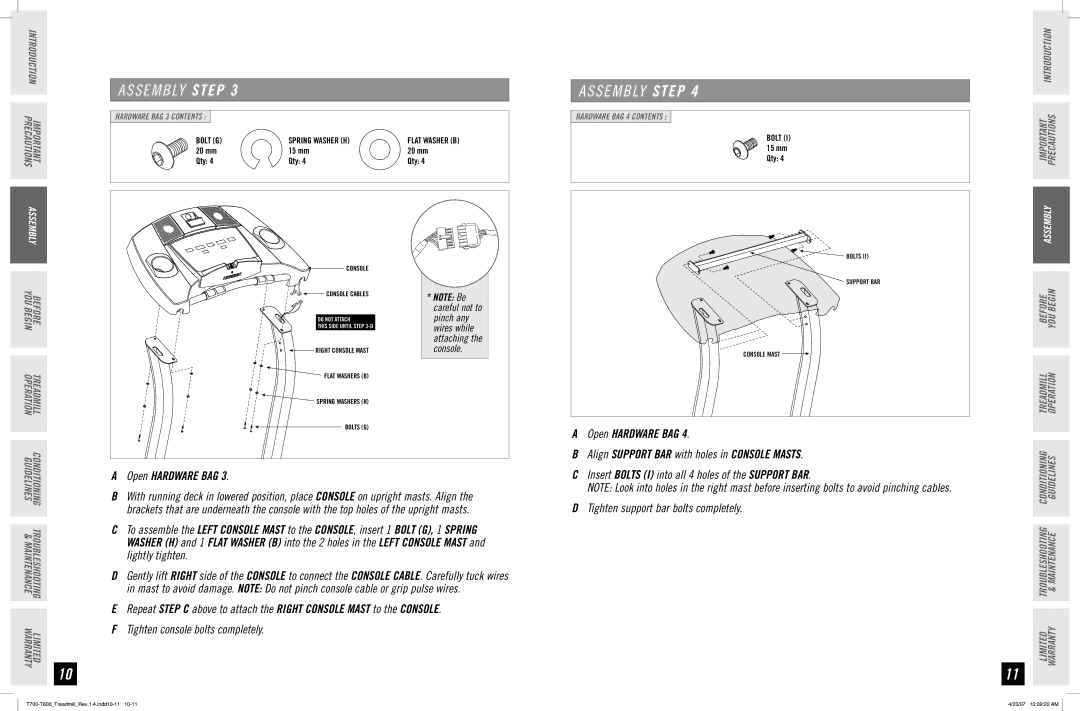
A S S E M B LY STEP 3
HARDWARE BAG 3 CONTENTS : |
|
|
BOLT (G) | SPRING WASHER (H) | FLAT WASHER (B) |
20 mm | 15 mm | 20 mm |
Qty: 4 | Qty: 4 | Qty: 4 |
A S S E M B LY STEP 4
HARDWARE BAG 4 CONTENTS :
BOLT (I) 15 mm Qty: 4
![]() BOLTS (I)
BOLTS (I)
IMPORTANT PRECAUTIONS INTRODUCTION
ASSEMBLY
BEFORE YOU BEGIN
TREADMILL OPERATION
CONSOLE
![]()
![]()
![]()
![]()
![]()
![]() CONSOLE CABLES
CONSOLE CABLES
DO NOT ATTACH
THIS SIDE UNTIL STEP
![]()
![]() RIGHT CONSOLE MAST
RIGHT CONSOLE MAST
![]() FLAT WASHERS (B)
FLAT WASHERS (B)
![]() SPRING WASHERS (H)
SPRING WASHERS (H)
BOLTS (G)
*Note: Be careful not to pinch any wires while attaching the console.
SUPPORT BAR
CONSOLE MAST ![]()
![]()
A Open Hardware Bag 4. |
BEFORE YOU BEGIN
TREADMILL OPERATION
CONDITIONING TROUBLESHOOTING LIMITED
GUIDELINES & MAINTENANCE WARRANTY
10
AOpen HARDWARE BAG 3.
BWith running deck in lowered position, place console on upright masts. Align the brackets that are underneath the console with the top holes of the upright masts.
CTo assemble the left CONSOLE MAST to the CONSOLE, insert 1 BOLT (G), 1 SPRING WASHER (H) and 1 FLAT WASHER (B) into the 2 holes in the left CONSOLE mast and lightly tighten.
DGently lift right side of the console to connect the console cable. Carefully tuck wires in mast to avoid damage. NOTE: Do not pinch console cable or grip pulse wires.
ERepeat step C above to attach the right console mast to the console.
FTighten console bolts completely.
B Align SUPPORT BAR with holes in CONSOLE MASTS. | |
C | Insert BOLTS (I) into all 4 holes of the SUPPORT BAR. |
| NOTE: Look into holes in the right mast before inserting bolts to avoid pinching cables. |
D | Tighten support bar bolts completely. |
11
LIMITED TROUBLESHOOTING CONDITIONING WARRANTY & MAINTENANCE GUIDELINES
4/23/07 10:09:22 AM |