Installation

Gas supply connection

Check that the appliance is set for the type of gas available and then connect it to the mains gas piping or the gas cylinder in compliance with current regulations and standards.

This appliance is designed and set to work with the gas indicated on the label situated on the actual hob. If the gas supply is other than the type for which the appliance has been set, proceed with replacing the corresponding nozzles (provided), following instructions given in the paragraph “Adaptation to different types of gas”.

For trouble-free operation, suitable use of energy and longer life of the appliance, make sure that the supply pressure complies with the values indicated in the table 1 "burners and nozzles specifications, otherwise install a special pressure regulator on the supply pipe in compliance with current standards and regulations.

Connect in such a way that the appliance is subjected to no strain whatsoever.

Either a rigid metal pipe with fittings in compliance with the standards in force must be used for connecting to the nipple union (threaded ½"G male fitting) situated at the rear of the appliance to the right (fig.5), or flexible steel pipe in compliance with the standards in force, which must not exceed 2000 mm in length.

Should it be necessary to turn the fitting, the gasket (supplied with the appliance) must be replaced.

fig.5

Upon completion of installation, check the gas circuit, the internal connections and the taps for leaks using a soapy solution (never a flame).

Also check that the connecting pipe cannot come into contact with moving parts which could damage or crush it.

Make sure that the natural gas pipe is adequate for a sufficient supply to the appliance when all the burners are lit.

Important: A pressure regulator, in compliance with the standards in force, must be inserted when connecting to a liquid gas supply (in a cylinder).

Adaptation to a different type of gas

If the hob is to be converted for use with a type of gas other than that for which it was set in the factory (indicated on the label to be found on the hob), the burner nozzles should be replaced as follows:

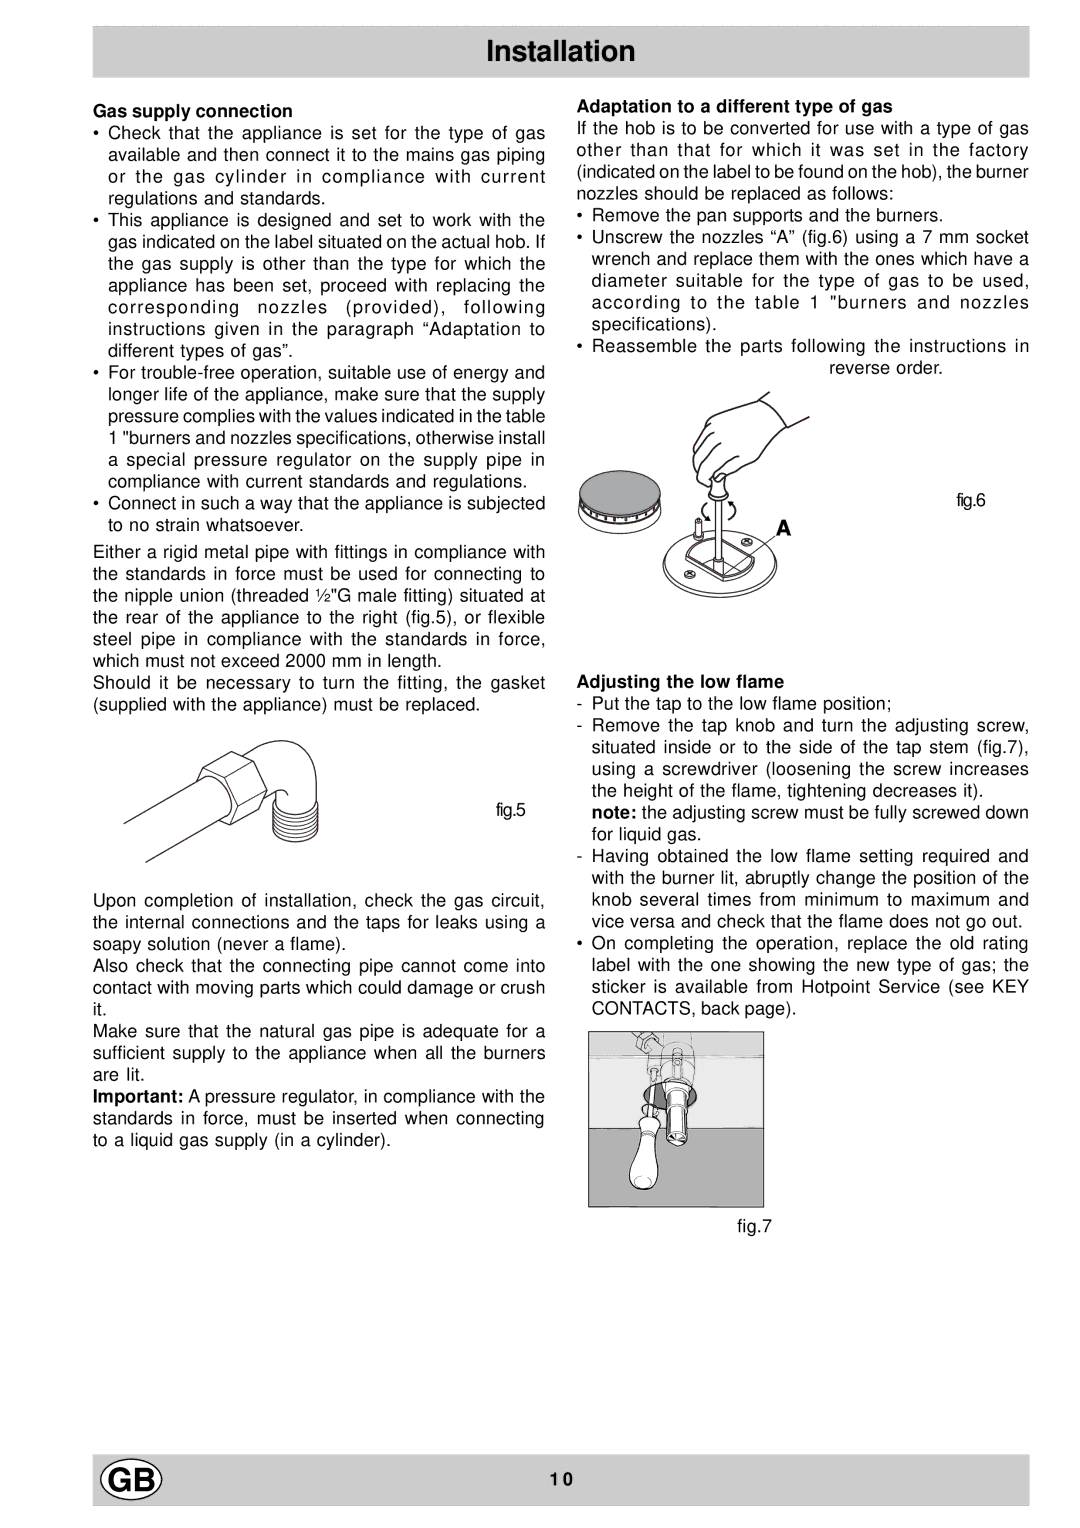
Remove the pan supports and the burners.

Unscrew the nozzles “A” (fig.6) using a 7 mm socket wrench and replace them with the ones which have a diameter suitable for the type of gas to be used, according to the table 1 "burners and nozzles specifications).

Reassemble the parts following the instructions in reverse order.

fig.6

A

Adjusting the low flame

-Put the tap to the low flame position;

-Remove the tap knob and turn the adjusting screw, situated inside or to the side of the tap stem (fig.7), using a screwdriver (loosening the screw increases the height of the flame, tightening decreases it). note: the adjusting screw must be fully screwed down for liquid gas.

-Having obtained the low flame setting required and with the burner lit, abruptly change the position of the knob several times from minimum to maximum and vice versa and check that the flame does not go out.

On completing the operation, replace the old rating label with the one showing the new type of gas; the sticker is available from Hotpoint Service (see KEY CONTACTS, back page).

fig.7

1 0

Page 10
Image 10
Hotpoint GX901X manual Gas supply connection, Adaptation to a different type of gas, Adjusting the low flame

GX901X specifications

The Hotpoint GX901X is a cutting-edge built-in oven designed to enhance your cooking experience, combining innovation with practicality. With its sleek stainless steel design, the GX901X not only complements modern kitchens but also offers a host of features that any home chef will appreciate.

One of the standout characteristics of the Hotpoint GX901X is its multifunctional cooking capabilities. This oven comes equipped with various cooking modes, including conventional heating, fan-assisted cooking, and grilling functions. This versatility allows users to prepare a wide array of dishes, from perfectly baked cakes to succulent roasts with ease. The fan-assisted cooking mode ensures even heat distribution, guaranteeing consistently cooked meals every time.

This model also incorporates advanced technologies that elevate its performance. The self-cleaning feature, known as Catalytic Cleaning, makes maintenance a breeze. This technology works by using the oven’s high temperatures to burn off food residues, minimizing the need for harsh cleaning chemicals and manual scrubbing. As a result, users can enjoy more time cooking and less time cleaning.

Another noteworthy aspect of the GX901X is its impressive capacity. With a sizable 71-liter interior, home cooks can easily accommodate large dishes or multiple trays simultaneously. This feature is particularly advantageous during family gatherings or special occasions when cooking large portions is necessary.

The Hotpoint GX901X also includes a digital display and user-friendly controls, allowing for precise temperature adjustments and cooking time settings. This intuitive interface makes it easy to navigate through its various functions, catering to both novice and experienced cooks alike.

Energy efficiency is another important characteristic of the GX901X. With an A energy rating, this oven not only helps in reducing electricity bills but also minimizes the environmental impact of your cooking activities.

Overall, the Hotpoint GX901X stands out as a reliable and feature-rich built-in oven that combines stylish design with practical functionality. Whether you are baking, roasting, or grilling, this oven provides the tools necessary to elevate your culinary creations.