The electronic programmer*


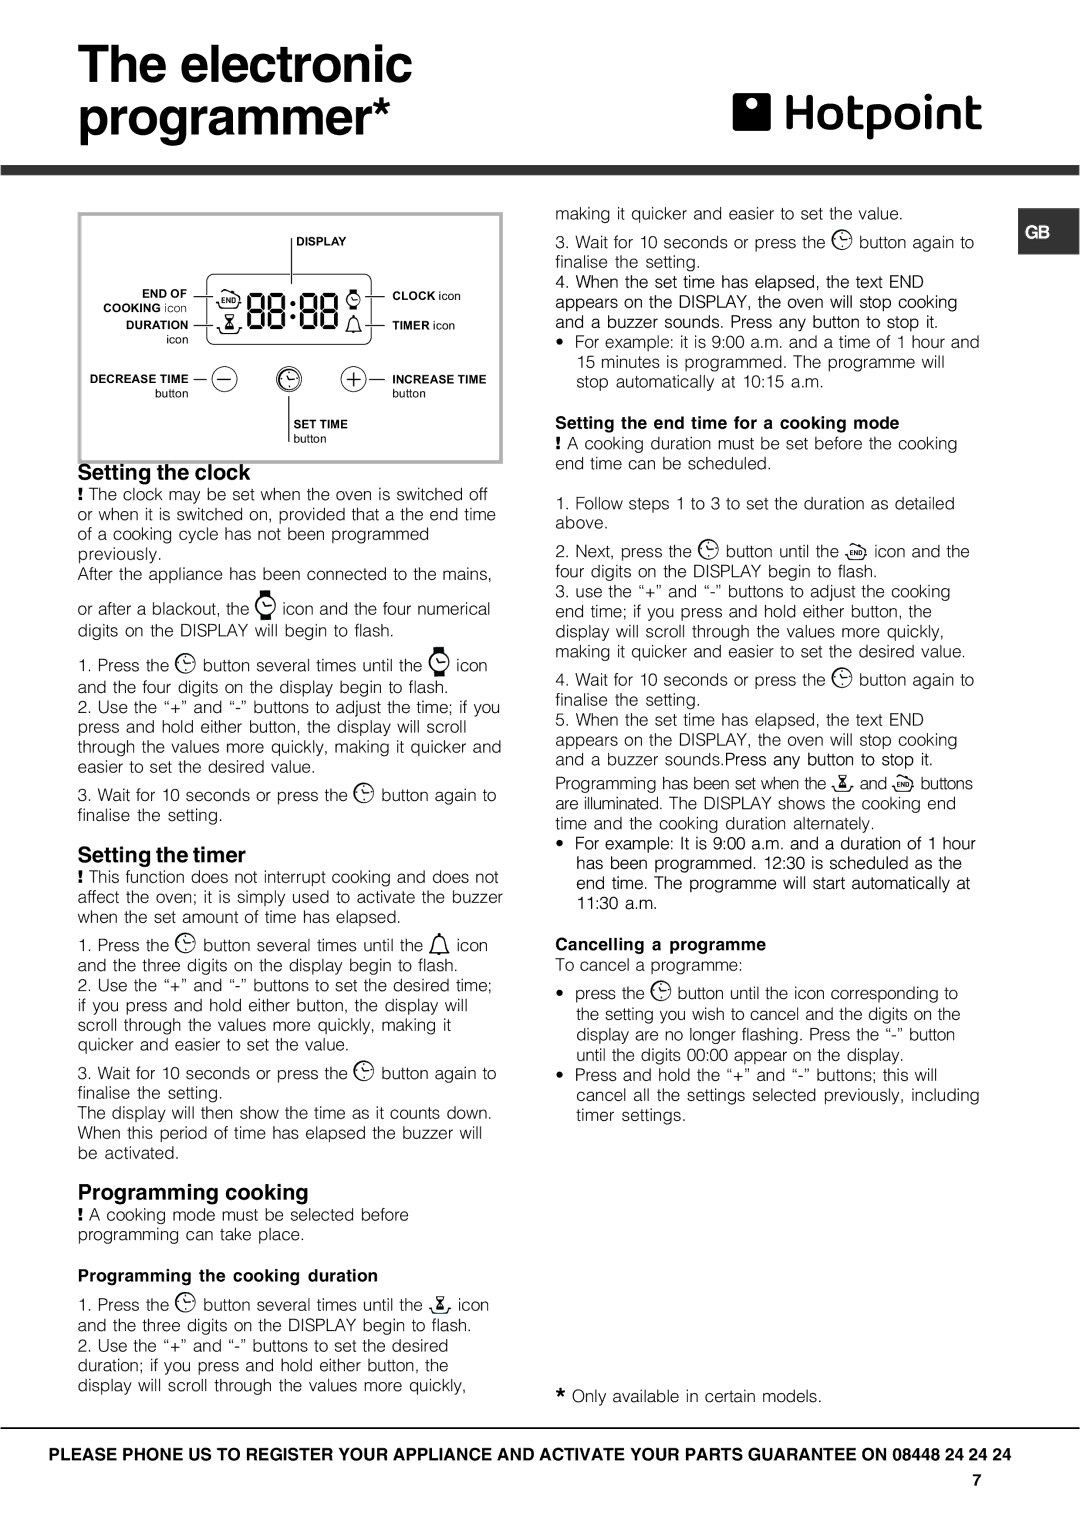
DISPLAY


END OF


•• ••


CLOCK icon


COOKING icon


DURATION


TIMER icon


icon


DECREASE TIME


INCREASE TIME


button


button

SET TIME

button

Setting the clock

!The clock may be set when the oven is switched off or when it is switched on, provided that a the end time of a cooking cycle has not been programmed previously.

After the appliance has been connected to the mains,

or after a blackout, the icon and the four numerical digits on the DISPLAY will begin to flash.

1.Press the button several times until the icon and the four digits on the display begin to flash.

2.Use the “+” and “-” buttons to adjust the time; if you press and hold either button, the display will scroll through the values more quickly, making it quicker and easier to set the desired value.

3.Wait for 10 seconds or press the button again to finalise the setting.

Setting the timer

!This function does not interrupt cooking and does not affect the oven; it is simply used to activate the buzzer when the set amount of time has elapsed.

1.Press the button several times until the icon and the three digits on the display begin to flash.

2.Use the “+” and “-” buttons to set the desired time; if you press and hold either button, the display will scroll through the values more quickly, making it quicker and easier to set the value.

3.Wait for 10 seconds or press the button again to finalise the setting.

The display will then show the time as it counts down. When this period of time has elapsed the buzzer will be activated.

Programming cooking

!A cooking mode must be selected before programming can take place.

Programming the cooking duration

1.Press the button several times until the icon and the three digits on the DISPLAY begin to flash.

2.Use the “+” and “-” buttons to set the desired duration; if you press and hold either button, the display will scroll through the values more quickly,

making it quicker and easier to set the value.

3. Wait for 10 seconds or press the

button again to

GB


finalise the setting.

4. When the set time has elapsed, the text END appears on the DISPLAY, the oven will stop cooking and a buzzer sounds. Press any button to stop it.

• For example: it is 9:00 a.m. and a time of 1 hour and 15 minutes is programmed. The programme will stop automatically at 10:15 a.m.

Setting the end time for a cooking mode

!A cooking duration must be set before the cooking end time can be scheduled.

1.Follow steps 1 to 3 to set the duration as detailed above.

2.Next, press the button until the icon and the four digits on the DISPLAY begin to flash.

3.use the “+” and “-” buttons to adjust the cooking end time; if you press and hold either button, the display will scroll through the values more quickly, making it quicker and easier to set the desired value.

4.Wait for 10 seconds or press the button again to finalise the setting.

5.When the set time has elapsed, the text END appears on the DISPLAY, the oven will stop cooking and a buzzer sounds.Press any button to stop it.

Programming has been set when the and buttons are illuminated. The DISPLAY shows the cooking end time and the cooking duration alternately.

For example: It is 9:00 a.m. and a duration of 1 hour has been programmed. 12:30 is scheduled as the end time. The programme will start automatically at 11:30 a.m.

Cancelling a programme

To cancel a programme:

press the button until the icon corresponding to the setting you wish to cancel and the digits on the display are no longer flashing. Press the “-” button until the digits 00:00 appear on the display.

Press and hold the “+” and “-” buttons; this will cancel all the settings selected previously, including timer settings.

*Only available in certain models.

PLEASE PHONE US TO REGISTER YOUR APPLIANCE AND ACTIVATE YOUR PARTS GUARANTEE ON 08448 24 24 24

7

Page 7
Image 7
Hotpoint SX manual Setting the clock, Setting the timer, Programming cooking

SX specifications

The Hotpoint SX is a leading-edge appliance designed to meet the demands of contemporary households. Renowned for its combination of style, functionality, and innovative technology, the Hotpoint SX range primarily includes refrigerators and refrigerators with advanced features tailored for modern living.

One of the standout characteristics of the Hotpoint SX is its sleek design. Available in various finishes, including stainless steel and classic white, these appliances can seamlessly integrate into any kitchen aesthetic. The clean lines and minimalist approach give a sophisticated touch while maintaining practicality.

A defining technology of the Hotpoint SX is its innovative cooling system, which utilizes dynamic airflow to ensure even temperature distribution throughout the refrigerator. This prevents hotspots and ensures that every corner of the fridge is efficiently cooled, preserving the freshness of food for longer. Additionally, the No Frost technology eliminates the need for manual defrosting, freeing users from the hassle of ice buildup and ensuring optimal energy efficiency.

Energy efficiency is a significant focus for the Hotpoint SX series, with many models featuring an A++ energy rating. This not only helps to reduce energy bills but also minimizes environmental impact, aligning with the growing global demand for sustainable living solutions.

Storage capacity is another crucial aspect of the Hotpoint SX. With spacious designs and clever organization features, including adjustable shelves and door balconies, users can store a diverse range of food items, from bulk grocery purchases to smaller containers. The fridge-freezer combination models also often come equipped with a dedicated fast freeze function, which rapidly freezes fresh items, locking in flavor and nutrients.

User-friendly functionalities like touch controls and LED displays make it simple to monitor and adjust settings, providing a modern touch to the cooking experience. Moreover, many models include an alarm system that alerts users if the door is left ajar or if temperatures fluctuate, adding an extra layer of convenience and safety.

The Hotpoint SX also pays attention to hygiene, with anti-bacterial surfaces and air purification systems designed to minimize odors and the spread of bacteria. This focus on cleanliness makes it an ideal choice for families concerned about food safety.

In summary, the Hotpoint SX range stands out for its stylish design, advanced cooling technologies, energy efficiency, and user-friendly features, making it a valuable addition to any kitchen that prioritizes quality and convenience. Whether you need ample storage, advanced temperature control, or a sleek appearance, the Hotpoint SX addresses the needs of modern home cooks.