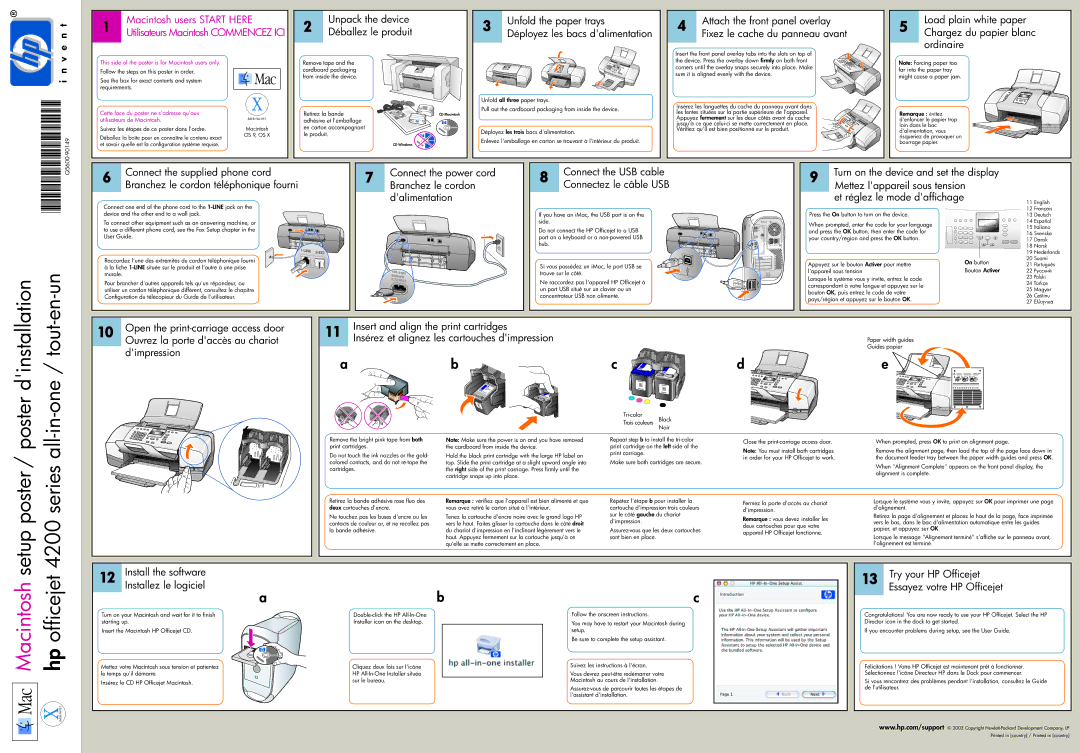
Connect one end of the phone cord to the 1-LINE jack on the device and the other end to a wall jack.
To connect other equipment such as an answering machine, or to use a different phone cord, see the Fax Setup chapter in the User Guide.
Raccordez l'une des extrémités du cordon téléphonique fourni à la fiche 1-LINE située sur le produit et l'autre à une prise murale.
Pour brancher d'autres appareils tels qu'un répondeur, ou utiliser un cordon téléphonique différent, consultez le chapitre Configuration du télécopieur du Guide de l'utilisateur.
If you have an iMac, the USB port is on the side.
Do not connect the HP Officejet to a USB port on a keyboard or a non-powered USB hub.
Si vous possédez un iMac, le port USB se trouve sur le côté.
Ne raccordez pas l'appareil HP Officejet à un port USB situé sur un clavier ou un concentrateur USB non alimenté.
Press the On button to turn on the device.
When prompted, enter the code for your language and press the OK button, then enter the code for your country/region and press the OK button.
Appuyez sur le bouton Activer pour mettre l'appareil sous tension
Lorsque le système vous y invite, entrez le code correspondant à votre langue et appuyez sur le bouton OK, puis entrez le code de votre pays/région et appuyez sur le bouton OK.
12 | Français |
13 | Deutsch |
14 | Español |
15 | Italiano |
16 | Svenska |
17 | Dansk |
18 | Norsk |
19 | Nederlands |
20 | Suomi |
21 | Português |
22 |
23 | Polski |
24 | Türkçe |
25 Magyar |
26 | Ceštinu |
27 | |
setup poster / poster d'installation 4200 series all-in-one / tout-en-un
Open the print-carriage access door Ouvrez la porte d'accès au chariot d'impression
11 | Insert and align the print cartridges |
| Insérez et alignez les cartouches d'impression |
ab
Remove the bright pink tape from both | Note: Make sure the power is on and you have removed |
print cartridges. | the cardboard from inside the device. |
Do not touch the ink nozzles or the gold- | Hold the black print cartridge with the large HP label on |
colored contacts, and do not re-tape the | top. Slide the print cartridge at a slight upward angle into |
cartridges. | the right side of the print carriage. Press firmly until the |
| cartridge snaps up into place. |
Retirez la bande adhésive rose fluo des | Remarque : vérifiez que l'appareil est bien alimenté et que |
deux cartouches d'encre. | vous avez retiré le carton situé à l'intérieur. |
Ne touchez pas les buses d'encre ou les | Tenez la cartouche d'encre noire avec le grand logo HP |
contacts de couleur or, et ne recollez pas | vers le haut. Faites glisser la cartouche dans le côté droit |
la bande adhésive. | du chariot d'impression en l'inclinant légèrement vers le |
| haut. Appuyez fermement sur la cartouche jusqu'à ce |
| qu'elle se mette correctement en place. |
| | |
| | |
c
Tri-color
Trois couleurs Black
Noir
Repeat step b to install the tri-color print cartridge on the left side of the print carriage.
Make sure both cartridges are secure.
Répétez l'étape b pour installer la cartouche d'impression trois couleurs sur le côté gauche du chariot d'impression.
Assurez-vous que les deux cartouches sont bien en place.
Close the print-carriage access door.
Note: You must install both cartridges in order for your HP Officejet to work.
Fermez la porte d'accès au chariot d'impression.
Remarque : vous devez installer les deux cartouches pour que votre appareil HP Officejet fonctionne.
Paper width guides
Guides papier
When prompted, press OK to print an alignment page.
Remove the alignment page, then load the top of the page face down in the document feeder tray between the paper width guides and press OK.
When "Alignment Complete" appears on the front panel display, the alignment is complete.
Lorsque le système vous y invite, appuyez sur OK pour imprimer une page d'alignement.
Retirez la page d'alignement et placez le haut de la page, face imprimée vers le bas, dans le bac d'alimentation automatique entre les guides papier, et appuyez sur OK.
Lorsque le message "Alignement terminé" s'affiche sur le panneau avant, l'alignement est terminé.
12 | Install the software | |
| Installez le logiciel | b |
| a |
Turn on your Macintosh and wait for it to finish | Double-click the HP All-In-One |
starting up. | Installer icon on the desktop. |
Insert the Macintosh HP Officejet CD. | |
Mettez votre Macintosh sous tension et patientez | Cliquez deux fois sur l'icône |
le temps qu'il démarre. | HP All-In-One Installer située |
Insérez le CD HP Officejet Macintosh. | sur le bureau. |
|
c
Follow the onscreen instructions.
You may have to restart your Macintosh during setup.
Be sure to complete the setup assistant.
Suivez les instructions à l'écran.
Vous devrez peut-être redémarrer votre Macintosh au cours de l'installation.
Assurez-vous de parcourir toutes les étapes de l'assistant d'installation.
13 | Try your HP Officejet |
| Essayez votre HP Officejet |
Congratulations! You are now ready to use your HP Officejet. Select the HP Director icon in the dock to get started.
If you encounter problems during setup, see the User Guide.
Félicitations ! Votre HP Officejet est maintenant prêt à fonctionner. Sélectionnez l'icône Directeur HP dans le Dock pour commencer.
Si vous rencontrez des problèmes pendant l'installation, consultez le Guide de l'utilisateur.