HP Officejet J4500

All-in-One series

Start

Lea esto primero

Démarrage


Iniciar


Iniciar


0957-2242

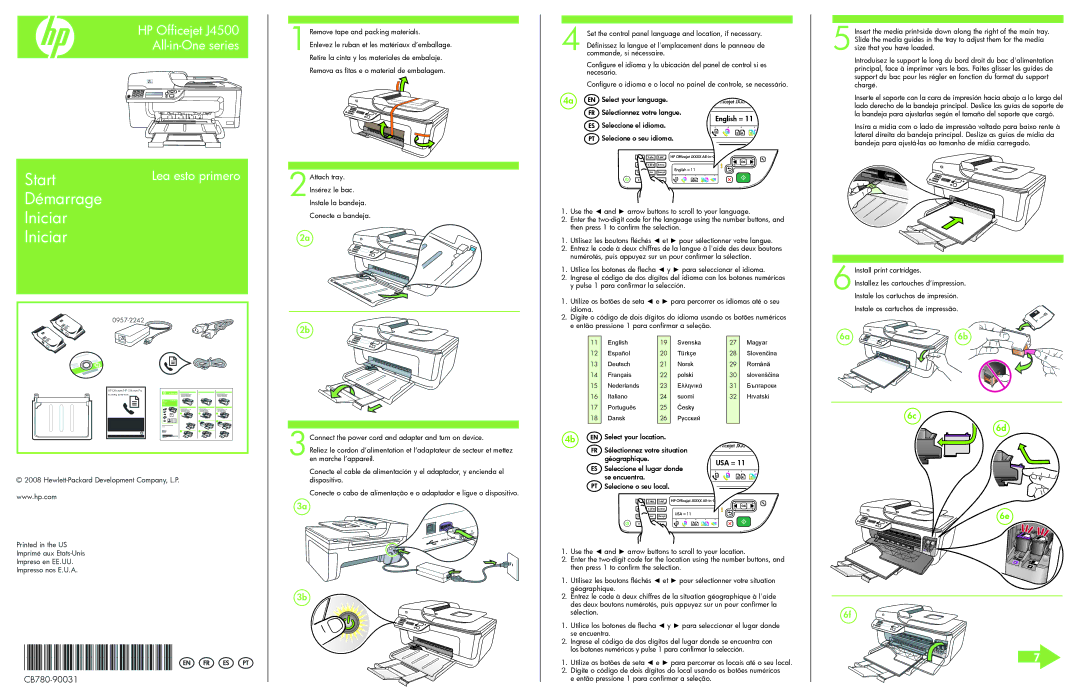
1Remove tape and packing materials.

Enlevez le ruban et les matériaux d’emballage. Retire la cinta y los materiales de embalaje. Remova as fitas e o material de embalagem.

2Attach tray. Insérez le bac. Instale la bandeja. Conecte a bandeja.

2a

2b

4 Set the control panel language and location, if necessary. Définissez la langue et l'emplacement dans le panneau de commande, si nécessaire.

Configure el idioma y la ubicación del panel de control si es necesario.

Configure o idioma e o local no painel de controle, se necessário.

4a

Select your language.


Sélectionnez votre langue.

English = 11


Seleccione el idioma.


Selecione o seu idioma.


English = 11


1.Use the ◄ and ► arrow buttons to scroll to your language.

2.Enter the two-digit code for the language using the number buttons, and then press 1 to confirm the selection.

1.Utilisez les boutons fléchés ◄ et ► pour sélectionner votre langue.

2.Entrez le code à deux chiffres de la langue à l'aide des deux boutons numérotés, puis appuyez sur un pour confirmer la sélection.

1.Utilice los botones de flecha ◄ y ► para seleccionar el idioma.

2.Ingrese el código de dos dígitos del idioma con los botones numéricos y pulse 1 para confirmar la selección.

1.Utilize os botões de seta ◄ e ► para percorrer os idiomas até o seu idioma.

2.Digite o código de dois dígitos do idioma usando os botões numéricos e então pressione 1 para confirmar a seleção.

5Insert the media print-side down along the right of the main tray. Slide the media guides in the tray to adjust them for the media size that you have loaded.

Introduisez le support le long du bord droit du bac d'alimentation principal, face à imprimer vers le bas. Faites glisser les guides de support du bac pour les régler en fonction du format du support chargé.

Inserte el soporte con la cara de impresión hacia abajo a lo largo del lado derecho de la bandeja principal. Deslice las guías de soporte de la bandeja para ajustarlas según el tamaño del soporte que cargó.

Insira a mídia com o lado de impressão voltado para baixo rente à lateral direita da bandeja principal. Deslize as guias de mídia da bandeja para ajustá-las ao tamanho de mídia carregado.

6Install print cartridges.

Installez les cartouches d’impression. Instale los cartuchos de impresión. Instale os cartuchos de impressão.

6a 6b

HP Officejet/HP Officejet Pro

Fax Getting Started Guide

11

12

13

14

15

16

17

18

English

Español

Deutsch

Français

Nederlands

Italiano

Português

Dansk

19Svenska

20Türkçe

21Norsk

22polski

23Ελληνικά

24suomi

25Česky

26Русский

27Magyar

28Slovenčina

29Română

30slovenščina

31Български

32Hrvatski

6c

© 2008 Hewlett-Packard Development Company, L.P.

www.hp.com

Printed in the US

Imprimé aux Etats-Unis

Impreso en EE.UU.

Impresso nos E.U.A.

*CB780-90031* *CB780-90031*

CB780-90031

3Connect the power cord and adapter and turn on device.

Reliez le cordon d’alimentation et l’adaptateur de secteur et mettez en marche l’appareil.

Conecte el cable de alimentación y el adaptador, y encienda el dispositivo.

Conecte o cabo de alimentação e o adaptador e ligue o dispositivo.

3a

3b

4b

Select your location.


Sélectionnez votre situation


géographique.

USA = 11


Seleccione el lugar donde


se encuentra.


Selecione o seu local.


USA = 11


1.Use the ◄ and ► arrow buttons to scroll to your location.

2.Enter the two-digit code for the location using the number buttons, and then press 1 to confirm the selection.

1.Utilisez les boutons fléchés ◄ et ► pour sélectionner votre situation géographique.

2.Entrez le code à deux chiffres de la situation géographique à l'aide des deux boutons numérotés, puis appuyez sur un pour confirmer la sélection.

1.Utilice los botones de flecha ◄ y ► para seleccionar el lugar donde se encuentra.

2.Ingrese el código de dos dígitos del lugar donde se encuentra con los botones numéricos y pulse 1 para confirmar la selección.

1.Utilize os botões de seta ◄ e ► para percorrer os locais até o seu local.

2.Digite o código de dois dígitos do local usando os botões numéricos e então pressione 1 para confirmar a seleção.

6d

6e

6f

7

Page 1
Image 1
HP J4540, J4580, J4524, J4550 manual Start

J4540, J4524, J4580, J4550 specifications

The HP J4580 and J4500 series printers are versatile all-in-one devices that cater to both home and small office environments. Designed to deliver high-quality printing, scanning, copying, and faxing capabilities, these models combine functionality with ease of use.

The HP J4580 model stands out with its compact design, making it an ideal choice for users with limited space. One of its main features is the ability to print in color and black-and-white at speeds up to 28 pages per minute (ppm). Additionally, the J4580 boasts a maximum print resolution of 4800 x 1200 optimized dpi, ensuring that both text and images look sharp and vibrant.

The J4500 model, while similar in design, introduces enhanced features suitable for slightly larger workloads. It offers a slightly higher performance, handling printing tasks with even greater efficiency. The J4500 can also print at impressive speeds, providing users with fast output without sacrificing quality.

Both models come equipped with advanced scanner technology, featuring a flatbed scanner that allows for high-resolution scanning to digital formats. The J4580 and J4500 are capable of scanning documents up to 1200 dpi, making it easy to capture intricate details from photos and pages. Moreover, users can copy documents quickly with a one-touch button that simplifies the copying process.

One of the standout characteristics is the built-in fax functionality. The fax modem included in both models can transmit documents at speeds of up to 33.6 kbps, ensuring that important information is sent swiftly. Additionally, they feature a 50-sheet automatic document feeder (ADF) for quicker faxing and scanning of multi-page documents.

Connectivity options are also essential for modern office needs, and both the J4580 and J4500 support USB and Ethernet connections, allowing users to print and share documents seamlessly over a network. Furthermore, wireless connectivity options enable quick access from mobile devices.

Overall, the HP J4580 and J4500 series printers provide comprehensive solutions for daily printing, scanning, copying, and faxing tasks. With their combination of speed, quality, and multifunction capabilities, these all-in-one printers are reliable assets for enhancing productivity in any workspace.