HP Q3675A Image Transfer Kit, Q3676A 110V Image Fuser Kit, Q3677A 220V Image Fuser Kit manual

Models: Q3675A Image Transfer Kit Q3676A 110V Image Fuser Kit Q3677A 220V Image Fuser Kit

1 20
Download 20 pages 3.51 Kb
Page 5
Image 5

1

2

3

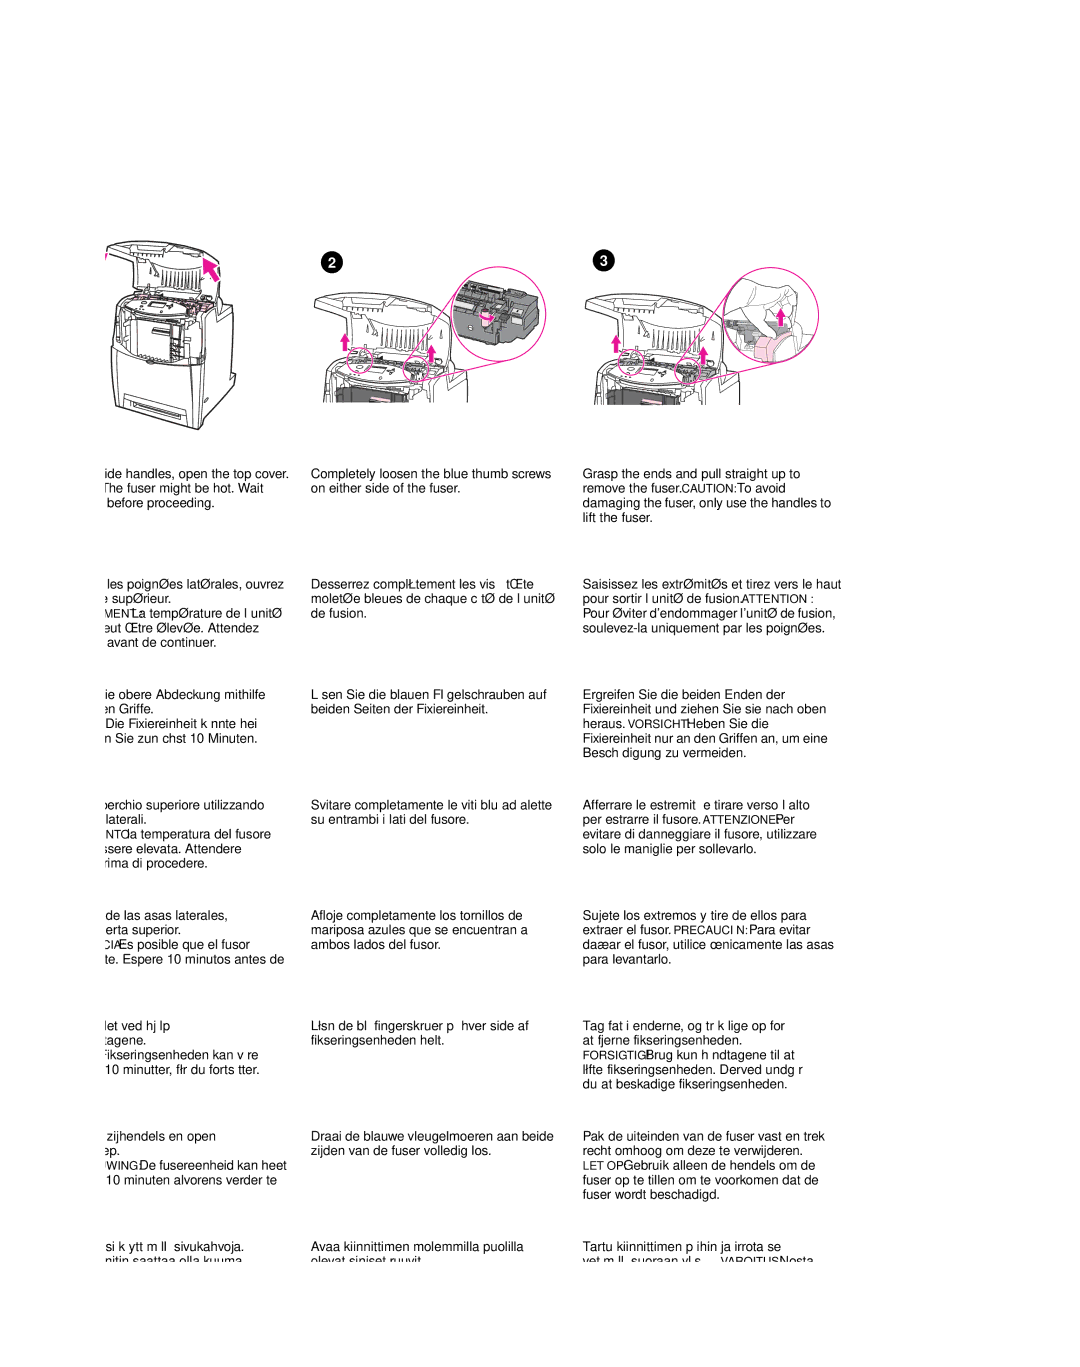
Using the side handles, open the top cover. WARNING: The fuser might be hot. Wait 10 minutes before proceeding.

En utilisant les poignées latérales, ouvrez le couvercle supérieur.

AVERTISSEMENT : La température de l’unité de fusion peut être élevée. Attendez

10 minutes avant de continuer.

Öffnen Sie die obere Abdeckung mithilfe der seitlichen Griffe.

WARNUNG: Die Fixiereinheit könnte heiß sein. Warten Sie zunächst 10 Minuten.

Aprire il coperchio superiore utilizzando le maniglie laterali.

AVVERTIMENTO: la temperatura del fusore potrebbe essere elevata. Attendere

10 minuti prima di procedere.

Completely loosen the blue thumb screws on either side of the fuser.

Desserrez complètement les vis à tête moletée bleues de chaque côté de l’unité de fusion.

Lösen Sie die blauen Flügelschrauben auf beiden Seiten der Fixiereinheit.

Svitare completamente le viti blu ad alette su entrambi i lati del fusore.

Grasp the ends and pull straight up to remove the fuser. CAUTION: To avoid damaging the fuser, only use the handles to lift the fuser.

Saisissez les extrémités et tirez vers le haut pour sortir l’unité de fusion. ATTENTION : Pour éviter d'endommager l'unité de fusion, soulevez-la uniquement par les poignées.

Ergreifen Sie die beiden Enden der Fixiereinheit und ziehen Sie sie nach oben heraus. VORSICHT: Heben Sie die Fixiereinheit nur an den Griffen an, um eine Beschädigung zu vermeiden.

Afferrare le estremità e tirare verso l’alto per estrarre il fusore. ATTENZIONE: Per evitare di danneggiare il fusore, utilizzare solo le maniglie per sollevarlo.

Con ayuda de las asas laterales, abra la cubierta superior. ADVERTENCIA: Es posible que el fusor esté caliente. Espere 10 minutos antes de tocarlo.

Åbn topdækslet ved hjælp af sidehåndtagene.

ADVARSEL! Fikseringsenheden kan være varm. Vent 10 minutter, før du fortsætter.

Gebruik de zijhendels en open de bovenklep.

WAARSCHUWING: De fusereenheid kan heet zijn. Wacht 10 minuten alvorens verder te gaan.

Avaa yläkansi käyttämällä sivukahvoja. VAARA: Kiinnitin saattaa olla kuuma. Odota 10 minuuttia ennen kuin jatkat.

Afloje completamente los tornillos de mariposa azules que se encuentran a ambos lados del fusor.

Løsn de blå fingerskruer på hver side af fikseringsenheden helt.

Draai de blauwe vleugelmoeren aan beide zijden van de fuser volledig los.

Avaa kiinnittimen molemmilla puolilla olevat siniset ruuvit.

3

Sujete los extremos y tire de ellos para extraer el fusor. PRECAUCIÓN: Para evitar dañar el fusor, utilice únicamente las asas para levantarlo.

Tag fat i enderne, og træk lige op for at fjerne fikseringsenheden. FORSIGTIG! Brug kun håndtagene til at løfte fikseringsenheden. Derved undgår du at beskadige fikseringsenheden.

Pak de uiteinden van de fuser vast en trek recht omhoog om deze te verwijderen. LET OP: Gebruik alleen de hendels om de fuser op te tillen om te voorkomen dat de fuser wordt beschadigd.

Tartu kiinnittimen päihin ja irrota se vetämällä suoraan ylös. VAROITUS: Nosta kiinnitysyksikköä vain sen kahvoista, jotta yksikkö ei vahingoitu.

Page 5
Image 5
HP Q3675A Image Transfer Kit, Q3676A 110V Image Fuser Kit, Q3677A 220V Image Fuser Kit manual

Q3675A Image Transfer Kit, Q3676A 110V Image Fuser Kit, Q3677A 220V Image Fuser Kit specifications

The HP Q3677A 220V Image Fuser Kit, Q3676A 110V Image Fuser Kit, and Q3675A Image Transfer Kit are essential components designed to ensure high-quality printing performance in compatible HP printers. These kits are crafted to meet the needs of both home and office environments, providing reliable, consistent output for various printing tasks.

The HP Q3677A 220V Image Fuser Kit is specifically designed for use in regions with a 220V electrical supply. It features advanced thermal technology that ensures even heat distribution, which is crucial for achieving crisp, clear prints. The fuser kit is engineered to handle a wide range of print jobs, from everyday documents to high-resolution graphics. Its durable construction allows for an extended lifespan, minimizing the need for frequent replacements.

On the other hand, the HP Q3676A 110V Image Fuser Kit caters to users in areas where 110V is the standard voltage. Similar to its 220V counterpart, it employs state-of-the-art thermal mechanisms to ensure optimum fusing performance. This kit is designed to facilitate fast print speeds while maintaining exceptional quality, making it ideal for busy office environments where time efficiency is paramount.

Both image fuser kits are equipped with technologies that help prevent paper jams and enhance print reliability. They are compatible with various HP LaserJet printers, ensuring users can easily integrate these kits into their printing setups. The installation process is straightforward, allowing for quick replacements that do not disrupt workflow.

Complementing these fuser kits, the HP Q3675A Image Transfer Kit plays a critical role in the print process by transferring toner from the cartridge to paper. This kit is designed with a focus on precision and reliability, ensuring that images and text are transferred accurately for a professional finish. The transfer kit also contributes to the overall quality of printed materials, supporting a wide array of media types.

With these kits, users can expect not only excellent print quality but also enhanced operational efficiency. By investing in the HP Q3677A, Q3676A, and Q3675A kits, organizations can optimize their printing capabilities, reduce downtime, and produce exceptional documents that meet their professional standards. In conclusion, these image fuser and transfer kits are integral for achieving the best performance in HP laser printers, ensuring that users enjoy both longevity and quality in their printing endeavors.