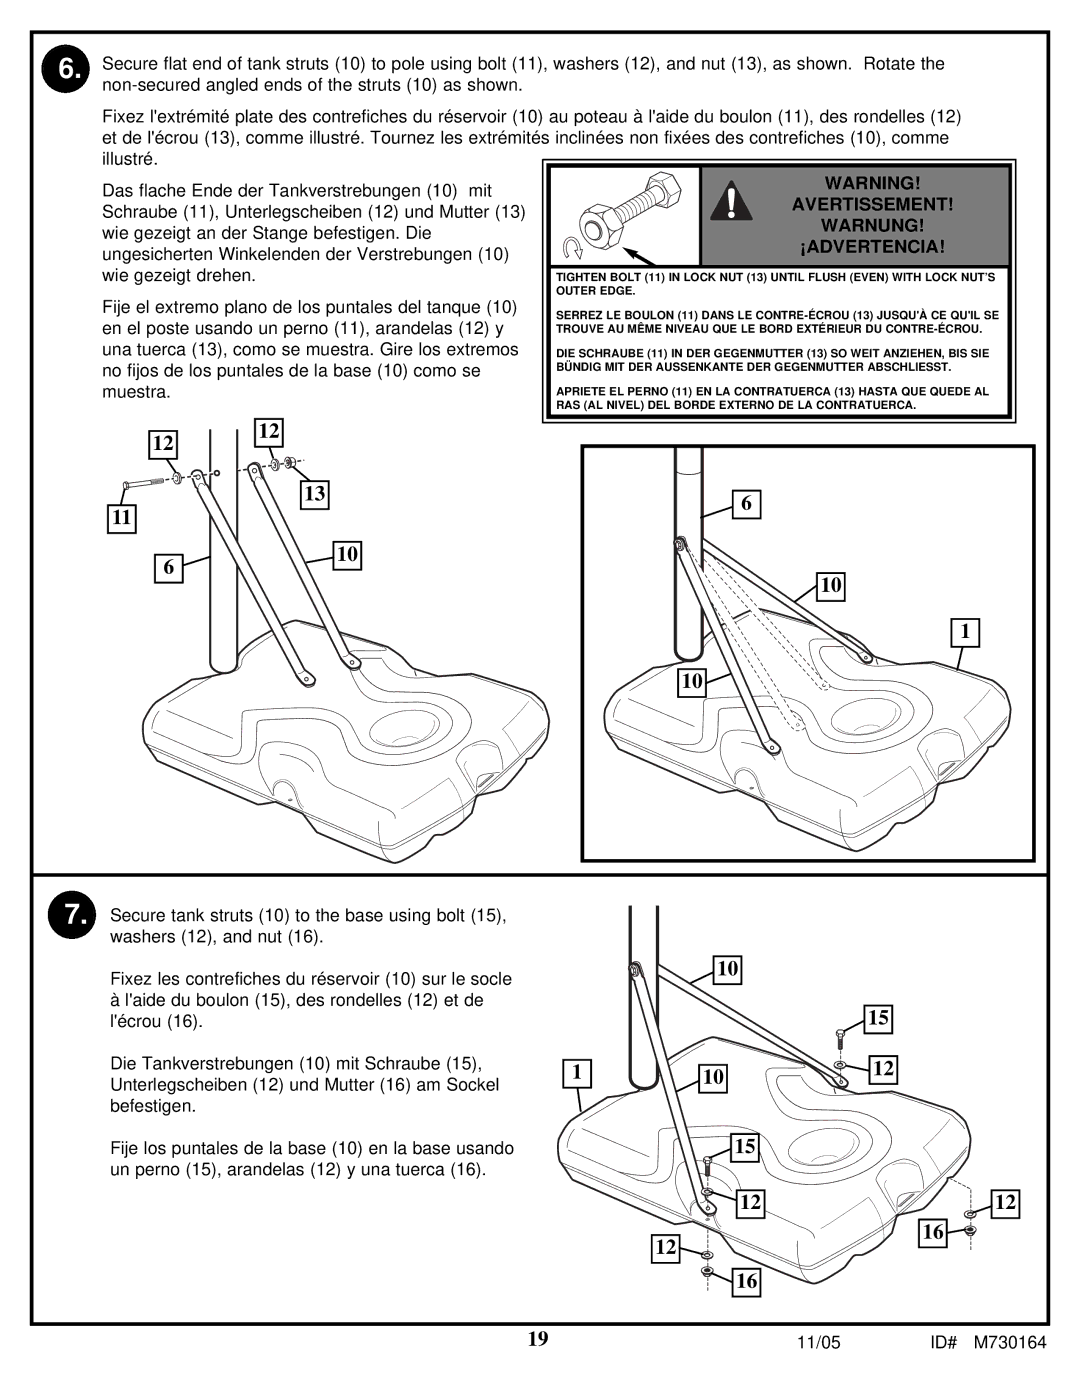
6. Secure flat end of tank struts (10) to pole using bolt (11), washers (12), and nut (13), as shown. Rotate the
Fixez l'extrémité plate des contrefiches du réservoir (10) au poteau à l'aide du boulon (11), des rondelles (12) | |||
et de l'écrou (13), comme illustré. Tournez les extrémités inclinées non fixées des contrefiches (10), comme | |||
illustré. |
|
| |
Das flache Ende der Tankverstrebungen (10) mit | WARNING! | ||
AVERTISSEMENT! | |||
Schraube (11), Unterlegscheiben (12) und Mutter (13) | |||
WARNUNG! | |||
wie gezeigt an der Stange befestigen. Die | |||
¡ADVERTENCIA! | |||
ungesicherten Winkelenden der Verstrebungen (10) | |||
| |||
wie gezeigt drehen. |
| TIGHTEN BOLT (11) IN LOCK NUT (13) UNTIL FLUSH (EVEN) WITH LOCK NUT’S | |
Fije el extremo plano de los puntales del tanque (10) | OUTER EDGE. | ||
SERREZ LE BOULON (11) DANS LE | |||
en el poste usando un perno (11), arandelas (12) y | |||
TROUVE AU MÊME NIVEAU QUE LE BORD EXTÉRIEUR DU | |||
una tuerca (13), como se muestra. Gire los extremos | DIE SCHRAUBE (11) IN DER GEGENMUTTER (13) SO WEIT ANZIEHEN, BIS SIE | ||
no fijos de los puntales de la base (10) como se | BÜNDIG MIT DER AUSSENKANTE DER GEGENMUTTER ABSCHLIESST. | ||
muestra. |
| APRIETE EL PERNO (11) EN LA CONTRATUERCA (13) HASTA QUE QUEDE AL | |
|
| RAS (AL NIVEL) DEL BORDE EXTERNO DE LA CONTRATUERCA. | |
12 | 12 |
| |
|
| ||
11 | 13 | 6 | |
| |||
|
| ||
6 | 10 |
| |
| 10 | ||
|
| ||
|
| 1 | |
|
| 10 | |
7. Secure tank struts (10) to the base using bolt (15), washers (12), and nut (16).
Fixez les contrefiches du réservoir (10) sur le socle
àl'aide du boulon (15), des rondelles (12) et de l'écrou (16).
Die Tankverstrebungen (10) mit Schraube (15), Unterlegscheiben (12) und Mutter (16) am Sockel befestigen.
1
10
10
15
12
Fije los puntales de la base (10) en la base usando un perno (15), arandelas (12) y una tuerca (16).
15
12
12
16 |
![]()
![]()
![]() 12 16
12 16 ![]()
19 | 11/05 | ID# M730164 |
