Manuals
/
Huffy
/
Fitness & Sports
/
Board Games
Huffy
Portable System manual Backboard, Pole Support Strut Base, Front
Models:
Portable System
1
6
22
22
Download
22 pages
677 b
3
4
5
6
7
8
9
10
<
>
Install
Parts list
IMPORTANT! Center alignment slot of middle pole in a lower hole of top pole as shown. While maintaining alignment, bounce pole top 4 and middle together as shown until they no longer move toward taped reference mark. Upright assembly
Height Adjustment
Toll-Free Customer Service Number for U.S
Secure base struts 10 to base using bolt 15, washers 12, and nut
Page 6
Image 6
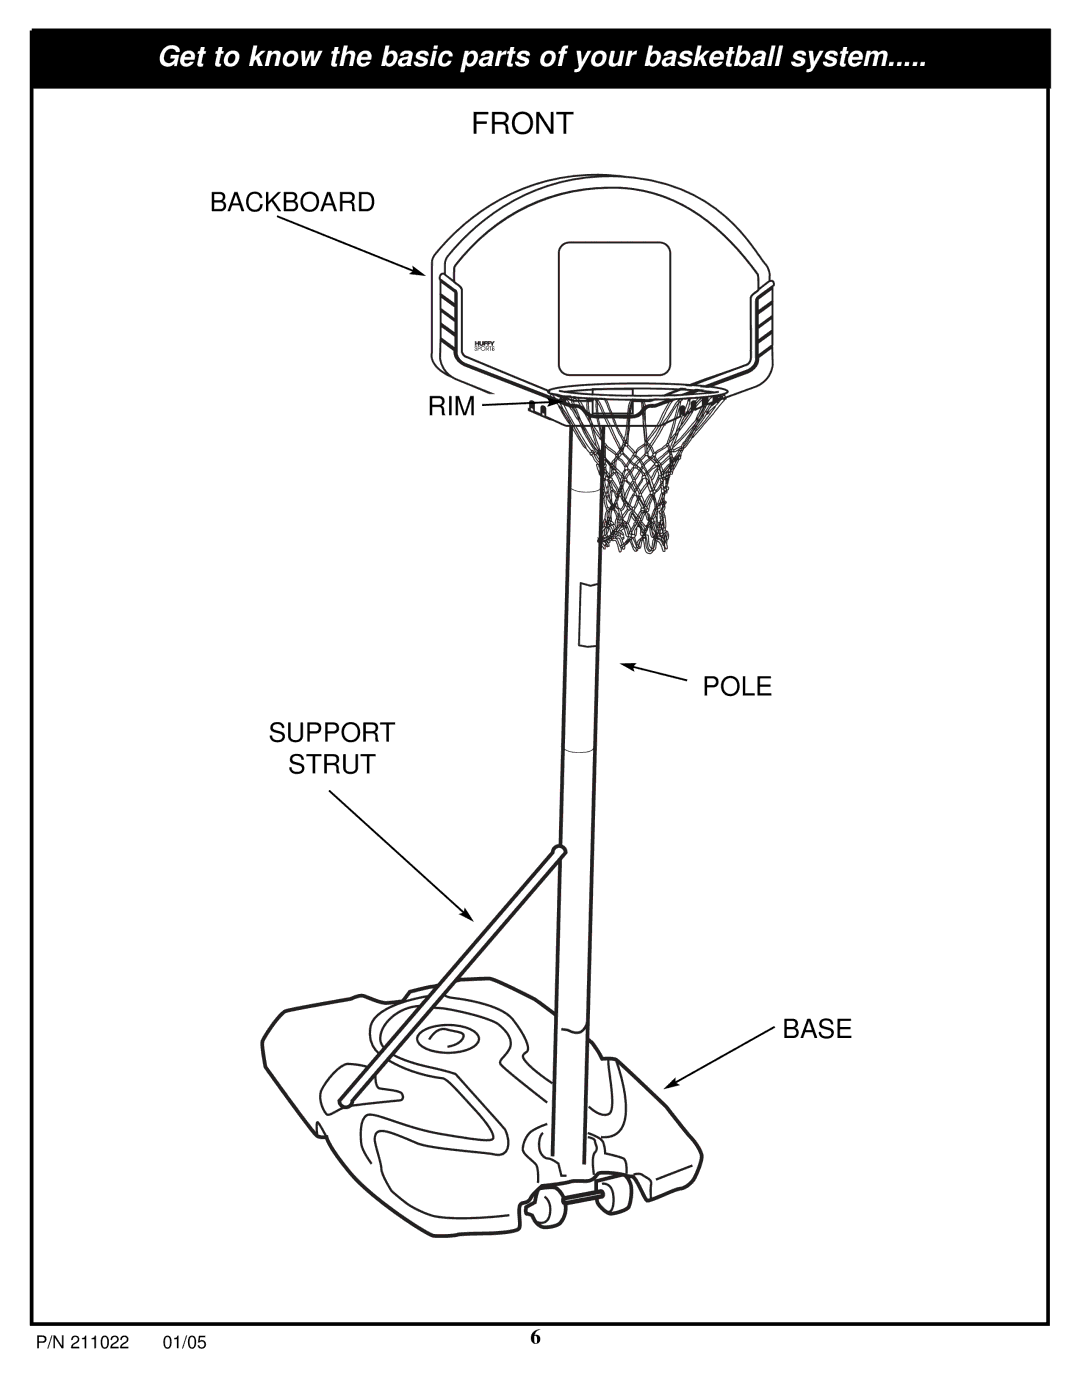
Get to know the basic parts of your basketball system.....
FRONT
BACKBOARD
RIM
POLE
SUPPORT
STRUT
BASE
P/N 211022
01/05
6
Page 5
Page 7
Page 6
Image 6
Page 5
Page 7
Contents
For Canada For Europe 00 800 555 85234 Sweden 009 555
Toll-Free Customer Service Number for U.S
Portable System Owners Manual
For Australia 1-800-333
¡ANTES DE COMENZAR
BEFORE YOU START
AVANT DE COMMENCER
VORBEREITENDE MASSNAHMEN
Owner must ensure that all players know and follow
these rules for safe operation of the system
Do not slide, climb, shake or play on base and/or pole
Remove all contents from boxes
NOTICE TO ASSEMBLERS
SAFETY INSTRUCTIONS
HEIGHT ADJUSTMENT
MOVING SYSTEM
FRONT
BACKBOARD
POLE SUPPORT STRUT BASE
Get to know the basic parts of your basketball system
ItemQty.Part No. Description
PARTS LIST - See Hardware Identifier
ItemQty.Part No. Description
Not all hardware will be used
HARDWARE IDENTIFIER BOLTS
HARDWARE IDENTIFIER NUTS & WASHERS
Item #7
TOOLS REQUIRED FOR THIS SECTION 2 1/2”, 2 9/16 AND 2 3/4 Wrenches
SECTION A ASSEMBLE THE BASE
1/2” 9/16” 3/4”
AND/OR 2 Socket Wrenches and Sockets
BOTTOM POLE 43”
TOP POLE 31”
MIDDLE POLE 43”
1. Remove contents from tank
3. IMPORTANT! Center alignment slot of middle pole section 5 in a lower hole of top pole section 4 as shown. While maintaining alignment, bounce pole top 4 and middle section 5 together as shown until they no longer move toward taped reference mark. Upright assembly
DO NOT OVER
TIGHTEN
8. Secure base struts 10 to base using bolt 15, washers 12, and nut
01/05
Board
Toward
Toward
Pole
12. Secure pawl 27 in place with clevis pin 30 and washers 18 as shown
TOOLS REQUIRED FOR THIS SECTION 2 1/2”, 2 9/16” AND 2 3/4” Wrenches
SECTION B ATTACH THE BACKBOARD
1/2” 9/16” 3/4”
AND/OR 2 Socket Wrenches and Sockets
Attach rim 21 and plastic spacer to board with
3. Support pole on sawhorse
Attach pole cap 22 as shown
Page
Insert net into bottom of clip as shown
NET INSTALLATION
01/05
SIDE VIEW NETCLIP NET
ADJUST HEIGHT
DO NOT ALLOW
CHILDREN TO