M5565_ManE_531192-1_A.qxd 5/4/2003 9:39 PM Page 22

Display the Waypoints Submenu: From any view, press the MENU key twice to display the Main Menu System, then use the RIGHT Cursor key to select the Navigation tab. Select Waypoints and press the RIGHT Cursor key to display the Waypoints submenu.

Program a specific position as a waypoint: To create a waypoint that is NOT your current position, from the Waypoints submenu, select the Create option and press the RIGHT Cursor key. Use the Cursor keys to program a waypoint name, latitude, longitude, and icon before selecting Save.

Edit a waypoint: From the Waypoints submenu, select Edit and press the RIGHT Cursor key to display a list of saved waypoints. Select the waypoint you want to edit by pressing the RIGHT Cursor key. Use the RIGHT and LEFT Cursor keys to move from field to field, and the UP and DOWN Cursor keys to changes values once you are in a field. In the Waypoint Name, Latitude and Longitude fields, the UP and DOWN Cursor keys change the letter or number. All upper and lower case letters are available, as well as digits 0-9 and some punctuation characters. In the Waypoint Icon field, the UP and DOWN Cursor keys change the icon used to represent the waypoint on the Combo and Chart Views. You can exit these fields with the LEFT and RIGHT Cursor keys or by pressing the EXIT key. Select Save and press the RIGHT Cursor key to save your changes.

To make it easier to select a waypoint, select Sort By and press the RIGHT or LEFT Cursor keys to select a sort order:

Name shows the waypoints alphabetically

Time shows the most recently-created waypoint first

Distance shows the closest waypoint first.

Delete a waypoint: From the Waypoints submenu, select Delete and press the RIGHT Cursor key to display a list of waypoints. Select the waypoint you want to delete, then press the RIGHT Cursor key. You will be asked to confirm deletion before the waypoint is actually deleted.

Navigate to a Waypoint or Position

Navigate to the cursor position: From the Combo or Track view, use the Cursor key to select a position or waypoint to which you want to navigate. Press the GOTO key. Navigation will begin immediately.

Navigate to a specified waypoint: Press the GOTO key, then choose the waypoint to which you would like to navigate from the waypoint list and press the RIGHT Cursor key to select it.

From any view, you can also navigate to a waypoint using the GOTO key.

NOTE: By repeating the previous instructions, you can add more waypoints to create a longer route.

Skipping a waypoint: From the Navigation X-PressTMmenu, select Skip Next Waypoint and press the RIGHT Cursor key. If there is not another waypoint to skip to, navigation will be cancelled.

Cancel navigation: From the Navigation X-PressTMmenu, select Cancel Navigation and press the RIGHT Cursor key. Canceling navigation removes the route and any waypoints created using the GOTO key.

Add a Waypoint Target or Trolling Grid

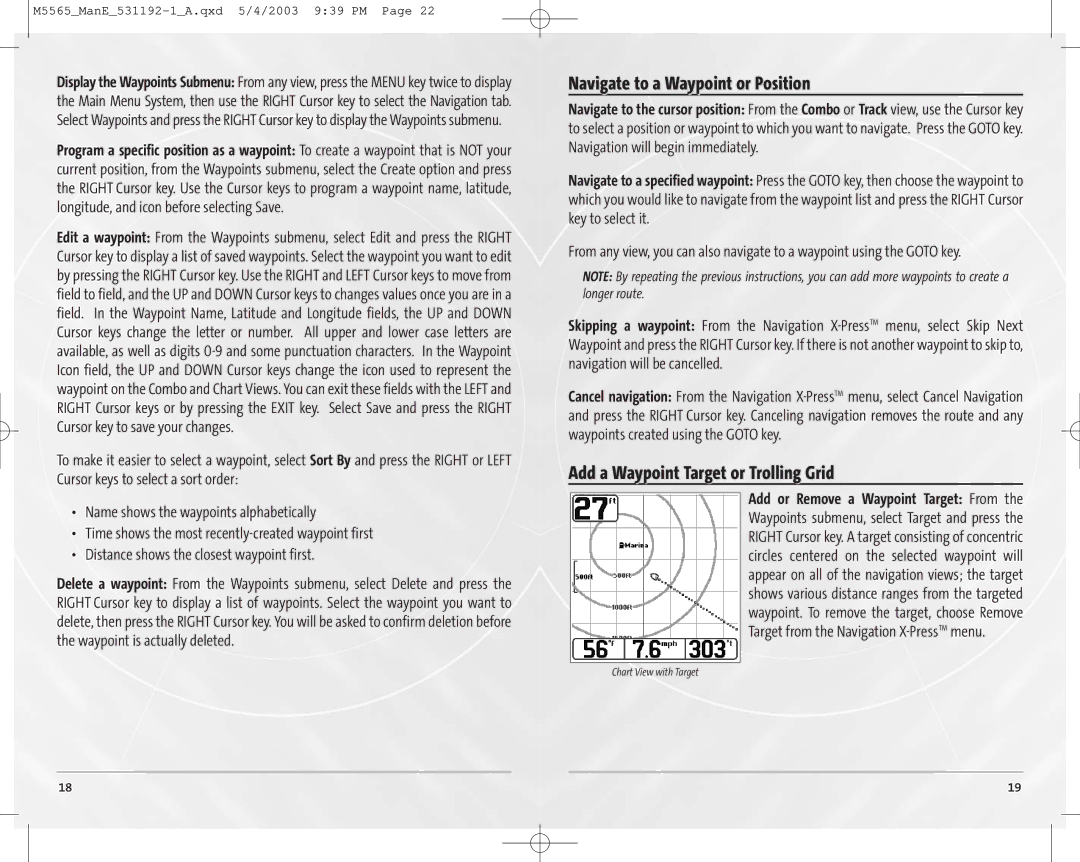
Add or Remove a Waypoint Target: From the Waypoints submenu, select Target and press the RIGHT Cursor key. A target consisting of concentric circles centered on the selected waypoint will appear on all of the navigation views; the target shows various distance ranges from the targeted waypoint. To remove the target, choose Remove Target from the Navigation X-PressTMmenu.

Chart View with Target

18

19

Page 12
Image 12
Humminbird 55, 65 manual Navigate to a Waypoint or Position, Add a Waypoint Target or Trolling Grid

65, 55 specifications

Humminbird is renowned for its innovative fish finders, and the Humminbird 55 and 65 models stand out as excellent choices for both novice and experienced anglers. Designed with user-friendly features and advanced technologies, these models are engineered to enhance fishing experiences on the water.

The Humminbird 55 boasts a 5-inch grayscale display, providing clear visibility in various lighting conditions. It features Humminbird's exclusive DualBeam PLUS sonar technology, which utilizes two beams to provide both wide coverage and detailed bottom mapping. This technology allows users to see not only fish but also underwater structures, making it easier to identify potential hotspots.

Another standout feature of the 55 is its Fish ID technology, which simplifies the interpretation of sonar returns by automatically identifying fish sizes and depths. This user-friendly addition is especially helpful for those new to fish finding, as it removes some of the complexities associated with traditional sonar readings.

In contrast, the Humminbird 65 offers a larger 6.5-inch display, providing even greater clarity and detail. This model also includes DualBeam PLUS sonar technology but enhances it with the addition of a built-in GPS. This GPS enables anglers to mark waypoints, navigate back to favorite fishing spots, and track their routes, adding a layer of convenience during excursions on the water.

Both models come equipped with advanced fish tracking capabilities, offering features like scrollable history and a customizable sensitivity setting, allowing users to tailor their experience to their unique fishing style. The automatic sonar sensitivity adjustment ensures that anglers receive optimal performance in varying water conditions, whether in freshwater lakes or coastal waters.

Durability is another hallmark of the Humminbird 55 and 65 series. Both units are built to withstand the rigors of marine environments, featuring weather-resistant housings that protect them from splashes and moisture. Easy-to-use controls and a straightforward interface make navigating through menus and settings hassle-free.

Overall, the Humminbird 55 and 65 models represent a blend of innovative technology, practical features, and robust design. These fish finders enhance anglers' ability to locate and catch fish, making them worthwhile investments for anyone passionate about fishing. With their user-friendly designs and advanced sonar capabilities, the Humminbird 55 and 65 models elevate the fishing experience, catering to a robust range of angler needs.