Set Up (Continued)
USING A PRESSURIZED PAINT TANK
This model is readily adaptable for use with a pressurized paint tank. This allows continuous spraying of large quantities of paint without stopping. It also allows the gun to be used while being held in ANY position without spilling paint.
NON-BLEEDER TO BLEEDER CONVERSION
IMPORTANT: Spray guns are shipped for
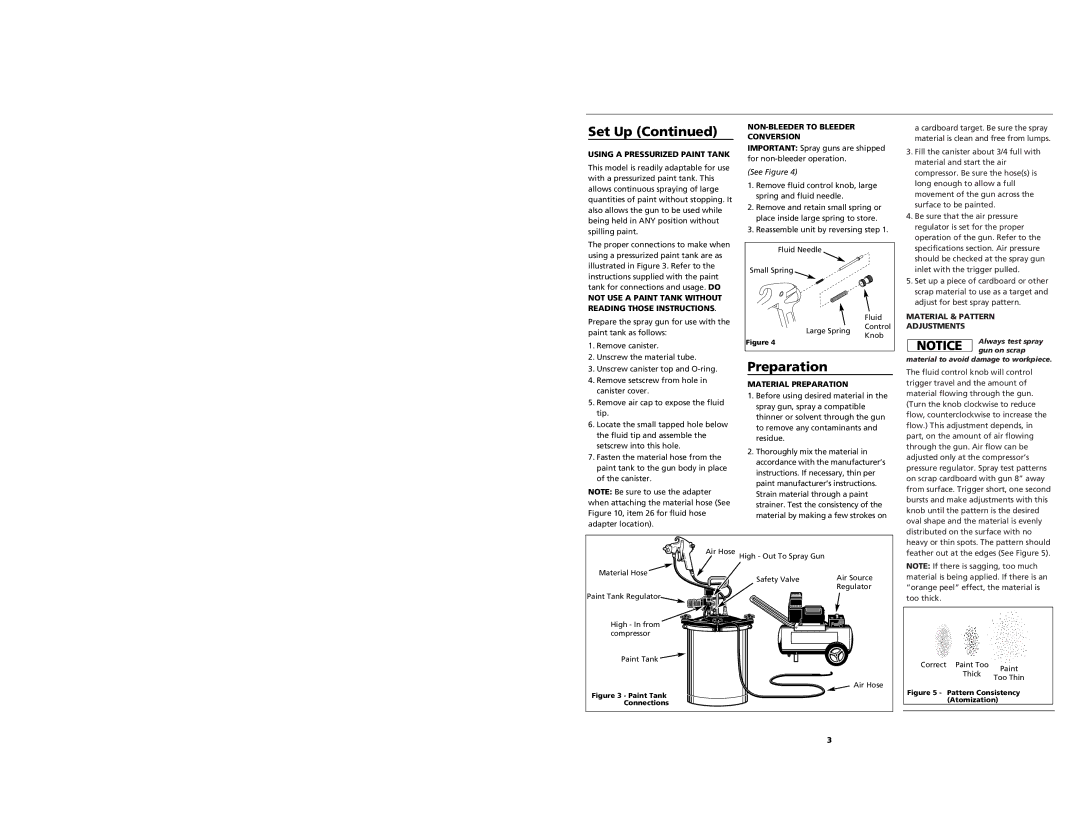
(See Figure 4)
1.Remove fluid control knob, large spring and fluid needle.
2.Remove and retain small spring or place inside large spring to store.
3.Reassemble unit by reversing step 1.
a cardboard target. Be sure the spray material is clean and free from lumps.
3. Fill the canister about 3/4 full with |
material and start the air |
compressor. Be sure the hose(s) is |
long enough to allow a full |
movement of the gun across the |
surface to be painted. |
4. Be sure that the air pressure |
regulator is set for the proper |
operation of the gun. Refer to the |
The proper connections to make when using a pressurized paint tank are as illustrated in Figure 3. Refer to the instructions supplied with the paint tank for connections and usage. DO
NOT USE A PAINT TANK WITHOUT READING THOSE INSTRUCTIONS.
Prepare the spray gun for use with the paint tank as follows:
1.Remove canister.
2.Unscrew the material tube.
3.Unscrew canister top and
4.Remove setscrew from hole in canister cover.
5.Remove air cap to expose the fluid tip.
6.Locate the small tapped hole below the fluid tip and assemble the setscrew into this hole.
7.Fasten the material hose from the paint tank to the gun body in place of the canister.
NOTE: Be sure to use the adapter when attaching the material hose (See Figure 10, item 26 for fluid hose adapter location).
Fluid Needle |
| |
Small Spring |
| |
| Fluid | |
Large Spring | Control | |
Knob | ||
Figure 4 | ||
|
Preparation
MATERIAL PREPARATION
1.Before using desired material in the spray gun, spray a compatible thinner or solvent through the gun to remove any contaminants and residue.
2.Thoroughly mix the material in accordance with the manufacturer’s instructions. If necessary, thin per paint manufacturer’s instructions. Strain material through a paint strainer. Test the consistency of the material by making a few strokes on
specifications section. Air pressure |
should be checked at the spray gun |
inlet with the trigger pulled. |
5. Set up a piece of cardboard or other |
scrap material to use as a target and |
adjust for best spray pattern. |
MATERIAL & PATTERN
ADJUSTMENTS
NOTICE | Always test spray | |
gun on scrap | ||
|
material to avoid damage to workpiece.
The fluid control knob will control trigger travel and the amount of material flowing through the gun. (Turn the knob clockwise to reduce flow, counterclockwise to increase the flow.) This adjustment depends, in part, on the amount of air flowing through the gun. Air flow can be adjusted only at the compressor’s pressure regulator. Spray test patterns on scrap cardboard with gun 8” away from surface. Trigger short, one second bursts and make adjustments with this knob until the pattern is the desired oval shape and the material is evenly distributed on the surface with no heavy or thin spots. The pattern should
Material Hose
Paint Tank Regulator
High - In from compressor
Paint Tank ![]()
Figure 3 - Paint Tank Connections
Air Hose High - Out To Spray Gun |
|
Safety Valve | Air Source |
| Regulator |
Air Hose
feather out at the edges (See Figure 5).
NOTE: If there is sagging, too much material is being applied. If there is an “orange peel” effect, the material is too thick.
Correct Paint Too | Paint | |
Thick | ||
Too Thin | ||
|
Figure 5 - Pattern Consistency
(Atomization)
3