Preparation (Continued)
If the spray is too fine (excessive overspray), caused by too much air for the amount of paint being sprayed, reduce the air pressure or open the fluid control to spray more material.
If the spray is too coarse (spitting globs), reduce the amount of material with the fluid control knob or thin the material.
DISTANCE ADJUSTMENTS
Start 6” away from work surface. If pattern begins to run, move back an inch and try again. The pattern will be dry and thin and may feel rough if sprayed from too far away.
SPEED OF STROKE ADJUSTMENTS
If speed of stroke is too slow, paint will be wet on work surface and may run. If speed of stroke is too fast, paint will be dry and uneven on work surface.
Operation
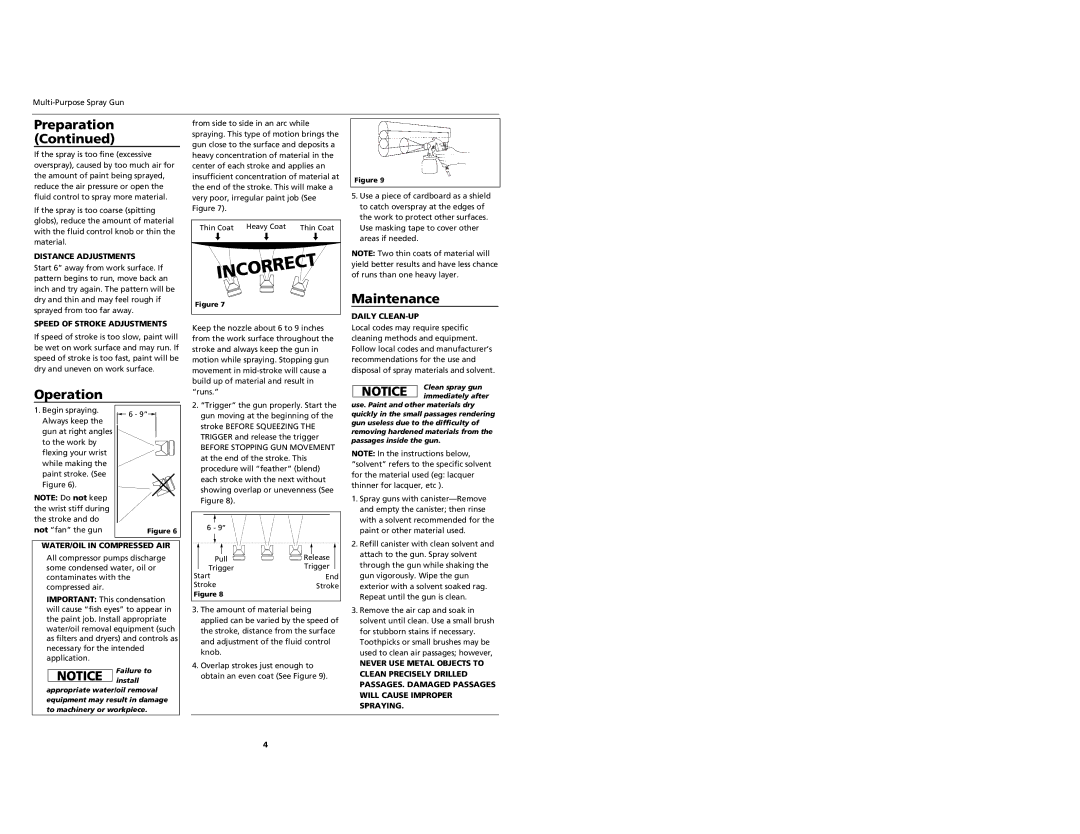
from side to side in an arc while spraying. This type of motion brings the gun close to the surface and deposits a heavy concentration of material in the center of each stroke and applies an insufficient concentration of material at the end of the stroke. This will make a very poor, irregular paint job (See Figure 7).
Thin Coat Heavy Coat | Thin Coat |
Figure 7
Keep the nozzle about 6 to 9 inches from the work surface throughout the stroke and always keep the gun in motion while spraying. Stopping gun movement in
Figure 9
5.Use a piece of cardboard as a shield to catch overspray at the edges of the work to protect other surfaces. Use masking tape to cover other areas if needed.
NOTE: Two thin coats of material will yield better results and have less chance of runs than one heavy layer.
Maintenance
DAILY CLEAN-UP
Local codes may require specific cleaning methods and equipment. Follow local codes and manufacturer’s recommendations for the use and disposal of spray materials and solvent.
NOTICE | Clean spray gun | |
immediately after | ||
|
1.Begin spraying. Always keep the gun at right angles to the work by flexing your wrist while making the paint stroke. (See Figure 6).
NOTE: Do not keep the wrist stiff during the stroke and do not “fan” the gun
6 - 9” |
Figure 6 |
2.“Trigger” the gun properly. Start the gun moving at the beginning of the stroke BEFORE SQUEEZING THE TRIGGER and release the trigger
BEFORE STOPPING GUN MOVEMENT at the end of the stroke. This procedure will “feather” (blend) each stroke with the next without showing overlap or unevenness (See Figure 8).
6 - 9” |
use. Paint and other materials dry quickly in the small passages rendering gun useless due to the difficulty of removing hardened materials from the passages inside the gun.
NOTE: In the instructions below, “solvent” refers to the specific solvent for the material used (eg: lacquer thinner for lacquer, etc ).
1. Spray guns with |
and empty the canister; then rinse |
with a solvent recommended for the |
paint or other material used. |
WATER/OIL IN COMPRESSED AIR
All compressor pumps discharge some condensed water, oil or contaminates with the compressed air.
IMPORTANT: This condensation will cause “fish eyes” to appear in the paint job. Install appropriate water/oil removal equipment (such as filters and dryers) and controls as necessary for the intended application.
Failure to
NOTICE install
appropriate water/oil removal
equipment may result in damage to machinery or workpiece.
Pull | Release |
Trigger | Trigger |
Start | End |
Stroke | Stroke |
Figure 8 |
|
3.The amount of material being applied can be varied by the speed of the stroke, distance from the surface and adjustment of the fluid control knob.
4.Overlap strokes just enough to obtain an even coat (See Figure 9).
2. Refill canister with clean solvent and |
attach to the gun. Spray solvent |
through the gun while shaking the |
gun vigorously. Wipe the gun |
exterior with a solvent soaked rag. |
Repeat until the gun is clean. |
3. Remove the air cap and soak in |
solvent until clean. Use a small brush |
for stubborn stains if necessary. |
Toothpicks or small brushes may be |
used to clean air passages; however, |
NEVER USE METAL OBJECTS TO |
CLEAN PRECISELY DRILLED |
PASSAGES. DAMAGED PASSAGES |
WILL CAUSE IMPROPER |
SPRAYING. |
4