ASSEMBLY

Assembly of the blade and trimmer head

Assembling the blade guard and clearing blade

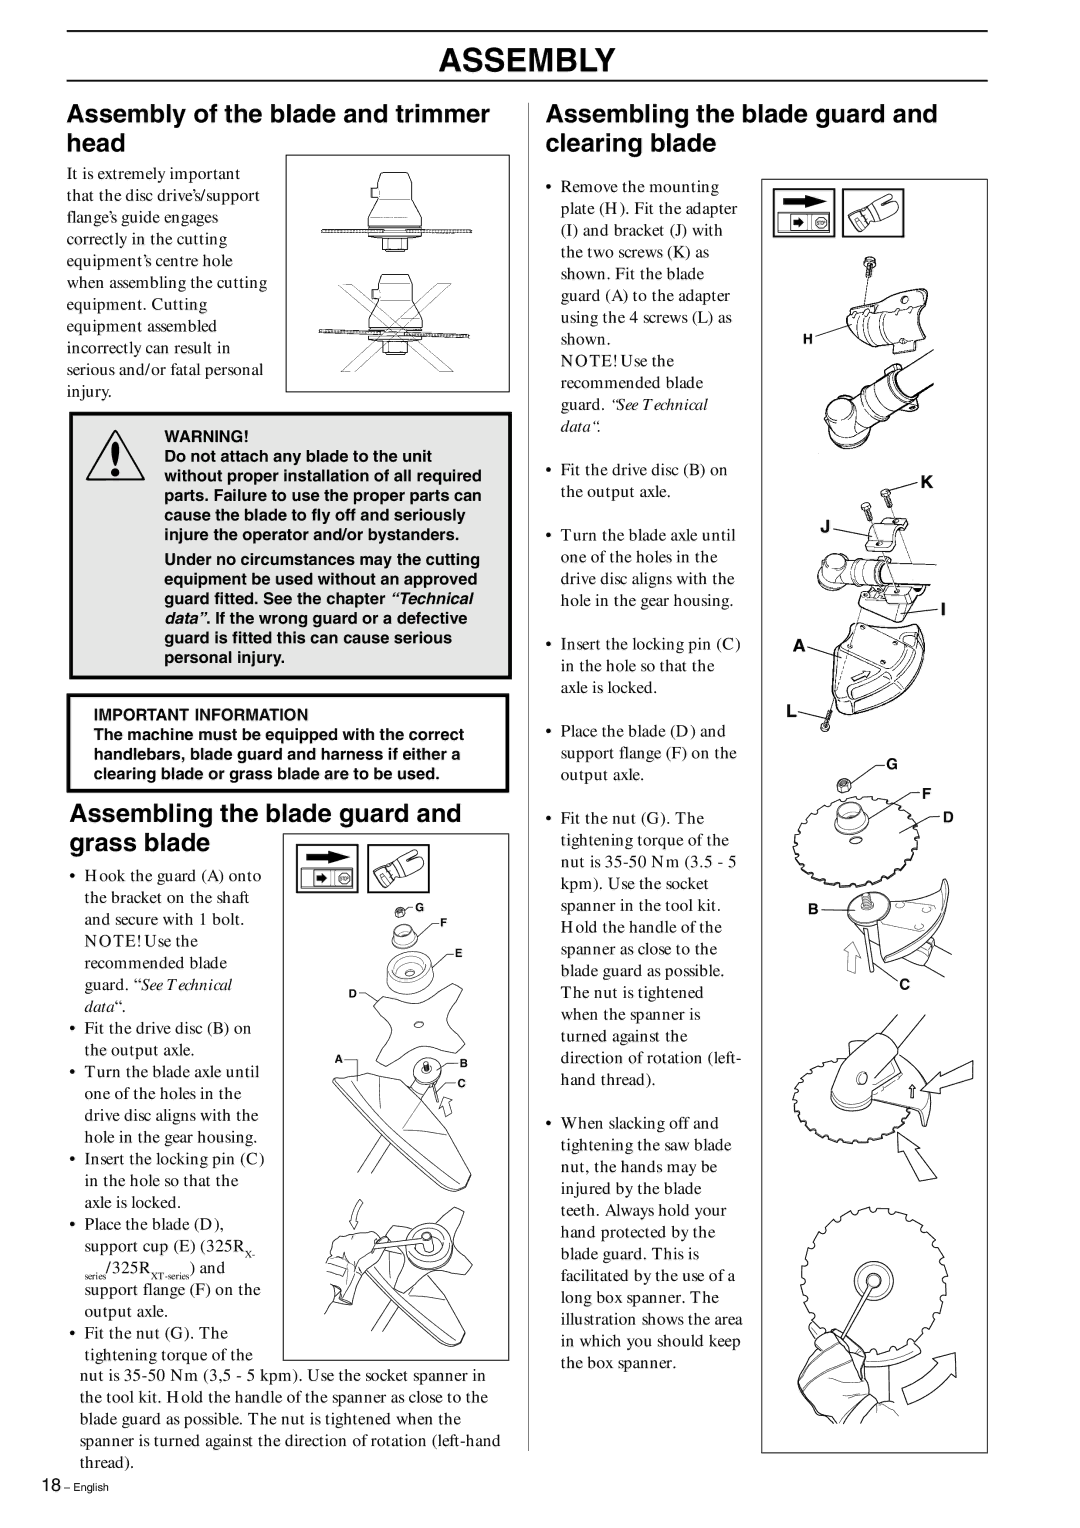
It is extremely important that the disc drive’s/support flange’s guide engages correctly in the cutting equipment’s centre hole when assembling the cutting equipment. Cutting equipment assembled incorrectly can result in serious and/or fatal personal injury.

!WARNING!

Do not attach any blade to the unit without proper installation of all required parts. Failure to use the proper parts can cause the blade to fly off and seriously injure the operator and/or bystanders.

Under no circumstances may the cutting equipment be used without an approved guard fitted. See the chapter “Technical data”. If the wrong guard or a defective guard is fitted this can cause serious personal injury.

IMPORTANT INFORMATION

The machine must be equipped with the correct handlebars, blade guard and harness if either a clearing blade or grass blade are to be used.

Assembling the blade guard and

grass blade


• Hook the guard (A) onto


the bracket on the shaft


G

and secure with 1 bolt.


F

NOTE! Use the


E

recommended blade


guard. “See Technical


D

data“.


• Fit the drive disc (B) on


the output axle.

A

B

• Turn the blade axle until


C

one of the holes in the


drive disc aligns with the


hole in the gear housing.


Insert the locking pin (C) in the hole so that the axle is locked.

Place the blade (D),

support cup (E) (325RX-

series/325RXT-series) and

support flange (F) on the output axle.

Fit the nut (G). The

tightening torque of the

nut is 35-50 Nm (3,5 - 5 kpm). Use the socket spanner in the tool kit. Hold the handle of the spanner as close to the blade guard as possible. The nut is tightened when the spanner is turned against the direction of rotation (left-hand thread).

18 – English

Remove the mounting plate (H). Fit the adapter

(I) and bracket (J) with the two screws (K) as shown. Fit the blade guard (A) to the adapter using the 4 screws (L) as shown.

NOTE! Use the recommended blade guard. “See Technical data“.

Fit the drive disc (B) on the output axle.

Turn the blade axle until one of the holes in the drive disc aligns with the hole in the gear housing.

Insert the locking pin (C) in the hole so that the axle is locked.

Place the blade (D) and support flange (F) on the output axle.

Fit the nut (G). The tightening torque of the nut is 35-50 Nm (3.5 - 5 kpm). Use the socket spanner in the tool kit. Hold the handle of the spanner as close to the blade guard as possible. The nut is tightened when the spanner is turned against the direction of rotation (left- hand thread).

When slacking off and tightening the saw blade nut, the hands may be injured by the blade teeth. Always hold your hand protected by the blade guard. This is facilitated by the use of a long box spanner. The illustration shows the area in which you should keep the box spanner.

G

F

D

B

C

Page 18
Image 18
Husqvarna 325R, 323R manual Grass blade, Guard. See Technical Data

325R, 323R specifications

The Husqvarna 325R and 323R are both impressive trimmers designed for users who demand power, efficiency, and durability in their landscaping equipment. These models showcase Husqvarna's commitment to quality and innovation, making them ideal for both professionals and avid gardeners.

The Husqvarna 325R features a robust 25.4cc X-Torq engine. This engine technology is designed to reduce fuel consumption and emissions, thus promoting eco-friendly gardening. The unit boasts a high power-to-weight ratio, meaning that users can handle heavier workloads without feeling fatigued. The 325R is equipped with a professional-grade gear head that enhances durability while ensuring optimal cutting performance. The trimmer shaft is straight and designed for efficient trimming in hard-to-reach areas.

On the other hand, the Husqvarna 323R also packs a powerful 25cc engine, offering a similar emphasis on reduced emissions and low fuel consumption. With its lightweight design, the 323R provides excellent maneuverability, making it suitable for residential applications as well as light professional work. This model is equipped with an efficient cutting head that utilizes a dual line system for quicker and more effective trimming.

Both models incorporate Smart Start technology, which significantly reduces the effort needed for starting the engine. This feature minimizes resistance in the starter cord, allowing users to get to work quickly. The trimmers also come with an adjustable handle, giving operators the flexibility to achieve the most comfortable grip and stance, resulting in improved control and reduced fatigue during extended use.

Additionally, both the 325R and 323R models are fitted with an anti-vibration system, enhancing comfort for longer sessions. This technology absorbs vibrations, providing a smoother operational experience. The trimmers' fuel tank is designed for extended operation, allowing users to work longer without frequent refueling.

In summary, the Husqvarna 325R and 323R stand out as reliable landscaping tools that cater to a variety of trimming tasks. Both models feature powerful engines, user-friendly technologies, and ergonomic designs that enhance comfort and efficiency. Whether you are a professional landscaper or a dedicated gardener, these trimmers are built to deliver superior performance while prioritizing user satisfaction and environmental responsibility.