Assembly

Your generator requires some assembly and is ready for use after it has been properly serviced with the recommended fuel and oil.

If you have any problems with the assembly of your generator, please call the generator helpline at (877) 224-0458. If calling for assistance, please have the model, revision, and serial number from the data tag available. See Generator Controls and Features for data tag location.

Unpack Generator

1.Set the carton on a rigid, flat surface.

2.Remove everything from carton except generator.

3.Open carton completely by cutting each corner from top to bottom.

4.Leave generator on carton to install wheel kit.

The generator is supplied with:

Engine oil bottle

Battery charge cables

Operator’s manual

Engine operator’s manual

Wheel kit

Install Wheel Kit

The wheel kit is designed to greatly improve the portability of your generator.

NOTE: Wheel kit is not intended for over-the-road use.

You will need the following tool to install these components:

• Needle Nose Pliers

Install the wheel kit as follows:

1.Tip generator up onto handle end.

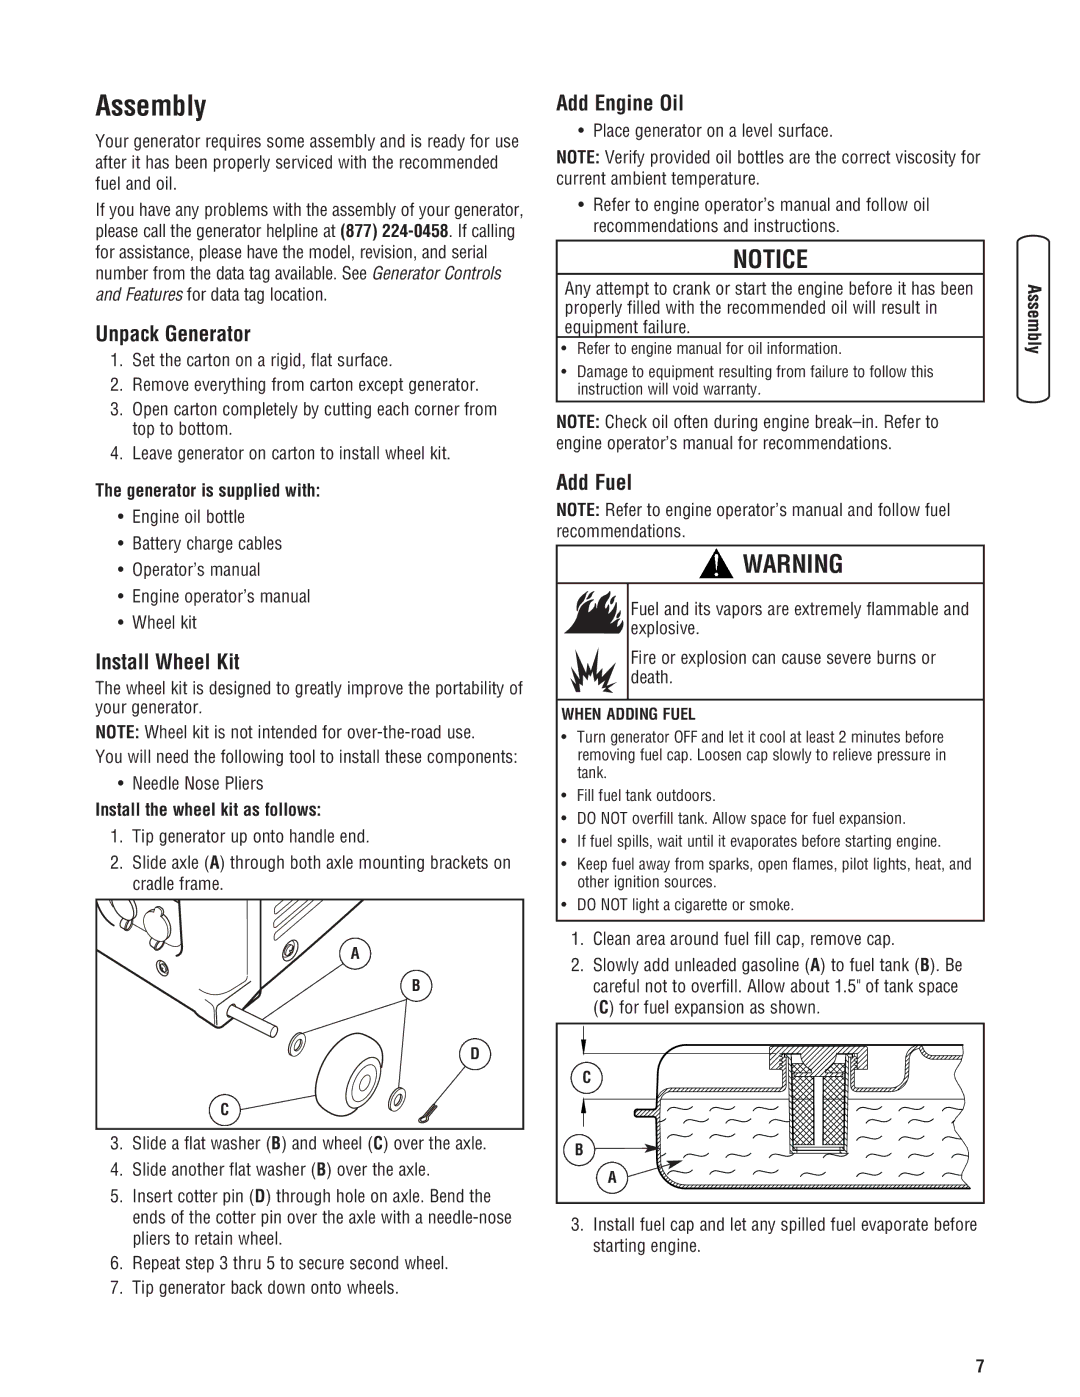
2.Slide axle (A) through both axle mounting brackets on cradle frame.

A

B

D

C

3.Slide a flat washer (B) and wheel (C) over the axle.

4.Slide another flat washer (B) over the axle.

5.Insert cotter pin (D) through hole on axle. Bend the ends of the cotter pin over the axle with a needle-nose pliers to retain wheel.

6.Repeat step 3 thru 5 to secure second wheel.

7.Tip generator back down onto wheels.

Add Engine Oil

• Place generator on a level surface.

NOTE: Verify provided oil bottles are the correct viscosity for current ambient temperature.

Refer to engine operator’s manual and follow oil recommendations and instructions.

NOTICE

Any attempt to crank or start the engine before it has been properly filled with the recommended oil will result in equipment failure.

Refer to engine manual for oil information.

Damage to equipment resulting from failure to follow this instruction will void warranty.

NOTE: Check oil often during engine break–in. Refer to engine operator’s manual for recommendations.

Add Fuel

NOTE: Refer to engine operator’s manual and follow fuel recommendations.

WARNING

Fuel and its vapors are extremely flammable and explosive.

Fire or explosion can cause severe burns or death.

WHEN ADDING FUEL

Turn generator OFF and let it cool at least 2 minutes before removing fuel cap. Loosen cap slowly to relieve pressure in tank.

Fill fuel tank outdoors.

DO NOT overfill tank. Allow space for fuel expansion.

If fuel spills, wait until it evaporates before starting engine.

Keep fuel away from sparks, open flames, pilot lights, heat, and other ignition sources.

DO NOT light a cigarette or smoke.

1.Clean area around fuel fill cap, remove cap.

2.Slowly add unleaded gasoline (A) to fuel tank (B). Be careful not to overfill. Allow about 1.5" of tank space (C) for fuel expansion as shown.

C

B

A

3.Install fuel cap and let any spilled fuel evaporate before starting engine.

7

Page 7
Image 7
Husqvarna 420 GN manual Assembly, Unpack Generator, Install Wheel Kit, Add Engine Oil, Add Fuel

420 GN specifications

The Husqvarna 420 GN is a powerful and versatile garden tool designed to meet the needs of both professional landscapers and dedicated gardening enthusiasts. This robust chainsaw boasts a range of advanced features and technologies that enhance its performance, ensuring efficient and effective cutting in various outdoor tasks.

One of the standout features of the Husqvarna 420 GN is its powerful engine, which provides a remarkable power-to-weight ratio. The excellent performance is complemented by a low vibration design, allowing extended periods of use without discomfort. The chainsaw is equipped with a centrifugal air cleaning system that significantly reduces the amount of debris and dust entering the air filter. This ensures longer operating periods between air filter cleanings and contributes to the overall longevity of the equipment.

The intuitive design of the Husqvarna 420 GN leads to excellent maneuverability. Its lightweight construction allows users to easily handle the chainsaw during various cutting applications, improving efficiency and precision. The front and rear handles are ergonomically designed, providing a secure grip that enhances control, particularly during demanding cutting tasks.

The chainsaw features an X-Torque engine technology, which minimizes fuel consumption and emissions while maintaining high levels of power. This emphasizes Husqvarna’s commitment to sustainability without compromising performance. Additionally, the chainsaw is equipped with an automatic oil pump that optimizes chain lubrication based on usage, ensuring the chain is always properly lubricated for optimal cutting performance.

The chainsaw is also designed for easy maintenance, with a tool-less chain tensioning system that allows users to adjust the chain tension quickly and efficiently without the need for additional tools. The sturdy construction of the Husqvarna 420 GN, coupled with its ideal size for various cutting tasks, makes it a favorite among professionals and avid gardeners alike.

Overall, the Husqvarna 420 GN is an exceptional choice for those seeking a reliable and powerful chainsaw. With its combination of advanced technologies, ergonomic design, and ease of maintenance, it sets a high standard in the world of outdoor power equipment, making it a valuable addition to any toolkit. Whether tackling heavy-duty jobs or handling lighter pruning tasks, the Husqvarna 420 GN delivers excellence in performance and reliability.