BP5

5. Set up

Hose clamps are not completely tight. Please tighten hose clamps prior to using. Hose clamps are left loose to extend life of gaskets and fittings.

Fig. 2

ASSEMBLY OF PUMP HANDLE PUMP LEVER & PUMP MODULE

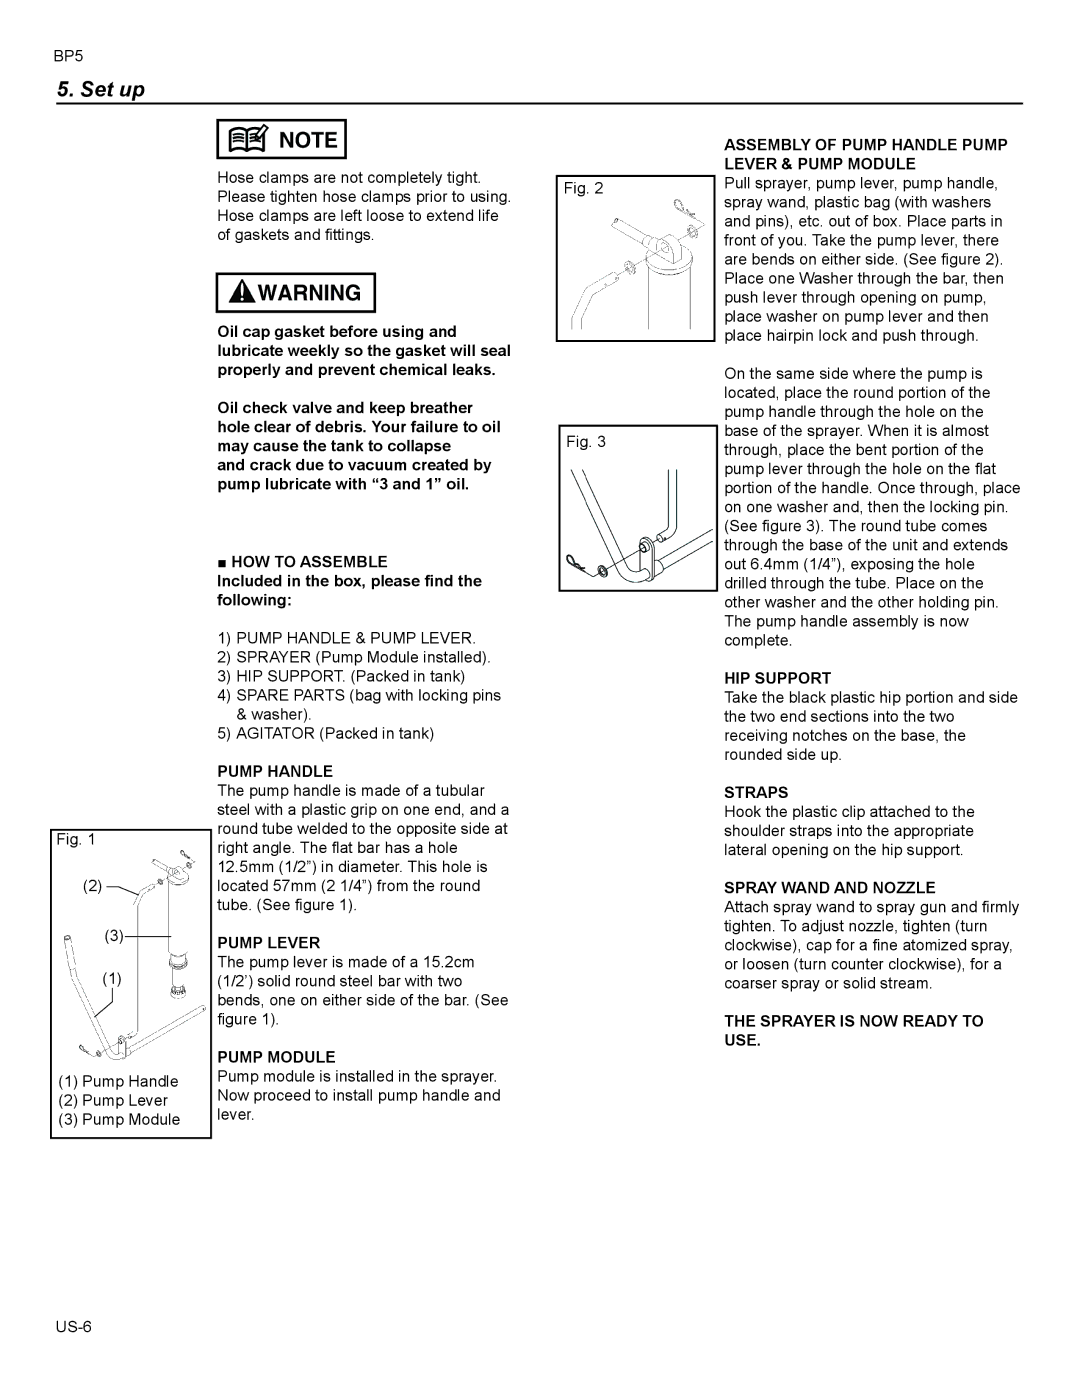
Pull sprayer, pump lever, pump handle, spray wand, plastic bag (with washers and pins), etc. out of box. Place parts in front of you. Take the pump lever, there are bends on either side. (See figure 2). Place one Washer through the bar, then push lever through opening on pump, place washer on pump lever and then

Fig. 1

(2)

(3)

(1)

(1)Pump Handle

(2)Pump Lever

(3)Pump Module

Oil cap gasket before using and lubricate weekly so the gasket will seal properly and prevent chemical leaks.

Oil check valve and keep breather hole clear of debris. Your failure to oil may cause the tank to collapse

and crack due to vacuum created by pump lubricate with “3 and 1” oil.

■ HOW TO ASSEMBLE

Included in the box, please find the following:

1)PUMP HANDLE & PUMP LEVER.

2)SPRAYER (Pump Module installed).

3)HIP SUPPORT. (Packed in tank)

4)SPARE PARTS (bag with locking pins & washer).

5)AGITATOR (Packed in tank)

PUMP HANDLE

The pump handle is made of a tubular steel with a plastic grip on one end, and a round tube welded to the opposite side at right angle. The flat bar has a hole 12.5mm (1/2”) in diameter. This hole is located 57mm (2 1/4”) from the round tube. (See figure 1).

PUMP LEVER

The pump lever is made of a 15.2cm (1/2’) solid round steel bar with two bends, one on either side of the bar. (See figure 1).

PUMP MODULE

Pump module is installed in the sprayer. Now proceed to install pump handle and lever.

Fig. 3

place hairpin lock and push through.

On the same side where the pump is located, place the round portion of the pump handle through the hole on the base of the sprayer. When it is almost through, place the bent portion of the pump lever through the hole on the flat portion of the handle. Once through, place on one washer and, then the locking pin. (See figure 3). The round tube comes through the base of the unit and extends out 6.4mm (1/4”), exposing the hole drilled through the tube. Place on the other washer and the other holding pin. The pump handle assembly is now complete.

HIP SUPPORT

Take the black plastic hip portion and side the two end sections into the two receiving notches on the base, the rounded side up.

STRAPS

Hook the plastic clip attached to the shoulder straps into the appropriate lateral opening on the hip support.

SPRAY WAND AND NOZZLE

Attach spray wand to spray gun and firmly tighten. To adjust nozzle, tighten (turn clockwise), cap for a fine atomized spray, or loosen (turn counter clockwise), for a coarser spray or solid stream.

THE SPRAYER IS NOW READY TO USE.

US-6

Page 6
Image 6
Husqvarna BP5 manual Set up

BP5 specifications

The Husqvarna BP5 is a powerful and versatile backpack blower designed for both professional landscapers and homeowners seeking efficient outdoor maintenance solutions. With its robust construction and advanced technology, the BP5 stands out in the market for its ease of use and high-performance capabilities.

One of the standout features of the Husqvarna BP5 is its highly efficient engine. Powered by a 50.2cc 2-stroke X-Torq engine, this blower offers increased power while reducing fuel consumption and emissions. This technology not only benefits the environment but also allows users to work longer with fewer interruptions for refueling.

The BP5 is designed with ergonomics in mind. Its adjustable harness and padded shoulder straps ensure a comfortable fit, minimizing fatigue during extended use. The fan housing is engineered to provide optimal airflow, resulting in a high blowing force of up to 250 km/h. This impressive airspeed allows users to tackle even the most challenging debris, from leaves to grass clippings, with ease.

Another significant innovation in the Husqvarna BP5 is its LowVib technology, which significantly reduces vibrations from the engine. This feature enhances user comfort and helps to decrease the risk of developing hand-arm vibration syndrome, a concern for those using power tools for lengthy periods.

The BP5 also includes a simple start system, making it easier to initiate the blower with minimal effort. The air filter is easily accessible for quick removal and cleaning, ensuring the engine runs smoothly and efficiently. Additionally, the blower is equipped with a semi-automatic choke for better starting in various weather conditions.

In terms of design, the Husqvarna BP5 boasts a sleek, professional look complemented by its durable materials. Its lightweight construction does not compromise its durability, allowing it to handle the rigors of professional use while remaining manageable for residential users.

Overall, the Husqvarna BP5 backpack blower combines power, efficiency, and user-friendly features, making it an ideal choice for anyone in need of a reliable leaf blower. Whether for professional landscaping or home yard maintenance, the BP5 delivers exceptional performance while prioritizing user comfort and environmental responsibility.