ASSEMBLY

Remove the two (2) bolts and flat washers securing the seat to cardboard packing. Keep the two (2) bolts only and place them with the two (2) identical bolts and four (4) washers in the parts bag. Discard the flat washers and cardboard packing.

Release L.H. seat slide on seat pan by pulling out on adjustment handle and sliding it to the rear position exposing seat mounting holes from bottom. Slide R.H. slide to same rear position.

Mount rear of seat on slides using mounting bolts and lock washers as shown.

Pull out on adjustment handle and slide seat all the way forward. Install front mounting bolts and lock washers. Tighten all mounting bolts securely.

Lower seat into operating position and sit on seat.Press clutch/brake pedal all the way down. If operating posi- tion is not comfortable, adjust seat.

To adjust seat: Grasp adjustment handle and pull out, slide seat to desired position and release adjustment handle.

L.H. SEAT


SLIDE

SEAT


ADJUSTMENT

HANDLE SEAT

PAN

LOCK

WASHERS

02521

R.H. SEAT SLIDE

MOUNTING

BOLTS

FIG. 3

Note: You may now roll or drive your tractor off the skid. Follow the appropriate instruction below to remove the tractor from the skid.

TO ROLL TRACTOR OFF SKID (See Op- eration section for location and function of controls)

Press lift lever plunger and raise attachment lift lever to its highest position.

Release parking brake by depressing brake pedal.

Place freewheel control in "transmission disengaged position" (See “TO TRANSPORT” in the Operation section of this manual).

Roll tractor forward off skid.

TO DRIVE TRACTOR OFF SKID (See Op- eration section for location and function of controls)

WARNING: Before starting, read, understand and follow all instructions in the Operation section of this manual. Be sure tractor is in a well-ventilated area. Be sure the area in front of tractor is clear of other people and objects.

Be sure all the above assembly steps have been com- pleted.

Check engine oil level and fill fuel tank with gasoline.

Place freewheel control in "transmission engaged" position (see "TO TRANSPORT" in Operation section of this manual).

Sit on seat in operating position, depress brake pedal and set the parking brake.

Place motion control lever in neutral (N) position.

Press lift lever plunger and raise attachment lift lever to its highest position.

Start the engine.After engine has started, move throttle control to idle position.

Release parking brake.

Slowly move the motion control lever forward and slowly drive tractor off skid.

Apply brake to stop tractor, set parking brake and place motion control lever in neutral position.

Turn ignition key to "STOP" position.

Continue with the instructions that follow.

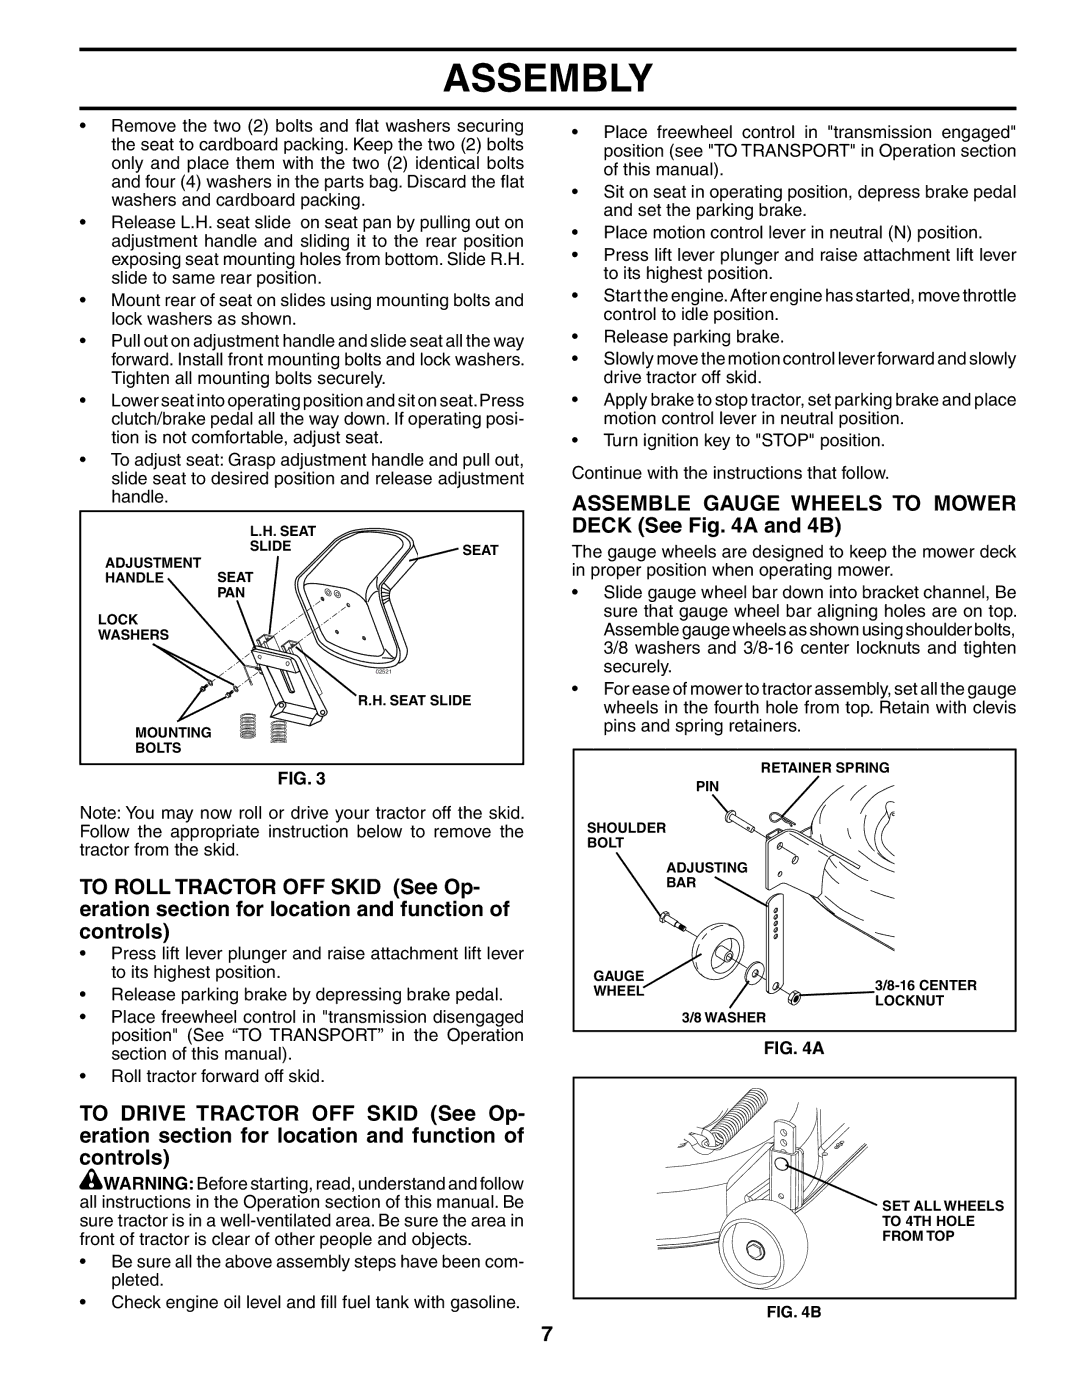
ASSEMBLE GAUGE WHEELS TO MOWER DECK (See Fig. 4A and 4B)

The gauge wheels are designed to keep the mower deck in proper position when operating mower.

Slide gauge wheel bar down into bracket channel, Be sure that gauge wheel bar aligning holes are on top. Assemble gauge wheels as shown using shoulder bolts, 3/8 washers and 3/8-16 center locknuts and tighten securely.

For ease of mower to tractor assembly, set all the gauge wheels in the fourth hole from top. Retain with clevis pins and spring retainers.

RETAINER SPRING

PIN

SHOULDER

BOLT

ADJUSTING

BAR

GAUGE

3/8-16 CENTER

WHEEL

LOCKNUT


3/8 WASHER

FIG. 4A

SET ALL WHEELS

TO 4TH HOLE

FROM TOP

FIG. 4B

7

Page 7
Image 7
Husqvarna GTH2554XP owner manual Assemble Gauge Wheels to Mower Deck See a and 4B

GTH2554XP specifications

The Husqvarna GTH2554XP is a robust and versatile riding lawn mower designed for homeowners who seek efficiency and power in their lawn care routine. This mower is equipped with a powerful 24 HP Briggs & Stratton engine that delivers excellent performance, ensuring that it can tackle even the most challenging terrains with ease. The engine is paired with a hydrostatic transmission, which allows for smooth and effortless speed adjustments without the need for manual gear shifting.

One of the standout features of the GTH2554XP is its cutting deck. The 54-inch cutting deck is designed to provide a wide cutting path, reducing the time required to mow larger areas. The deck is made from high-quality stamped steel, ensuring durability and longevity. Additionally, it comes with a cutting height adjustment feature that allows users to choose from multiple height settings, ensuring a precise cut tailored to their lawn’s needs.

The mower is also designed with comfort in mind. Its ergonomic steering wheel and adjustable seat allow the operator to maintain a comfortable posture during extended mowing sessions. The high-back seat provides excellent lumbar support, making it suitable for long hours of work. Furthermore, the mower features cruise control, enabling users to maintain a steady speed without having to keep their foot on the pedal, thus reducing fatigue.

Another impressive aspect of the Husqvarna GTH2554XP is its innovative technology integration. It is compatible with various attachment options, including mulching kits and baggers, making it a versatile choice for lawn care. The mower’s compact design makes it maneuverable around tight corners and flower beds, providing an efficient mowing experience.

Safety is also a priority with the Husqvarna GTH2554XP; it is equipped with a motion detector that automatically shuts off the engine if the operator leaves the seat. This feature adds an extra layer of safety, especially in households with children or pets.

Overall, the Husqvarna GTH2554XP combines power, comfort, and advanced features to deliver an exceptional mowing experience. Its robust build, efficient engine, and innovative technology make it an ideal choice for homeowners who value quality and performance in their lawn maintenance equipment. Whether tackling a small yard or a larger property, the GTH2554XP stands out as a reliable and efficient solution.