ON COMPLETION OF TRIMMING
Clean grass from under deck. Remove any leaves or grass cuttings from around the engine cooling fins, carburettor and impeller air openings.
AIR FILTER MAINTENANCE
●Your Tecumseh engine is equipped with a dry paper cartridge air filter.
●Every 10 operating hours check condition of paper cartridge.
●Every 50 operating hours (or more regularly) replace the paper cartridge. (see Air Filter Cleaning Instructions number 1).
●Do not attempt to wash, clean or oil the paper cartridge.
●If engine is operating in dustyordirty areas, the air filter system will require more frequent
Air Filter Cleaning Instructions
(see illustration)
1.Turn cover (3) (anti-clockwise) and remove it and filter (2) from flange (1). Discard paper cartridge.
2.Clean cover and flange thoroughly.
3.Insert new cartridge (2) onto flange (1).
4.Position cover (3) against flange (1) with tab (4) on cover inserted into slot (5) in flange (1).
5.Push cover firmly against flange and turn it (clockwise) as far as it will go. Be sure retainers are locked around flange.
1
4
1.When cleaning the air cleaner, also check and clean the debris guard using a soft brush.
2.If debris guard is very dirty, unscrew wing nut and remove debris guard and filter.
3.Wash filter in clean soapy water, rinse, wrap in a clean dry cloth and ‘squeeze dry’.
4.Re-assemble ensuring that the recoil rope passes through the slot in the foam filter.
COOLING SYSTEM AIR INTAKE
Never operate the engine without the debrisguard and filter being fitted. Failure to fit the debris guard and filter will cause premature engine failure.
SPARK PLUG
An oily or carboned spark plug makes starting dif- ficult and decreases the efficiency of the engine. Periodically remove the spark plug and clean and adjust when necessary. Gap setting 0.030”
Do not remove spark plug when engine is hot. Do not sand blast the spark plug to clean it. Remove spark plug lead and spark plug.
WINTER CARE
For trouble-free trimming next season, make sure that your trimmer is serviced immediately after the last cut of the year, as follows:- When the engine is cold, drain all fuel from the tank and then run the engine until it stops. (Fuel left in the machine becomes stale and causes difficult starting). Thoroughlycleanallexternal partsofthetrimmer. Clean air filter (see air filter maintenance).
Inspect, clean and replace spark plug. Do not replace spark plug lead. Check and replace cutting lines.
Store the trimmer in a dry, damp-proof secure area out of the reach of children.
CUTTING LINE
The cutting line is sharp, wear gloves and take care when handling it.
Check the cutting line frequently during use and on completion of trimming.
Removing the Cutting Line
Switch machine off and disconnect spark plug lead.
Push the line towards the centre of the cutting disc and carefully remove. See Fig 3.
Fig. 3
Renewing the Cutting Line
Holding the line with thumb and forefinger and using other thumb as a guide, curve around centre portion of the cutting disc (as illustrated in Fig 4) and thread through the hole on the rim of the cutting disc.
Fig. 4
Carefully pull the line into place as illustrated in Fig. 5.
Fig. 5
At all times the amount of line extending beyond the edge of disc should be of an even length. If there is a variation of more than half an inch between the four lengths of line replace immediately with four full new lengths.
Important:- Only fit four cutting lines at any one time
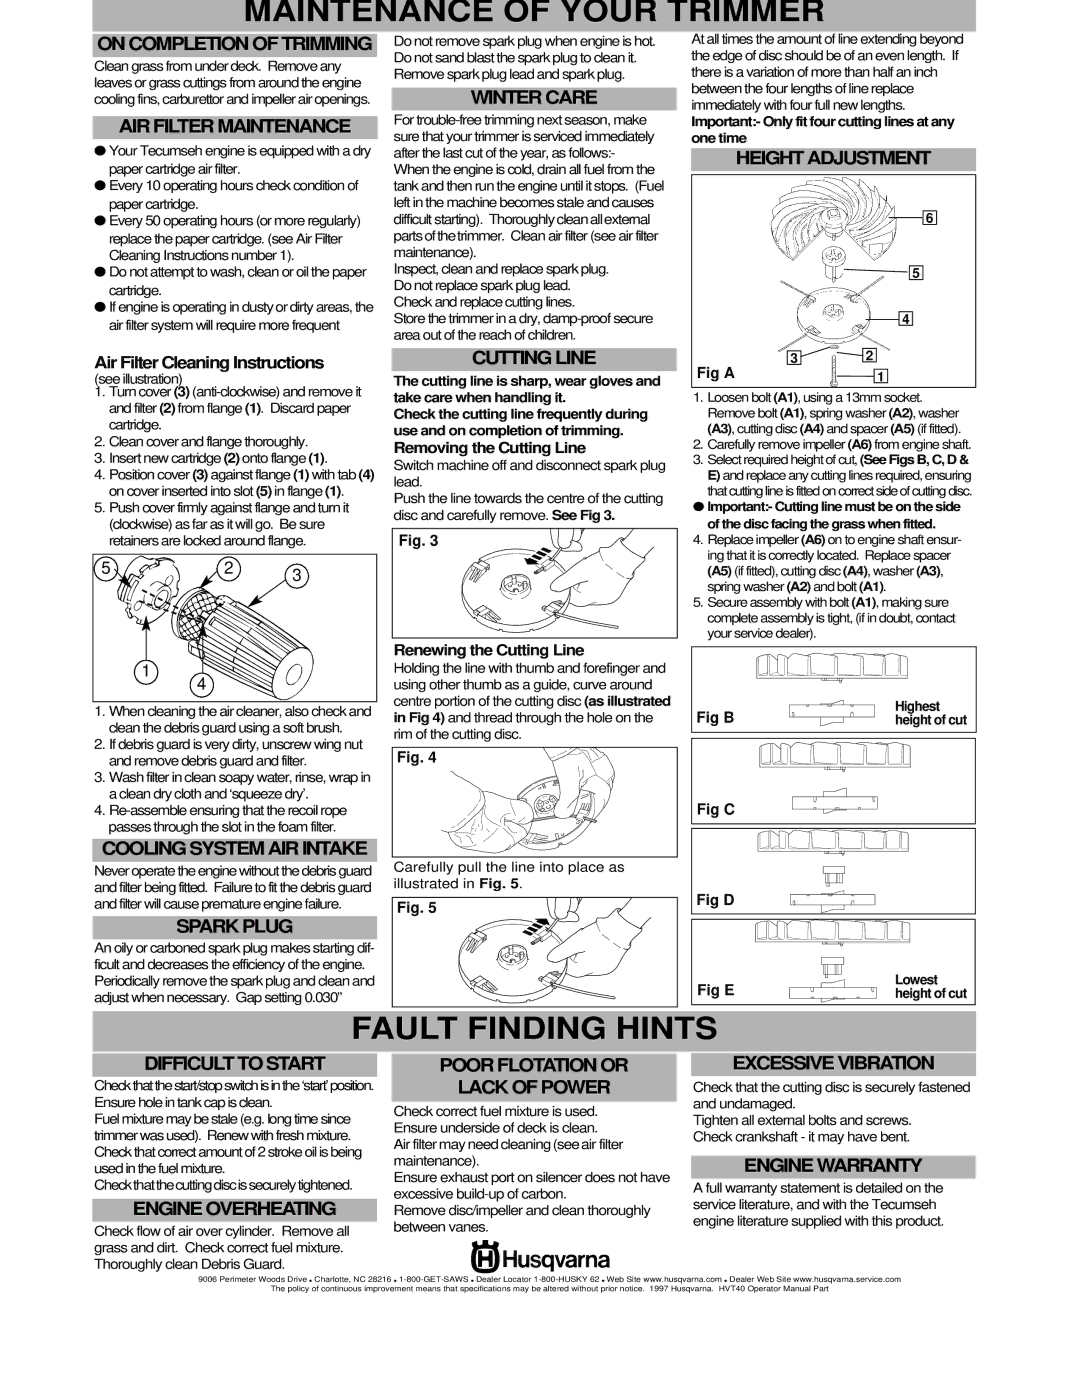
HEIGHT ADJUSTMENT
6
5
4
32
1.Loosen bolt (A1), using a 13mm socket. Remove bolt (A1), spring washer (A2), washer (A3), cutting disc (A4) and spacer (A5) (if fitted).
2.Carefully remove impeller (A6) from engine shaft.
3.Select required height of cut, (See Figs B, C, D &
E) and replace any cutting lines required, ensuring that cutting line is fitted on correct side of cutting disc.
●Important:- Cutting line must be on the side of the disc facing the grass when fitted.
4.Replace impeller (A6) on to engine shaft ensur- ing that it is correctly located. Replace spacer (A5) (if fitted), cutting disc (A4), washer (A3), spring washer (A2) and bolt (A1).
5.Secure assembly with bolt (A1), making sure complete assembly is tight, (if in doubt, contact your service dealer).
Fig B | Highest |
height of cut |
Fig C
Fig D
DIFFICULT TO START
Checkthatthestart/stopswitchisinthe‘start’ position. Ensure hole in tank cap is clean.
Fuel mixture may be stale (e.g. long time since trimmer was used). Renew with fresh mixture. Check that correct amount of 2 stroke oil is being used in the fuel mixture. Checkthatthecuttingdiscissecurelytightened.
ENGINE OVERHEATING
Check flow of air over cylinder. Remove all grass and dirt. Check correct fuel mixture. Thoroughly clean Debris Guard.
POOR FLOTATION OR
LACK OF POWER
Check correct fuel mixture is used. Ensure underside of deck is clean.
Air filtermayneedcleaning(seeair filter maintenance).
Ensure exhaust port on silencer does not have excessive build-up of carbon.
Remove disc/impeller and clean thoroughly between vanes.
EXCESSIVE VIBRATION
Check that the cutting disc is securely fastened and undamaged.
Tighten all external bolts and screws. Check crankshaft - it may have bent.
ENGINE WARRANTY
A full warranty statement is detailed on the service literature, and with the Tecumseh engine literature supplied with this product.