Hyundai Plasma Display
FCC Information
Hyundai Plasma Display
Pixel Defect
Cause
Preventation
Precaution
Panorama, Wide, 43 aspect ratio Box or Still image
You can adjust aspect Ratio as you want
You can change channels while watching TV through F-Scart
Table of Contents
Safety Precaution
Do not use a damaged power cord or plug, or loose outlet
Firmly plug in the power cord so that
Do not install the PDP in a
Do not install on an unstable place
Never attempt to open, fix, or modify the PDP
Do not block ventilating slits
Do not install the product on the floor
Alert
Do not allow children to climb or play on the PDP
+ and marks in the battery compartment
Unplug when you do not use your PDP for a long time
Contents of the Package
Separately Sold Products
Video cable PC signal cable
Wall mounting frame
Parts Names and Functions
Front View
Power input terminal
Stand assembly
DTV Component Current program from Speaker assembly
Phone Jack
Remote Control
To open cover Polarities of + Closed
How to Insert Batteries in Remote Control
Press and hold ∆ part and push Insert batteries with proper
Assembly and Connection Method
How To Use Speakers Standing Type
Parts configuration chart
How To Use Speakers Desk Type
Assembly and Connect method
Speakers left and right
Upright Place them on On the bottom of speakers
How To Install Wall Hanger Support
Angle AdjustmentOption
How To Install Wall mount frame
Installation Method
How To Install Desktop Stand
Connections
Press Channel to select the desired channels
Turn on your PDP and press TV/AV on remote control unit
Press To move between entries. And press
316& !C316
Video/Audio connectors
Connecting a VCR, Cable/Satellite Receiver
Video or S-Video
Connecting a DVD Player
Rear of PDP
Connecting a DTVDigital Broadcast Receiver
DTV Receiver
Playing Back a Tape Recorded On a Camcorder
Connect cables and terminal in the same colors
Player and Audio input terminal of PDP
Video
Connecting to a PCDVI, D-SUB
On remote control unit
Press
PC or DVI
Resolutions Supported in PC
Resolution Horizontal frequency Vertical frequency
Scart Connection to the External Input/Output
Scart or H Scart
Scart Pin Specifications
PIN Signal
Picture Setup
How to Select the Picture Mode
How To Directly Select Picture Mode Press button
How to Set the Desired Picture
Users can manually adjust the picture in their own ways
Press Menu button
Press Left and Right buttons to select
If the Exit button is pressed, the menu disappears
How to Set Blue Screen
Press Left and Right button to ON/OFF
How to Set Film Mode
How to Select a Color Temperature
Users can adjust Color as users want
How to Set PIP Mode
This is to set PIPPicture In Picture mode or Twin mode
How to Set Multi-Screen Input Source/Position/Size
Press Up and Down buttons to move to Position
Right Down Left Down Left Up Right Up
How to Directly Turn PIP Function ON/OFF Press PIP button
How To Directly Adjust PIP Mode & Size Press button
How To Directly Set The Swap Press button
How To Directly Set The Sub Channel Press button
How to Set Noise Reduction
This is to eliminate some noise on the screen in Video mode
How to Select the FitFine Image Technology Engine Mode
OFF Demo on on
Sound Setup
How to Select the Audio Mode
Standard Music Movie News User
Sound Custom menu appears
How to Set the Desired Audio
Users can manually adjust the sound in thier own ways
How to Select AVL
Setup
Press Left and Right buttons to ON/OFF
How to Select SRS WOWSurround
You can enjoy the spectacular, clear and crisp sound
How to Select S. Mode
Users can adjust S. Mode as users want
How To Directly Select S. Mode Press
Button
ON-SCREEN Indication
Sub Woofer menu appears
How to Set the Output of Subwoofer
Choose item, then Press Left and Right buttons to adjust
Channel Setup
Storing Channels Automatically
Channel
Storing Channels Manually
Manual Store menu appears
Ntsc or Secam may not be supported in some regions
Assigning Names to Channel
Press Left and Right buttons to select OK
Skipping Unwanted Channels
Channel Edit menu appears
Press Left and Right buttons to select ADD/DELETE
ADD/DELETE menu appears
Sorting the Stored Channels
Activating the Child Lock
Child Lock menu appears
Fine Tuning Channel Reception
Press Left and Right buttons to adjust Screen
New Menu items appears
Channel number is current channel
Using the LNALow-Noise-Amplifier Feature
Teletext Feature
Teletext OSDOn-Screen-Display Picture
Displaying the Teletext Information
Selecting Display Options
INFO. Table To Store
Return to List or Flof mode
Index Full Level One Facilities
Channel Setup
Function Setup
How to Select the Aspect Ratio
Users can adjust Aspect Ratio as users want
General broadcast picture is adjusted to
General picture size
Picture size for panorama video
Zoom in 169 in vertical direction
Displaying Information
Case of applying TV input
Press Info button
Case of applying Video input
How to Set Key-Lock
Using the Pixel Shift / Full White / Wiper Function
How to Freeze Picture
User can temporarily stop the playing picture
Press Still button Playing picture is stopped
Under multi-screen modePIP, TWIN, the main picture stops
How to Set Dpms
When in PC mode, you can activate Power Saving mode
Choosing the Your Languages
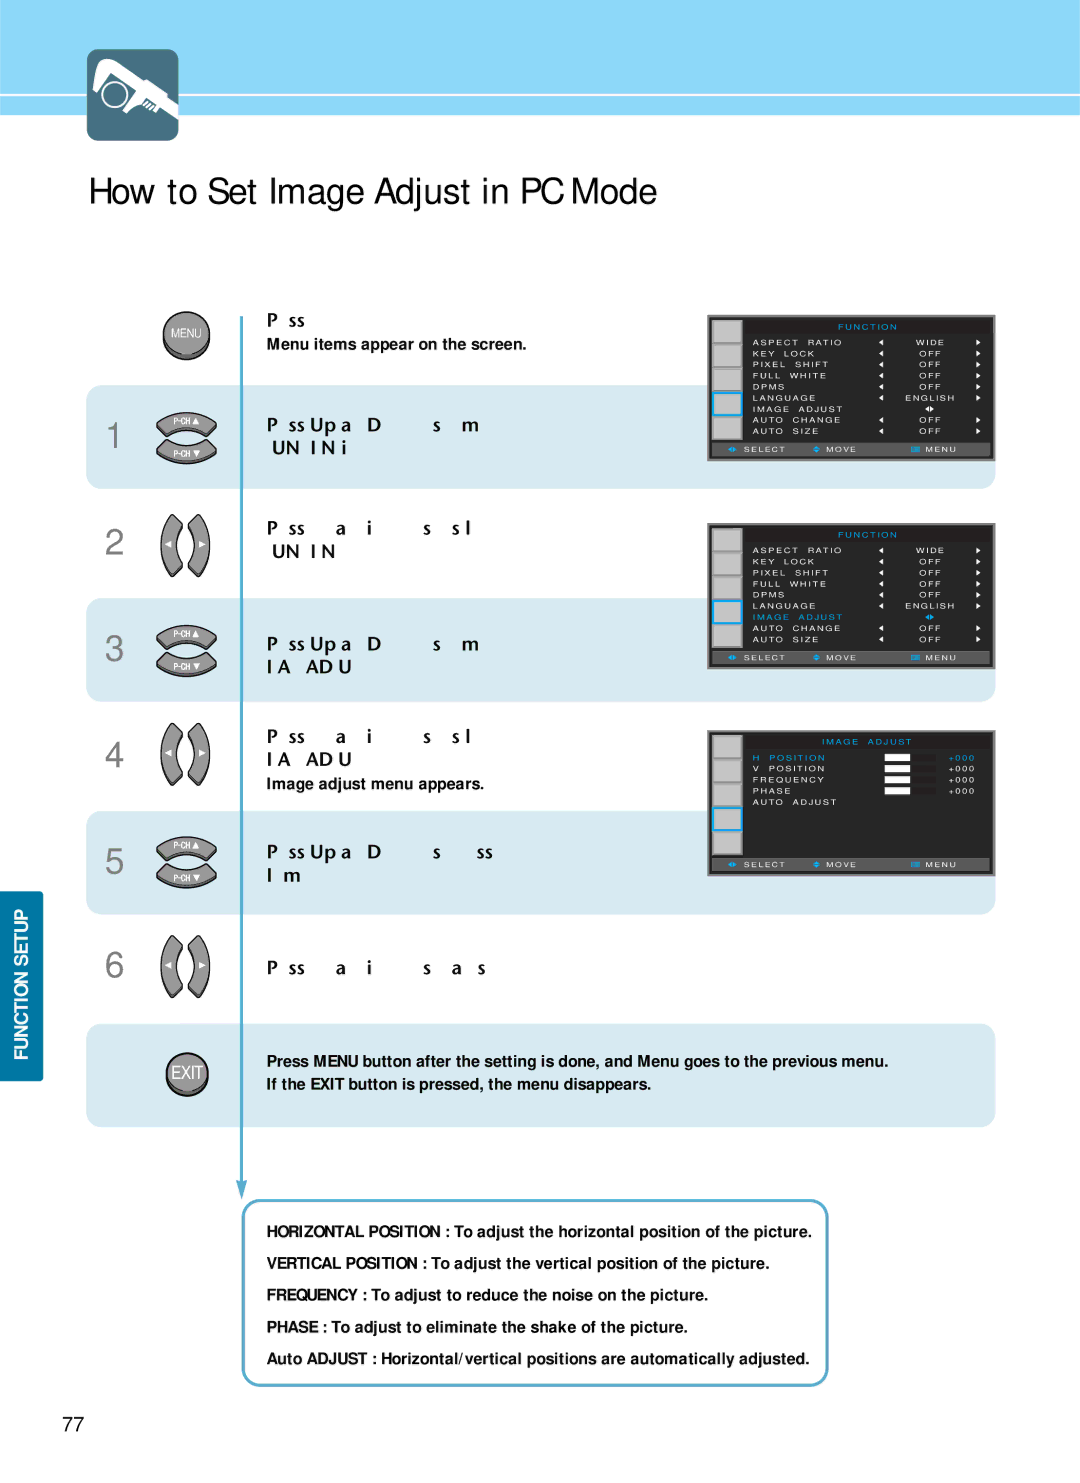
How to Set Image Adjust in PC Mode
Image adjust menu appears
This function is provided in only PC mode
Using the Auto Change
Using the Auto Size
Supported Aspect Ratio Mode
Clock Setup
How to Set Clock
Clock Setup
How to Set On Time
On Time menu appears
M E
How to Set Off Time
Ex To set to 1130 PM
From previous
OFF 30 60 90 120
How to Set Sleep Time
How To Directly Start Sleep Press button
Clock Setup
Appendix
Glossary
Hyundai Plasma Display
Troubleshooting
After setting the time
Auto On does not work
Has been erased
Cable channel
Care and Cleaning
Cabinet Cleaning
Screen Cleaning
Cleaning Inside
Speaker Optional
Product Specifications
Display PDP TV
Component Video Signal Format
Memo
Memo