Manuals
/
IBM
/
Computer Equipment
/
Computer Drive
IBM
ATA-3
manual
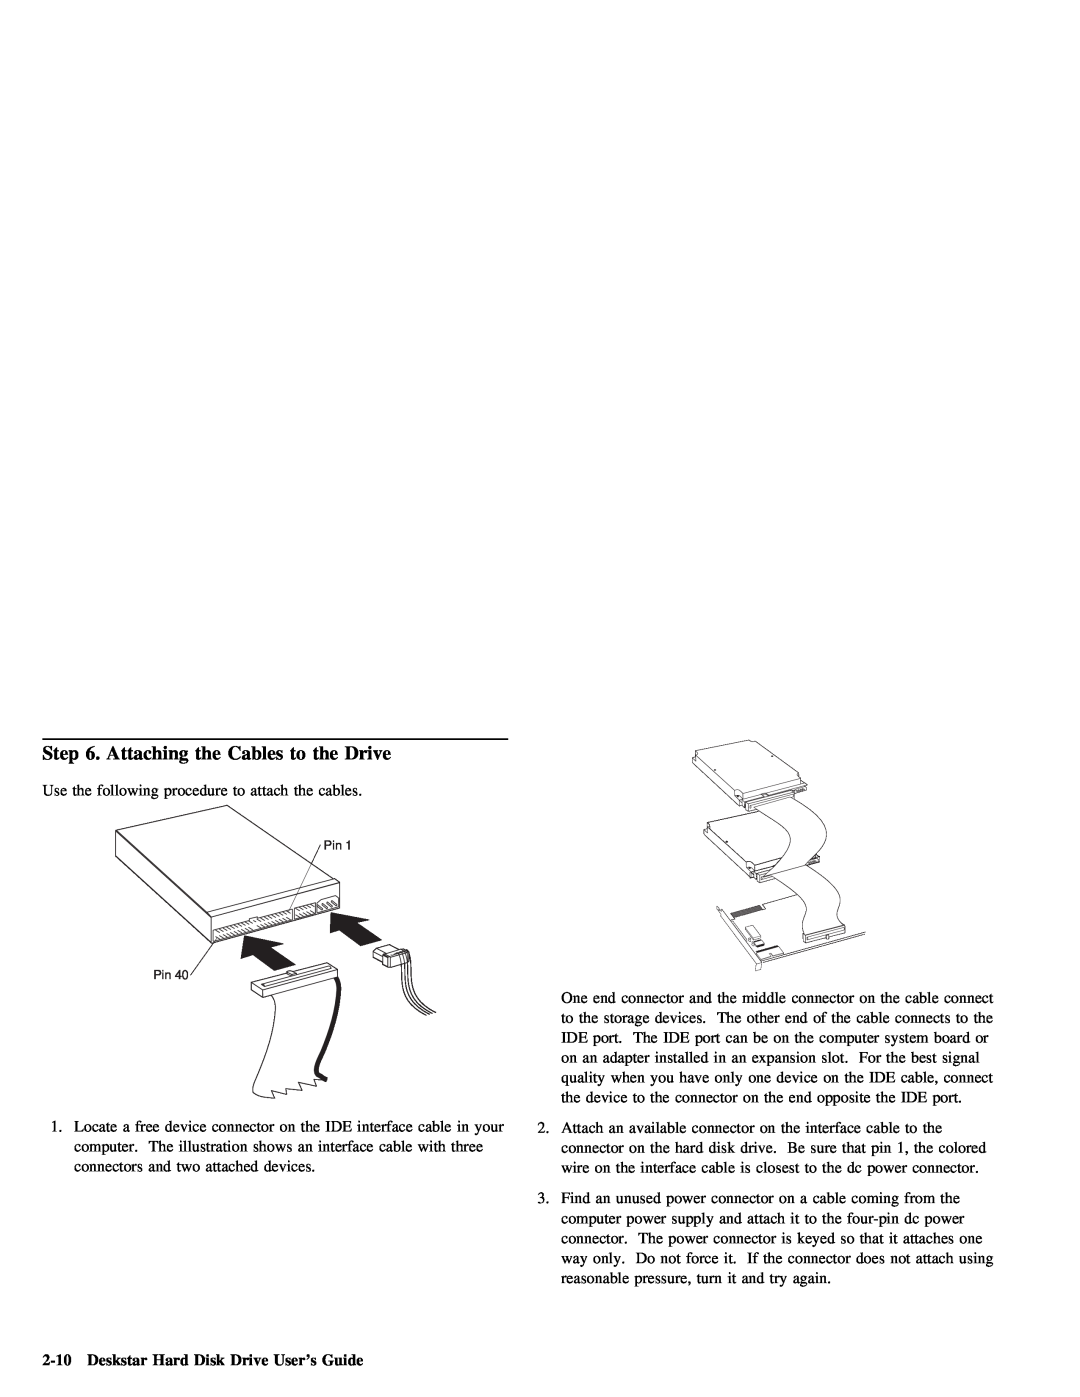
Attaching the Cables to the Drive, Deskstar Hard Disk Drive User’s Guide
Models:
ATA-3
1
66
92
92
Download
92 pages
28.43 Kb
63
64
65
66
67
68
69
70
Install
Configuration
Problem
Diagnostics
Backup Considerations
Handling Precautions
Safety
Service
Update
Using
Page 66
Image 66
Page 65
Page 67
Page 66
Image 66
Page 65
Page 67
Contents
OPTIONS
Deskstar Enhanced IDE ATA-3 Hard Disk Drive
Users Guide
by IBM
First
1997
Installation Guide
Contents
Part 2 Installation Guide
Part
Part
B. Help
iv Deskstar Hard Disk Drive User’s Guide
DO NOT
Safety
Read First
page
Book
This
About
Part
Quick
Installation
Part
Guide
Step 3. Setting the Configuration Jumpers
Master
1-2 Deskstar Hard Disk Drive User’s Guide
Part 1 Quick Installation Guide
Step 4. Installing the Drive in the Drive Bay
Step 5. Connecting the Drive and the Cables
Step 6. Closing the Computer
Next
Enter
1-4 Deskstar Hard Disk Drive User’s Guide
System
Type
Limitations
Detect
1-6 Deskstar Hard Disk Drive User’s Guide
Partitioning and Formatting Using Disk Manager
Easy
Disk
Quick
Installation
German
1-8 Deskstar Hard Disk Drive User’s Guide
Step 3. Setting the Configuration Jumpers
1-10 Deskstar Hard Disk Drive User’s Guide
Enter
System
1-12 Deskstar Hard Disk Drive User’s Guide
less
Detect
1-14 Deskstar Hard Disk Drive User’s Guide
French
1-16 Deskstar Hard Disk Drive User’s Guide
Part 1 Quick Installation Guide
1-18 Deskstar Hard Disk Drive User’s Guide
Part 1 Quick Installation Guide
1-20 Deskstar Hard Disk Drive User’s Guide
Partitioning and Formatting Using Disk Manager
1-22 Deskstar Hard Disk Drive User’s Guide
Spanish
Step 3. Setting the Configuration Jumpers
1-24 Deskstar Hard Disk Drive User’s Guide
Enter
1-26 Deskstar Hard Disk Drive User’s Guide
Detect
1-28 Deskstar Hard Disk Drive User’s Guide
Japanese
1-30 Deskstar Hard Disk Drive User’s Guide
Part 1 Quick Installation Guide
1-32 Deskstar Hard Disk Drive User’s Guide
Part 1 Quick Installation Guide
1-34 Deskstar Hard Disk Drive User’s Guide
Partitioning and Formatting Using Disk Manager
Italian
1-36 Deskstar Hard Disk Drive User’s Guide
Step 3. Setting the Configuration Jumpers
1-38 Deskstar Hard Disk Drive User’s Guide
Enter
1-40 Deskstar Hard Disk Drive User’s Guide
Detect
1-42 Deskstar Hard Disk Drive User’s Guide
Brazilian
Portuguese
1-44 Deskstar Hard Disk Drive User’s Guide
Part 1 Quick Installation Guide
1-46 Deskstar Hard Disk Drive User’s Guide
Part 1 Quick Installation Guide
1-48 Deskstar Hard Disk Drive User’s Guide
Partitioning and Formatting Using Disk Manager
1-50 Deskstar Hard Disk Drive User’s Guide
Description
Product
Installation
Begin
Installation Requirements
Before
IDE bus
tools
Configuration
Size
Drive
2-4 Deskstar Hard Disk Drive User’s Guide
Online
Size
FAT-16
means
Creating
Backup Considerations
Diskette
OS/2
Your
Installing the Drive
Handling Precautions
the most
2-8 Deskstar Hard Disk Drive User’s Guide
Open
Step 5. Mounting the Drive in the Bay
Next
Step
What
Step 6. Attaching the Cables to the Drive
2-10 Deskstar Hard Disk Drive User’s Guide
Preparing
Step 7. Completing the Installation
Drive
2-11
System
Using
Installing
Partitioning
x is
Installing
Windows
Disk
Primary
using
Drive
2-14 Deskstar Hard Disk Drive User’s Guide
Correcting
2-15
Enter
Limitations
Manager
Using
Disk
2-16 Deskstar Hard Disk Drive User’s Guide
File
Booting From a Diskette
Update
2-17
Utilities
Diagnostics
FileCopy
type filecopy
Solving
2-19
Problem
2-20 Deskstar Hard Disk Drive User’s Guide
Appendix A Safety Information
To Disconnect
Part 3 Appendixes
3-2 Deskstar Hard Disk Drive User’s Guide
DO NOT print this page-replace with National Safety Information
Part 3 Appendixes
3-4 Deskstar Hard Disk Drive User’s Guide
DO NOT print this page- replace with National Safety Information
To Connect
3-6 Deskstar Hard Disk Drive User’s Guide
DO NOT print this page- replace with National Safety Information
3-8 Deskstar Hard Disk Drive User’s Guide
DO NOT print this page- replace with National Safety Information
3-10 Deskstar Hard Disk Drive User’s Guide
Information
Service
Appendix B
Call
Computer and BIOS Manufacturers
3-12 Deskstar Hard Disk Drive User’s Guide
Telephone
Manufacturers
3-13
Address
Trademarks
Appendix C Notices
Notices
3-14 Deskstar Hard Disk Drive User’s Guide
Top
Page
Image
Contents