Lens Replacement Manual
This manual describes the procedure for replacing the following lenses.
Lens | Model |
Fixed short throw lens | |
Short throw lens | |
Standard projection lens | Standard Lens |
Long throw lens | |
|
|
Ultra long throw lens | |
|
|
Supplied Accessories
The following accessories are included with each lens.
Lens | Model | Supplied accessories |
Fixed short throw | Fixed short focal length projection lens, louver, lens cap, strap×2, | |
lens | lens replacement manual and option lens user's manual | |
Short throw lens | Short focal length projection lens, louver, lens cap, strap×2, | |
lens replacement manual and option lens user's manual | ||
|
|
|
Standard | Standard | Standard projection lens, |
projection lens | Lens | lens replacement manual and option lens user's manual |
Long throw lens | Long focal length projection lens, zoom window, lens cap, | |
strap, lens replacement manual and option lens user's manual | ||
|
|
|
Ultra long throw | Ultra long focal length projection lens, zoom window, lens cap, | |
lens | strap, lens replacement manual and option lens user's manual |
Important Safety Instructions (Always follow these instructions.) Please read this section on important safety instructions before replacing the projector lens.
To prevent accidents during lens replacement and ensure product safety after replacing the lens, be sure to follow the safety instructions described herein.
●These symbols indicate actions that can result in injury or damage if these operations are not followed correctly.
Warning | This symbol indicates that there is a possibility of serious |
injury or even death if the operation is not followed correctly. | |
|
|
Caution | This symbol indicates that there is a possibility of physical injury |
or damage to equipment if the operation is not followed correctly. | |
|
|
●These symbols indicate the types of precautions that must followed.
| This symbol indicates that |
|
|
|
| This symbol warns of possible |
| caution must be taken. |
|
|
|
| high heat. |
|
|
|
|
| ||
|
|
|
|
|
|
|
| This symbol warns of possible |
|
|
|
| This symbol indicates an action that |
| electrical shock. |
|
|
|
| must not be performed. |
Important Operation Instructions
![]() Warning
Warning
■ Before replacing the projector lens, be sure to read this
manual and the operation manual of the LCD projector for use with this lens.
To ensure safe operations and the continued safety of this product, be sure to follow all of the safety instructions written in this manual and the operation manual of the LCD projector.
■ Do not place the lens in a location subject to direct sunlight or other strong lighting or near
This can cause a fire due to the properties of the lens. It can also cause injury or damage to the lens.
■ Do not subject the lens to shocks.
This can cause injury or damage to the lens.
![]() ■ Be sure to unplug the LCD projector before replacing the lens.
■ Be sure to unplug the LCD projector before replacing the lens.
The inside of the LCD projector has areas of high voltage which can cause electrical shock.
■ Do not touch the fan of the LCD projector during operation.
This can cause injury.
■ Before replacing the lens, be sure to turn off and
unplug the LCD projector, and allow at least 45 minutes for the projector to fully cool.
Before replacing the lens, be sure to turn off and unplug the LCD projector, and allow at least 45 minutes for the projector to fully cool.
![]() ■ When removing the louver, first shut off the projector and wait approximately ten minutes.
■ When removing the louver, first shut off the projector and wait approximately ten minutes.
Removing while the cooling plate is still hot may result in burns.
 ■ When attaching, take care so that dust not enter inside.
Continued use with dust inside may result in fire or electric shock.
![]() Caution
Caution
■ When replacing the lens, do not touch the LCD panels or polariz- ing plates of the LCD projector or subject them to shocks.
This can cause damage to the equipment. It can also cause a misalignment of the optical adjustment and, therefore, require readjustments.
![]() ■ When replacing the lens, be careful not to damage the connectors or wires inside the LCD projector.
■ When replacing the lens, be careful not to damage the connectors or wires inside the LCD projector.
This can cause damage to the equipment. Be careful not to pull on the connectors or wires or get them caught in the circuit board or case.
■ After replacing the lens, part of the lens and louver
(Only for models
Transporting the LCD projector in the original projector shipping box can cause damage to the equipment.
Follow these Instructions
■Do not touch the lens directly with your hands or fingers. This can dirty the lens and cause deterioration in image quality.
■The lens is a precision optical device. Carefully handle the lens without subjecting it to shocks or vibrations.
■When resting the lens on a surface, place the lens face down on a soft cloth.
Replacing the Lens
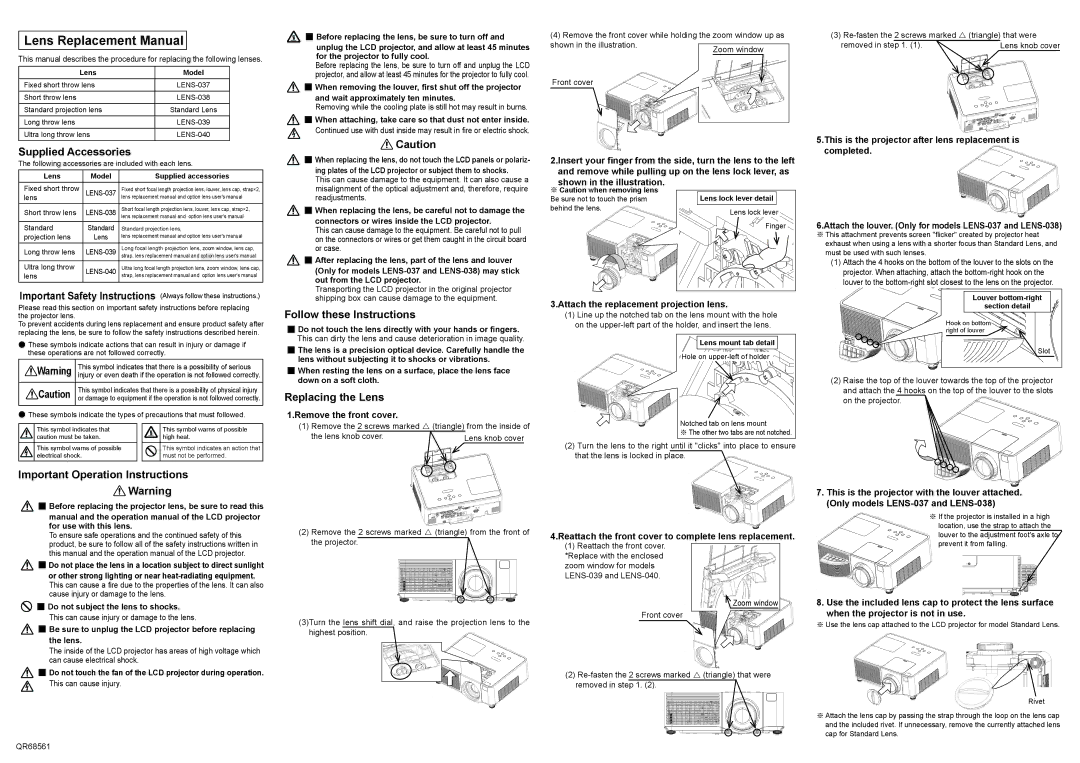
1.Remove the front cover.
(1) Remove the 2 screws marked U (triangle) from the inside of the lens knob cover.
(2)Remove the 2 screws marked U (triangle) from the front of the projector.
(3)Turn the lens shift dial, and raise the projection lens to the highest position.
(4) Remove the front cover while holding the zoom window up as shown in the illustration.
Front cover
2.Insert your finger from the side, turn the lens to the left and remove while pulling up on the lens lock lever, as shown in the illustration.
※Caution when removing lens
Be sure not to touch the prism | Lens lock lever detail | ||||
behind the lens. |
|
|
|
|
|
| Lens lock lever |
| |||
|
|
| |||
|
|
|
| ||
|
|
| Finger | ||
3.Attach the replacement projection lens.
(1)Line up the notched tab on the lens mount with the hole on the
Lens mount tab detail
Hole on
Notched tab on lens mount
※ The other two tabs are not notched.
(2)Turn the lens to the right until it "clicks" into place to ensure that the lens is locked in place.
4.Reattach the front cover to complete lens replacement.
(1)Reattach the front cover. *Replace with the enclosed zoom window for models
Zoom window
Front cover
(2)
(3)
removed in step 1. (1). | Lens knob cover |
5.This is the projector after lens replacement is completed.
6.Attach the louver. (Only for models LENS-037 and LENS-038)
※This attachment prevents screen "flicker" created by projector heat exhaust when using a lens with a shorter focus than Standard Lens, and must be used with such lenses.
(1)Attach the 4 hooks on the bottom of the louver to the slots on the projector. When attaching, attach the
Louver
section detail
Hook on bottom right of louver
Slot
(2)Raise the top of the louver towards the top of the projector and attach the 4 hooks on the top of the louver to the slots on the projector.
7.This is the projector with the louver attached. (Only models
※If the projector is installed in a high location, use the strap to attach the louver to the adjustment foot's axle to prevent it from falling.
8.Use the included lens cap to protect the lens surface
when the projector is not in use.
※Use the lens cap attached to the LCD projector for model Standard Lens.
Rivet
※Attach the lens cap by passing the strap through the loop on the lens cap and the included rivet. If unnecessary, remove the currently attached lens cap for Standard Lens.
QR68561