INSTALLATION AND SETUP
TROUBLESHOOTING
For sealed enclosures, use DBO to enhance the middle of the bass region. Set the HP FREQ control to 35Hz to 40Hz and adjust the BOOST control to taste. This will make the bass sound bigger and fuller. Alternatively, for tighter- sounding bass, set the HP FREQ control between 45Hz and 50Hz, and also adjust the BOOST control according to your preference.
For
INSTALLING NEON TUBES (OPTIONAL)
1.Using a Phillips screwdriver, remove all screws on the amplifier’s output/power end panel and set them aside.
2.Using a
3.Remove the end panel and slide the cover off. Set both parts aside.
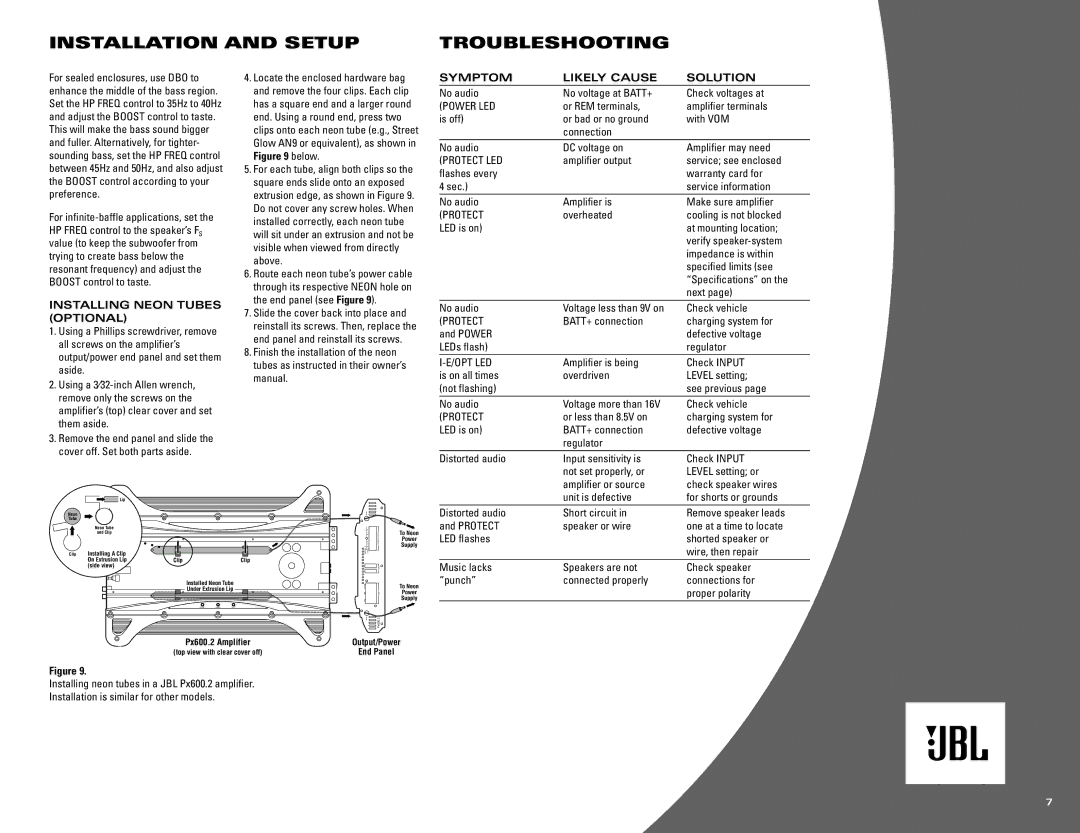
4.Locate the enclosed hardware bag and remove the four clips. Each clip has a square end and a larger round end. Using a round end, press two clips onto each neon tube (e.g., Street Glow AN9 or equivalent), as shown in Figure 9 below.
5.For each tube, align both clips so the square ends slide onto an exposed extrusion edge, as shown in Figure 9. Do not cover any screw holes. When installed correctly, each neon tube will sit under an extrusion and not be visible when viewed from directly above.
6.Route each neon tube’s power cable through its respective NEON hole on the end panel (see Figure 9).
7.Slide the cover back into place and reinstall its screws. Then, replace the end panel and reinstall its screws.
8.Finish the installation of the neon tubes as instructed in their owner’s manual.
SYMPTOM | LIKELY CAUSE | SOLUTION |
No audio | No voltage at BATT+ | Check voltages at |
(POWER LED | or REM terminals, | amplifier terminals |
is off) | or bad or no ground | with VOM |
| connection |
|
No audio | DC voltage on | Amplifier may need |
(PROTECT LED | amplifier output | service; see enclosed |
flashes every |
| warranty card for |
4 sec.) |
| service information |
No audio | Amplifier is | Make sure amplifier |
(PROTECT | overheated | cooling is not blocked |
LED is on) |
| at mounting location; |
|
| verify |
|
| impedance is within |
|
| specified limits (see |
|
| “Specifications” on the |
|
| next page) |
No audio | Voltage less than 9V on | Check vehicle |
(PROTECT | BATT+ connection | charging system for |
and POWER |
| defective voltage |
LEDs flash) |
| regulator |
| Amplifier is being | Check INPUT |
is on all times | overdriven | LEVEL setting; |
(not flashing) |
| see previous page |
No audio | Voltage more than 16V | Check vehicle |
(PROTECT | or less than 8.5V on | charging system for |
LED is on) | BATT+ connection | defective voltage |
| regulator |
|
Distorted audio | Input sensitivity is | Check INPUT |
| not set properly, or | LEVEL setting; or |
| amplifier or source | check speaker wires |
![]() Lip
Lip
Neon
Tube
Neon Tube
and Clip
Clip Installing A Clip On Extrusion Lip (side view)
Clip | Clip |
Installed Neon Tube |
Under Extrusion Lip |
NEON
To Neon
Power
Supply
To Neon
Power
Supply
| unit is defective | for shorts or grounds |
Distorted audio | Short circuit in | Remove speaker leads |
and PROTECT | speaker or wire | one at a time to locate |
LED flashes |
| shorted speaker or |
|
| wire, then repair |
Music lacks | Speakers are not | Check speaker |
“punch” | connected properly | connections for |
|
| proper polarity |
PROTECT | POWER |
Px600.2 Amplifier
(top view with clear cover off)
NEON | Px600.2 |
Output/Power
End Panel
Figure 9.
Installing neon tubes in a JBL Px600.2 amplifier. Installation is similar for other models.
7