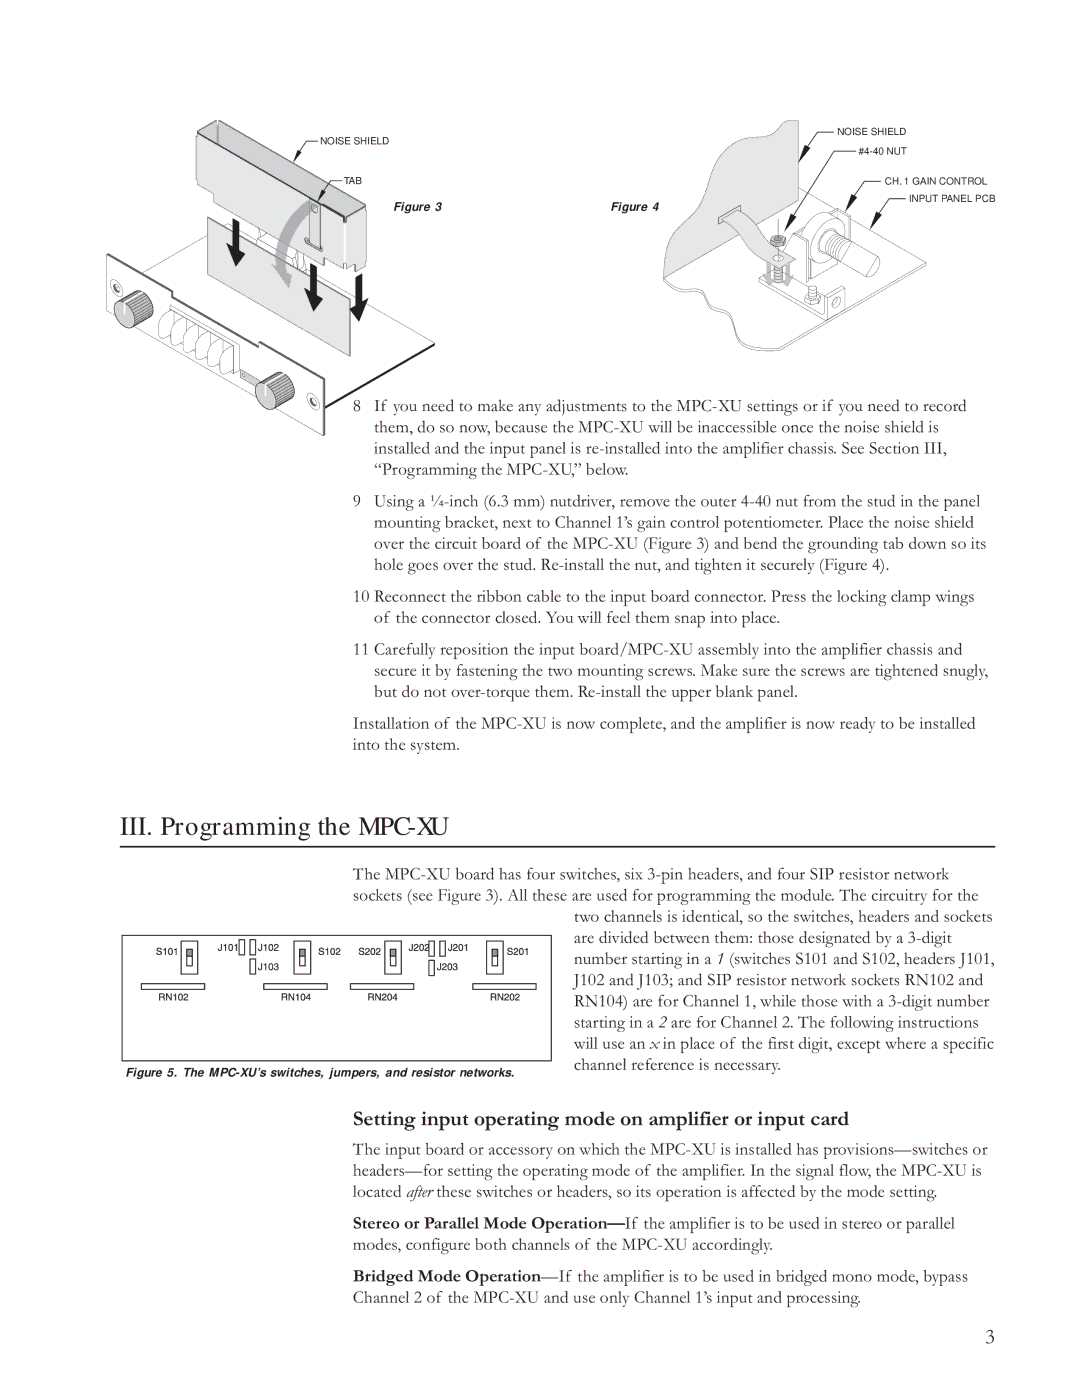
Figure 5. The MPC-XU’s switches, jumpers, and resistor networks.

NOISE SHIELD

TAB

Figure 3

Figure 4

NOISE SHIELD

#4-40 NUT

CH. 1 GAIN CONTROL

INPUT PANEL PCB

8 If you need to make any adjustments to the MPC-XU settings or if you need to record them, do so now, because the MPC-XU will be inaccessible once the noise shield is installed and the input panel is re-installed into the amplifier chassis. See Section III, “Programming the MPC-XU,” below.

9Using a ¼-inch (6.3 mm) nutdriver, remove the outer 4-40 nut from the stud in the panel mounting bracket, next to Channel 1’s gain control potentiometer. Place the noise shield over the circuit board of the MPC-XU (Figure 3) and bend the grounding tab down so its hole goes over the stud. Re-install the nut, and tighten it securely (Figure 4).

10 Reconnect the ribbon cable to the input board connector. Press the locking clamp wings of the connector closed. You will feel them snap into place.

11 Carefully reposition the input board/MPC-XU assembly into the amplifier chassis and secure it by fastening the two mounting screws. Make sure the screws are tightened snugly, but do not over-torque them. Re-install the upper blank panel.

Installation of the MPC-XU is now complete, and the amplifier is now ready to be installed into the system.

III. Programming the MPC-XU

The MPC-XU board has four switches, six 3-pin headers, and four SIP resistor network sockets (see Figure 3). All these are used for programming the module. The circuitry for the

two channels is identical, so the switches, headers and sockets

are divided between them: those designated by a 3-digit

number starting in a 1 (switches S101 and S102, headers J101,

J102 and J103; and SIP resistor network sockets RN102 and RN104) are for Channel 1, while those with a 3-digit number starting in a 2 are for Channel 2. The following instructions will use an x in place of the first digit, except where a specific channel reference is necessary.

Setting input operating mode on amplifier or input card

The input board or accessory on which the MPC-XU is installed has provisions—switches or headers—for setting the operating mode of the amplifier. In the signal flow, the MPC-XU is located after these switches or headers, so its operation is affected by the mode setting.

Stereo or Parallel Mode Operation—If the amplifier is to be used in stereo or parallel modes, configure both channels of the MPC-XU accordingly.

Bridged Mode Operation—If the amplifier is to be used in bridged mono mode, bypass

Channel 2 of the MPC-XU and use only Channel 1’s input and processing.

3

Page 3
Image 3
JBL Professional owner manual III. Programming the MPC-XU, Setting input operating mode on amplifier or input card

MPC-XU specifications

The JBL Professional MPC-XU is a powerful and versatile mixer designed for live sound, broadcast, and studio applications. As part of JBL's commitment to providing high-quality audio solutions, the MPC-XU combines advanced technology with user-friendly features, making it an ideal choice for a variety of sound reinforcement tasks.

One of the standout features of the MPC-XU is its robust design, built to withstand the rigors of touring and demanding environments. The mixer includes high-quality components that ensure durability and reliability over time, along with a streamlined layout that facilitates quick operation and accessibility during live performances.

The MPC-XU boasts a wide range of connectivity options. It is equipped with multiple inputs and outputs, including XLR, TRS, and RCA connections, allowing the user to connect a variety of audio sources and send signals to multiple destinations. This flexibility makes it suitable for complex audio setups commonly encountered in professional environments.

Another key characteristic of the MPC-XU is its powerful built-in processing capabilities. The mixer features high-resolution digital signal processing (DSP), providing users with crystal-clear audio quality. It includes a selection of advanced effects, including EQ, compression, reverb, and more, which can be applied to individual channels or the overall mix. This ensures that sound engineers can shape their audio according to specific requirements, enhancing the listening experience for audiences.

The user interface of the MPC-XU is designed for efficiency and ease of use. It features a clear LCD display that provides real-time feedback on levels and settings, along with intuitive controls for adjusting parameters quickly. This is particularly beneficial during live performances where time is of the essence, allowing sound engineers to focus more on the performance rather than struggling with complex configurations.

Compatibility with various software applications is another strong point of the MPC-XU. It integrates seamlessly with popular digital audio workstations (DAWs), enabling users to capture and manipulate audio effortlessly. This feature supports both recording and playback, making it suitable for studio environments as well.

In conclusion, the JBL Professional MPC-XU is a powerful mixer that is ideal for both live and studio applications. With its robust construction, extensive connectivity options, advanced DSP capabilities, and user-friendly interface, it stands out as a reliable and versatile choice for audio professionals seeking high-quality sound solutions.