Your JENSEN Subwoofer delivers powerful, deep bass sound output for a natural, life-like sonic experience. Please follow the directions in this manual to achieve the best performance from your system.
The hook-up and operation of the Subwoofer is the same for a Home Theater surround sound system or a stereo music system. The Subwoofer has its own built-in amplifier, so it works with any sound system. The Subwoofer’s own crossover network sends bass-only signals to the Subwoofer’s built-in amplifier. This lets the Subwoofer add extra bass to the output from your other speakers.
For simplicity, we call your Home Theater system’s or music system’s main speakers the Front speakers. We call your AV receiver, stereo receiver, or integrated amplifier the Receiver.
Placement
Your JENSEN Subwoofer must sit on the floor, preferably in a corner, to work properly. The floor and corner are actually a part of the Subwoofer’s design.
Place your Subwoofer in the corner nearest your system’s electronic components to keep wire or cable runs short.
Controls & Connections
Power Cord – Plug the power cord into an AC wall outlet or other AC outlet capable of supplying at least 200 Watts.
Power Switch – Turns the AC supply completely OFF or sets the Subwoofer to AUTO ON operation. In AUTO ON, the Subwoofer is in standby mode until it detects an audio signal input, then the Subwoofer turns on automatically. A few minutes after audio input signals cease, the Subwoofer automatically returns to standby mode.
Power Indicator LED – This LED is unlit when the AC power switch is OFF. It glows RED when the subwoofer is in standby mode and GREEN when the subwoofer is on.
FUSE 250V 2A – This fuse protects against internal and external faults. If the POWER switch is ON and the power indicator LED is unlit, unplug the power cord from the AC outlet and check the fuse by unscrewing the cen- ter piece from the holder. IMPORTANT- If the fuse is blown, replace it only with a fuse of the same type and current rating.
L, R SPEAKER-IN and OUT Terminals – See Connection Option 1. These terminals are for making connec- tions using speaker wire. If you use this option, do not use Option 2.
LINE IN Jack – See Connection Option 2. This jack is for input connection using an audio cable. If you use this option, do not use Option 1.
LOW PASS FREQUENCY Control – Adjusts the upper frequency limit for audio signals going to the subwoofer amplifi- er. This control helps you adjust the system's tonal balance.
LEVEL Control – Balances the loudness of the Subwoofer relative to the Front speakers and compensates for room effects on the Subwoofer’s output.
Connecting your Subwoofer
IMPORTANT – When you make connections, make sure that the power switches of all components, including the Subwoofer, are OFF.
Speaker wire Typical speaker wire has a pair of separate conductors with insulating jackets that are molded together. We recommend that you use 16-gauge speaker wire for hooking your Receiver to your Front speakers. To make connections to
the Subwoofer in parallel with the Front speakers easier, the speaker wire connecting the Receiver to the Subwoofer can be smaller (higher gauge number), since the Subwoofer does not draw large amounts of power through these wires.
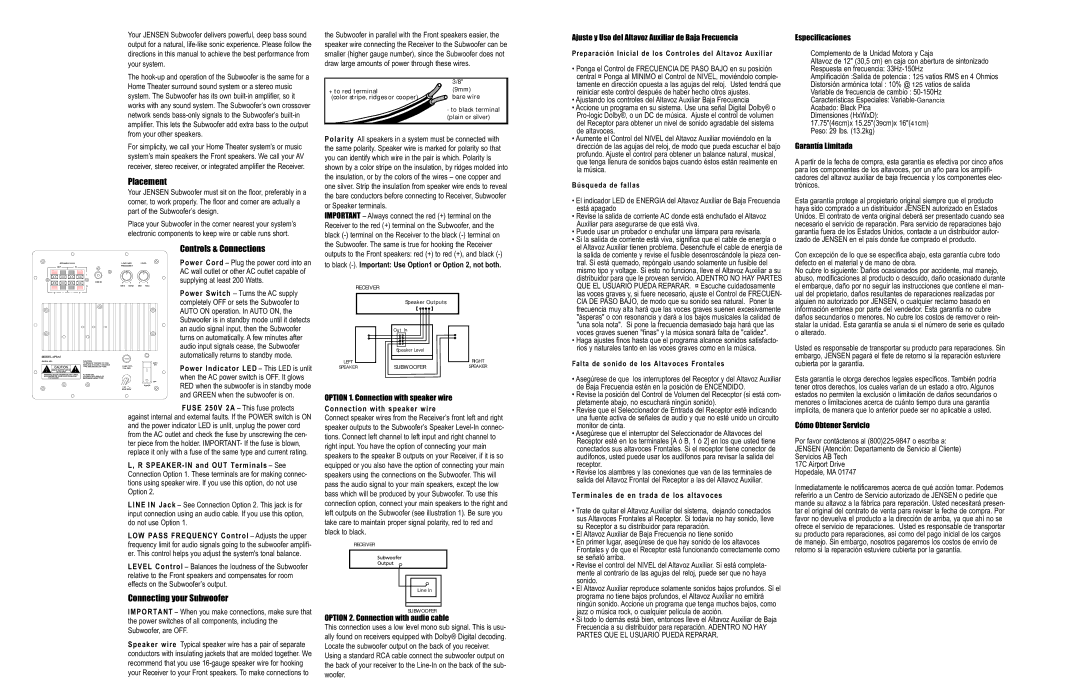
| 3/8" |
+ to red terminal | (9mm) |
(color stripe, ridges or cooper) | bare wire |
| - to black terminal |
| (plain or silver) |
Polarity All speakers in a system must be connected with the same polarity. Speaker wire is marked for polarity so that you can identify which wire in the pair is which. Polarity is shown by a color stripe on the insulation, by ridges molded into the insulation, or by the colors of the wires – one copper and one silver. Strip the insulation from speaker wire ends to reveal the bare conductors before connecting to Receiver, Subwoofer or Speaker terminals.
IMPORTANT – Always connect the red (+) terminal on the Receiver to the red (+) terminal on the Subwoofer, and the black (-) terminal on the Receiver to the black (-) terminal on the Subwoofer. The same is true for hooking the Receiver outputs to the Front speakers: red (+) to red (+), and black (-) to black (-). Important: Use Option1 or Option 2, not both.
RECEIVER
Speaker Outputs
| Out In | |
| Speaker Level | |
LEFT | | RIGHT |
SPEAKER | SUBWOOFER | SPEAKER |
OPTION 1. Connection with speaker wire
Connection with speaker wire
Connect speaker wires from the Receiver’s front left and right speaker outputs to the Subwoofer’s Speaker Level-In connec- tions. Connect left channel to left input and right channel to right input. You have the option of connecting your main speakers to the speaker B outputs on your Receiver, if it is so equipped or you also have the option of connecting your main speakers using the connections on the Subwoofer. This will pass the audio signal to your main speakers, except the low bass which will be produced by your Subwoofer. To use this connection option, connect your main speakers to the right and left outputs on the Subwoofer (see illustration 1). Be sure you take care to maintain proper signal polarity, red to red and black to black.
RECEIVER
Line In
SUBWOOFER
OPTION 2. Connection with audio cable
This connection uses a low level mono sub signal. This is usu- ally found on receivers equipped with Dolby® Digital decoding. Locate the subwoofer output on the back of you receiver.
Using a standard RCA cable connect the subwoofer output on the back of your receiver to the Line-In on the back of the sub- woofer.
Ajuste y Uso del Altavoz Auxiliar de Baja Frecuencia
Preparación Inicial de los Controles del Altavoz Auxiliar
•Ponga el Control de FRECUENCIA DE PASO BAJO en su posición central ¤ Ponga al MINIMO el Control de NIVEL, moviéndolo comple- tamente en dirección opuesta a las agujas del reloj. Usted tendrá que reiniciar este control después de haber hecho otros ajustes.
•Ajustando los controles del Altavoz Auxiliar Baja Frecuencia
•Accione un programa en su sistema. Use una señal Digital Dolby® o Pro-logic Dolby®, o un DC de música. Ajuste el control de volumen del Receptor para obtener un nivel de sonido agradable del sistema de altavoces.
•Aumente el Control del NIVEL del Altavoz Auxiliar moviéndolo en la dirección de las agujas del reloj, de modo que pueda escuchar el bajo profundo. Ajuste el control para obtener un balance natural, musical, que tenga llenura de sonidos bajos cuando éstos están realmente en la música.
Búsqueda de fallas
•El indicador LED de ENERGIA del Altavoz Auxiliar de Baja Frecuencia está apagado
•Revise la salida de corriente AC donde está enchufado el Altavoz Auxiliar para asegurarse de que está viva.
•Puede usar un probador o enchufar una lámpara para revisarla.
•Si la salida de corriente está viva, significa que el cable de energía o el Altavoz Auxiliar tienen problema. Desenchufe el cable de energía de la salida de corriente y revise el fusible desenroscándole la pieza cen- tral. Si está quemado, repóngalo usando solamente un fusible del mismo tipo y voltage. Si esto no funciona, lleve el Altavoz Auxiliar a su distribuidor para que le provean servicio. ADENTRO NO HAY PARTES QUE EL USUARIO PUEDA REPARAR. ¤ Escuche cuidadosamente las voces graves y, si fuere necesario, ajuste el Control de FRECUEN- CIA DE PASO BAJO, de modo que su sonido sea natural. Poner la frecuencia muy alta hará que las voces graves suenen excesivamente "ásperas" o con resonancia y dará a los bajos musicales la calidad de "una sola nota". Si pone la frecuencia demasiado baja hará que las voces graves suenen "finas" y la música sonará falta de "calidez".
•Haga ajustes finos hasta que el programa alcance sonidos satisfacto- rios y naturales tanto en las voces graves como en la música.
Falta de sonido de los Altavoces Frontales
•Asegúrese de que los interruptores del Receptor y del Altavoz Auxiliar de Baja Frecuencia estén en la posición de ENCENDIDO.
•Revise la posición del Control de Volumen del Rececptor (si está com- pletamente abajo, no escuchará ningún sonido).
•Revise que el Seleccionador de Entrada del Receptor esté indicando una fuente activa de señales de audio y que no esté unido un circuito monitor de cinta.
•Asegúrese que el interruptor del Seleccionador de Altavoces del Receptor esté en los terminales [A ó B, 1 ó 2] en los que usted tiene conectados sus altavoces Frontales. Si el receptor tiene conector de audífonos, usted puede usar los audífonos para revisar la salida del receptor.
•Revise los alambres y las conexiones que van de las terminales de salida del Altavoz Frontal del Receptor a las del Altavoz Auxiliar.
Terminales de en trada de los altavoces
•Trate de quitar el Altavoz Auxiliar del sistema, dejando conectados sus Altavoces Frontales al Receptor. Si todavía no hay sonido, lleve su Receptor a su distribuidor para reparación.
•El Altavoz Auxiliar de Baja Frecuencia no tiene sonido
•En primer lugar, asegúrese de que hay sonido de los altavoces Frontales y de que el Receptor está funcionando correctamente como se señaló arriba.
•Revise el control del NIVEL del Altavoz Auxiliar. Si está completa- mente al contrario de las agujas del reloj, puede ser que no haya sonido.
•El Altavoz Auxiliar reproduce solamente sonidos bajos profundos. Si el programa no tiene bajos profundos, el Altavoz Auxiliar no emitirá ningún sonido. Accione un programa que tenga muchos bajos, como jazz o música rock, o cualquier película de acción.
•Si todo lo demás está bien, entonces lleve el Altavoz Auxiliar de Baja Frecuencia a su distribuidor para reparación. ADENTRO NO HAY PARTES QUE EL USUARIO PUEDA REPARAR.
Especificaciones
Complemento de la Unidad Motora y Caja
Altavoz de 12" (30,5 cm) en caja con abertura de sintonizado Respuesta en frecuencia: 33Hz-150Hz
Amplificación :Salida de potencia : 125 vatios RMS en 4 Ohmios
Distorsión armónica total : 10% @ 125 vatios de salida
Variable de frecuencia de cambio : 50-150Hz
Características Especiales: Variable-Ganancia
Acabado: Black Pica Dimensiones (HxWxD):
17.75"(46cm)x 15.25"(39cm)x 16"(41cm) Peso: 29 lbs. (13.2kg)
Garantía Limitada
A partir de la fecha de compra, esta garantía es efectiva por cinco años para los componentes de los altavoces, por un año para los amplifi- cadores del altavoz auxiliar de baja frecuencia y los componentes elec- trónicos.
Esta garantía protege al propietario original siempre que el producto haya sido comprado a un distribuidor JENSEN autorizado en Estados Unidos. El contrato de venta original deberá ser presentado cuando sea necesario el servicio de reparación. Para servicio de reparaciones bajo garantía fuera de los Estados Unidos, contacte a un distribuidor autor- izado de JENSEN en el país donde fue comprado el producto.
Con excepción de lo que se especifica abajo, esta garantía cubre todo defecto en el material y de mano de obra.
No cubre lo siguiente: Daños ocasionados por accidente, mal manejo, abuso, modificaciones al producto o descuido, daño ocasionado durante el embarque, daño por no seguir las instrucciones que contiene el man- ual del propietario, daños resultantes de reparaciones realizadas por alguien no autorizado por JENSEN, o cualquier reclamo basado en información errónea por parte del vendedor. Esta garantía no cubre daños secundarios o menores. No cubre los costos de remover o rein- stalar la unidad. Esta garantía se anula si el número de serie es quitado o alterado.
Usted es responsable de transportar su producto para reparaciones. Sin embargo, JENSEN pagará el flete de retorno si la reparación estuviere cubierta por la garantía.
Esta garantía le otorga derechos legales específicos. También podría tener otros derechos, los cuales varían de un estado a otro. Algunos estados no permiten la exclusión o limitación de daños secundarios o menores o limitaciones acerca de cuánto tiempo dura una garantía implícita, de manera que lo anterior puede ser no aplicable a usted.
Cómo Obtener Servicio
Por favor contáctenos al (800)225-9847 o escriba a: JENSEN (Atención: Departamento de Servicio al Cliente) Servicios AB Tech
17C Airport Drive Hopedale, MA 01747
Inmediatamente le notificaremos acerca de qué acción tomar. Podemos referirlo a un Centro de Servicio autorizado de JENSEN o pedirle que mande su altavoz a la fábrica para reparación. Usted necesitará presen- tar el original del contrato de venta para revisar la fecha de compra. Por favor no devuelva el producto a la dirección de arriba, ya que ahí no se ofrece el servicio de reparaciones. Usted es responsable de transportar su producto para reparaciones, así como del pago inicial de los cargos de manejo. Sin embargo, nosotros pagaremos los costos de envío de retorno si la reparación estuviere cubierta por la garantía.