VM9511TS

USING THE TFT MONITOR

Open/Close TFT Monitor

Open TFT Monitor

Press the OPEN button (1) on the front panel or press the ( ) button (25) of the front zone remote control to activate the mechanism that moves the display panel into the viewing position.

Close TFT Monitor

Press the OPEN button (1) on the front panel or press the ( ) button (25) of the front zone remote control to load the display panel back into the compartment.

TFT Monitor Auto Open

If “TFT Auto Open” is “on” when the unit is turned on, the monitor automatically moves to the viewing position.

If “TFT Auto Open” is ”off” when the unit is turned on, press the OPEN button (1) or ( ) button (25) on the front zone remote control to move the monitor into the viewing position.

If “TFT Auto Open” is set to ”Manual”, the TFT will not close when the key is turned off.

Reverse Driving Use

If the rear-view video camera is connected, the unit is on, and the monitor is stationed inside the main compartment of the unit, the monitor automatically moves into the viewing position and switches to CAMERA mode upon reverse driving. When the reverse driving stops, the monitor returns to the main storage compartment.

If the monitor is in display mode, the monitor automatically switches to CAMERA mode upon reverse driving. When the reverse driving stops, the monitor return to its original input mode.

Monitor Tilt Angle Adjustment

A known characteristic of LCD panels is the quality of the display in relationship to the viewing angle. The monitor angle can be adjusted for optimum viewing using one of the following methods:

Step by Step Angle Adjustment

Press the ( ) or ( ) button (3, 4) on the monitor frame to adjust the tilt angle of the screen one step at a time.

Continuous Angle Adjustment

Press and hold the ( ) or ( ) button (3, 4) on the monitor frame to adjust the tilt angle in a continuous motion.

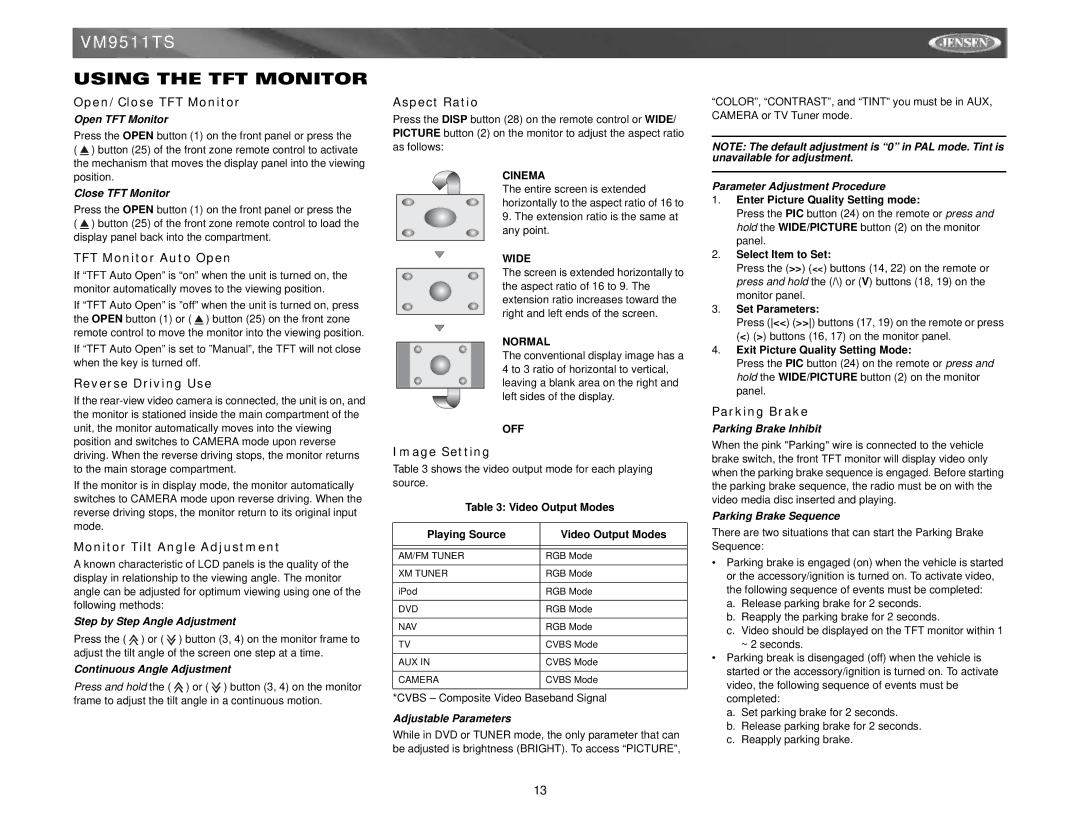
Aspect Ratio

Press the DISP button (28) on the remote control or WIDE/ PICTURE button (2) on the monitor to adjust the aspect ratio as follows:

CINEMA

The entire screen is extended horizontally to the aspect ratio of 16 to

9.The extension ratio is the same at any point.

WIDE

The screen is extended horizontally to the aspect ratio of 16 to 9. The extension ratio increases toward the right and left ends of the screen.

NORMAL

The conventional display image has a 4 to 3 ratio of horizontal to vertical, leaving a blank area on the right and left sides of the display.

OFF

Image Setting

Table 3 shows the video output mode for each playing source.

Table 3: Video Output Modes

Playing Source

Video Output Modes


AM/FM TUNER

RGB Mode


XM TUNER

RGB Mode


iPod

RGB Mode


DVD

RGB Mode


NAV

RGB Mode


TV

CVBS Mode


AUX IN

CVBS Mode


CAMERA

CVBS Mode


*CVBS – Composite Video Baseband Signal

Adjustable Parameters

While in DVD or TUNER mode, the only parameter that can be adjusted is brightness (BRIGHT). To access “PICTURE”,

“COLOR”, “CONTRAST”, and “TINT” you must be in AUX, CAMERA or TV Tuner mode.

NOTE: The default adjustment is “0” in PAL mode. Tint is unavailable for adjustment.

Parameter Adjustment Procedure

1.Enter Picture Quality Setting mode:

Press the PIC button (24) on the remote or press and hold the WIDE/PICTURE button (2) on the monitor panel.

2.Select Item to Set:

Press the (>>) (<<) buttons (14, 22) on the remote or press and hold the (/\) or (V) buttons (18, 19) on the monitor panel.

3.Set Parameters:

Press (<<) (>>) buttons (17, 19) on the remote or press (<) (>) buttons (16, 17) on the monitor panel.

4.Exit Picture Quality Setting Mode:

Press the PIC button (24) on the remote or press and hold the WIDE/PICTURE button (2) on the monitor panel.

Parking Brake

Parking Brake Inhibit

When the pink "Parking" wire is connected to the vehicle brake switch, the front TFT monitor will display video only when the parking brake sequence is engaged. Before starting the parking brake sequence, the radio must be on with the video media disc inserted and playing.

Parking Brake Sequence

There are two situations that can start the Parking Brake Sequence:

Parking brake is engaged (on) when the vehicle is started or the accessory/ignition is turned on. To activate video, the following sequence of events must be completed:

a.Release parking brake for 2 seconds.

b.Reapply the parking brake for 2 seconds.

c.Video should be displayed on the TFT monitor within 1 ~ 2 seconds.

Parking break is disengaged (off) when the vehicle is started or the accessory/ignition is turned on. To activate video, the following sequence of events must be completed:

a.Set parking brake for 2 seconds.

b.Release parking brake for 2 seconds.

c.Reapply parking brake.

13

Page 17
Image 17
Jensen VM9511TS instruction manual Using the TFT Monitor

VM9511TS specifications

The Jensen VM9511TS is a cutting-edge multimedia receiver designed to enhance the in-car entertainment experience while keeping the focus on safety and functionality. One of its standout features is the 6.8-inch touchscreen display, which enables users to easily navigate through different functionalities. The screen boasts a high resolution, ensuring that videos and images are crisp and clear, allowing for an enjoyable viewing experience.

One of the main attractions of the Jensen VM9511TS is its compatibility with various media formats. The receiver supports DVDs, CDs, and a range of digital formats, meaning users can enjoy their favorite content from a variety of sources. The built-in Bluetooth connectivity is another significant feature, enabling hands-free calling and audio streaming from smartphones. This not only enhances convenience but also contributes to safer driving by allowing users to keep their hands on the wheel.

Additionally, the VM9511TS features USB and AUX inputs, providing further options for connecting external devices. Whether it's a flash drive loaded with music or a smartphone through an auxiliary cable, users can easily play their preferred media. The receiver also supports video playback through its rear-view camera input, making it an excellent choice for those looking to enhance their vehicle's safety features.

Audio quality is a key focus of the Jensen VM9511TS, which is equipped with a built-in amplifier. The unit ensures that sound is delivered with clarity and power. It also offers customizable audio settings, allowing users to adjust bass, treble, and balance to suit their preferences. The equalizer settings available provide a tailor-made listening experience, enhancing the enjoyment of any type of music.

Moreover, the Jensen VM9511TS is designed with user-friendliness in mind. Its intuitive interface simplifies navigation, and the responsive touchscreen allows for quick access to functions. The receiver also supports steering wheel controls, allowing users to keep their attention on the road while adjusting settings.

In summary, the Jensen VM9511TS is a versatile multimedia receiver that combines functionality with modern technology. Its range of features, from touchscreen navigation to audio customization, makes it a top choice for those seeking to upgrade their car's entertainment system while ensuring a safe driving environment. With its robust capabilities and user-centric design, the Jensen VM9511TS stands out in the competitive landscape of in-car receivers.