3 1/2-inches

3-inches

31/2-inches

3-inches

S T E P 4

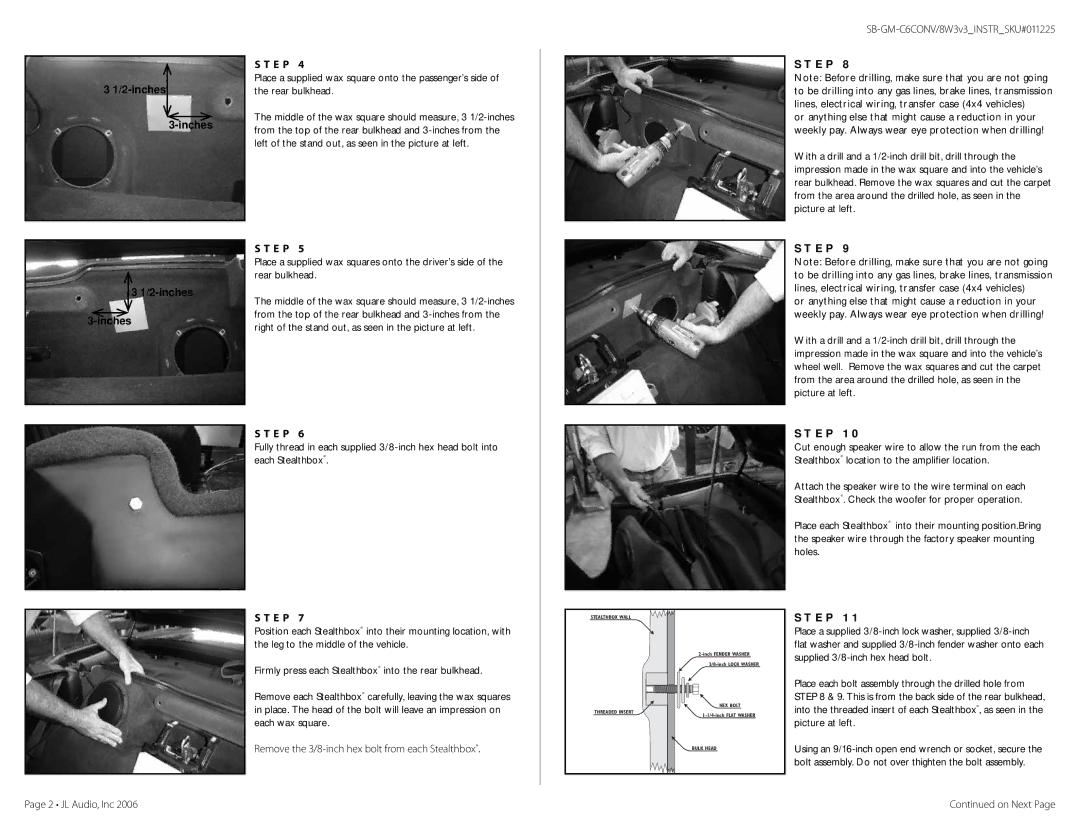
Place a supplied wax square onto the passenger’s side of the rear bulkhead.

The middle of the wax square should measure, 3 1/2-inches from the top of the rear bulkhead and 3-inches from the left of the stand out, as seen in the picture at left.

S T E P 5

Place a supplied wax squares onto the driver’s side of the rear bulkhead.

The middle of the wax square should measure, 3 1/2-inches from the top of the rear bulkhead and 3-inches from the right of the stand out, as seen in the picture at left.

S T E P 6

Fully thread in each supplied 3/8-inch hex head bolt into each Stealthbox®.

S T E P 7

Position each Stealthbox® into their mounting location, with the leg to the middle of the vehicle.

Firmly press each Stealthbox® into the rear bulkhead.

Remove each Stealthbox® carefully, leaving the wax squares in place. The head of the bolt will leave an impression on each wax square.

Remove the 3/8-inch hex bolt from each Stealthbox®.

STEALTHBOX WALL

2-inch FENDER WASHER

3/8-inch LOCK WASHER

HEX BOLT

THREADED INSERT

1-1/4-inch FLAT WASHER

BULK HEAD

SB-GM-C6CONV/8W3v3_INSTR_SKU#011225

S T E P 8

Note: Before drilling, make sure that you are not going to be drilling into any gas lines, brake lines, transmission lines, electrical wiring, transfer case (4x4 vehicles)

or anything else that might cause a reduction in your weekly pay. Always wear eye protection when drilling!

With a drill and a 1/2-inch drill bit, drill through the impression made in the wax square and into the vehicle’s rear bulkhead. Remove the wax squares and cut the carpet from the area around the drilled hole, as seen in the picture at left.

S T E P 9

Note: Before drilling, make sure that you are not going to be drilling into any gas lines, brake lines, transmission lines, electrical wiring, transfer case (4x4 vehicles)

or anything else that might cause a reduction in your weekly pay. Always wear eye protection when drilling!

With a drill and a 1/2-inch drill bit, drill through the impression made in the wax square and into the vehicle’s wheel well. Remove the wax squares and cut the carpet from the area around the drilled hole, as seen in the picture at left.

S T E P 1 0

Cut enough speaker wire to allow the run from the each Stealthbox® location to the amplifier location.

Attach the speaker wire to the wire terminal on each Stealthbox®. Check the woofer for proper operation.

Place each Stealthbox® into their mounting position.Bring the speaker wire through the factory speaker mounting holes.

S T E P 1 1

Place a supplied 3/8-inch lock washer, supplied 3/8-inch flat washer and supplied 3/8-inch fender washer onto each supplied 3/8-inch hex head bolt.

Place each bolt assembly through the drilled hole from STEP 8 & 9. This is from the back side of the rear bulkhead, into the threaded insert of each Stealthbox®, as seen in the picture at left.

Using an 9/16-inch open end wrench or socket, secure the bolt assembly. Do not over thighten the bolt assembly.

Page 2 • JL Audio, Inc 2006

Continued on Next Page

Page 2
Image 2
JL Audio warranty inches Inches E P, SB-GM-C6CONV/8W3v3INSTRSKU#011225, E P 1, JL Audio, Inc

SB-GM-C6CONV/8W3v3 specifications

The JL Audio SB-GM-C6CONV/8W3v3 is a premium subwoofer enclosure meticulously designed for Chevrolet and GMC 2004-2015 Colorado, Canyon, and S10 models. This high-performance product combines outstanding craftsmanship with advanced acoustical design, delivering exceptional bass output that enhances the overall audio experience in your vehicle.

One of the key features of the SB-GM-C6CONV/8W3v3 is its compatibility with the 8W3v3 subwoofer, renowned for its remarkable performance capabilities. The subwoofer offers a high motor strength, delivering deep, precise bass with minimal distortion. The optimized enclosure utilizes JL Audio's extensive engineering expertise to create a configuration that maximizes the 8W3v3's potential, resulting in improved sound quality and efficiency.

The enclosure is constructed from high-quality MDF (Medium-Density Fiberboard), which is known for its rigidity and acoustical properties. Its sturdy construction minimizes vibrations that can interfere with sound production, ensuring that the bass notes remain tight and well-defined. Moreover, the enclosure is finished with a durable black carpet that complements most vehicle interiors while protecting the unit from wear and tear.

Technologically, the SB-GM-C6CONV/8W3v3 features a unique design that allows for easy installation. JL Audio has engineered a precise fit that can be seamlessly integrated into the vehicle’s existing architecture, without having to compromise passenger space. This enclosure is designed to be mounted behind the rear seat, optimizing the use of available space while delivering robust sound performance.

Another important characteristic is its power handling capability. The enclosure is capable of handling up to 600 watts of peak power, allowing the 8W3v3 subwoofer to perform at its best under demanding conditions. This ensures that even the most intense musical tracks are delivered with impactful bass response.

The SB-GM-C6CONV/8W3v3's overall design not only enhances audio performance but also caters to user-friendly installation. It comes with all the necessary terminals for straightforward setup, making it an ideal choice for both enthusiasts and casual listeners seeking an upgrade to their sound system.

In summary, the JL Audio SB-GM-C6CONV/8W3v3 is a high-quality subwoofer enclosure that exemplifies premium audio engineering, impressive power handling, and excellent fitment for select Chevy and GMC models. With its superior design and technology, this product stands out as an extraordinary choice for any car audio aficionado looking to elevate their listening experience.