END PLATE
PLACA DEL EXTREMO
PLAQUE D'EXTREMITE

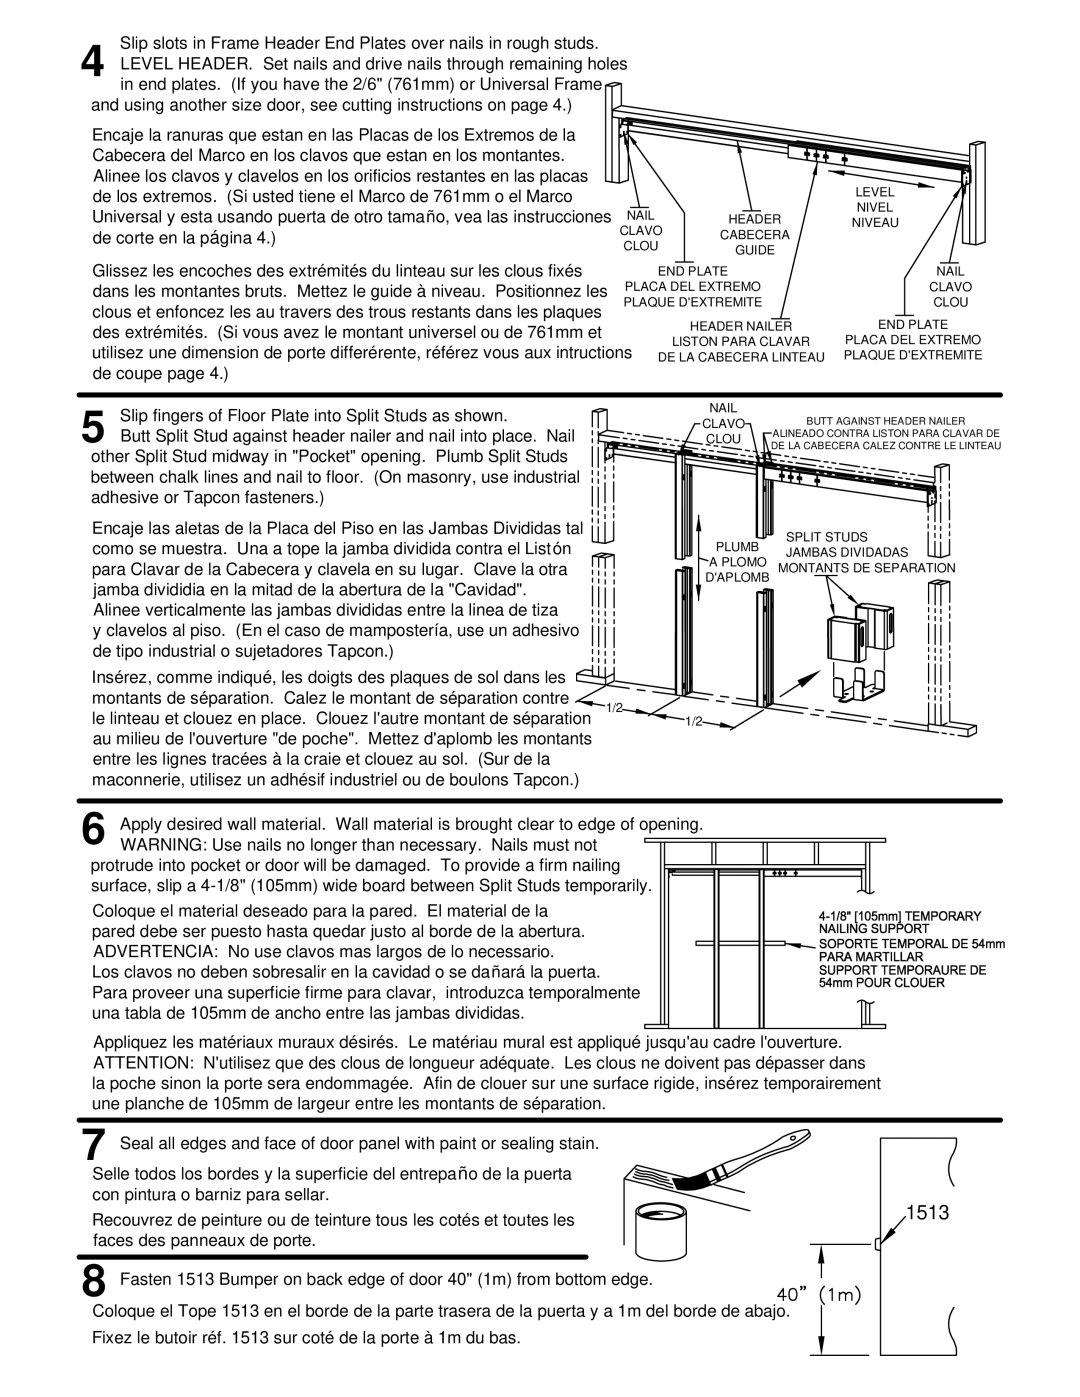
Slip slots in Frame Header End Plates over nails in rough studs.

4 LEVEL HEADER. Set nails and drive nails through remaining holes in end plates. (If you have the 2/6" (761mm) or Universal Frame

and using another size door, see cutting instructions on page 4.)

Encaje la ranuras que estan en las Placas de los Extremos de la Cabecera del Marco en los clavos que estan en los montantes. Alinee los clavos y clavelos en los orificios restantes en las placas de los extremos. (Si usted tiene el Marco de 761mm o el Marco Universal y esta usando puerta de otro tamaño, vea las instrucciones NAIL

de corte en la página 4.)

CLAVO

CLOU


LEVEL

NIVEL

HEADERNIVEAU CABECERA

GUIDE

Glissez les encoches des extrémités du linteau sur les clous fixés dans les montantes bruts. Mettez le guide à niveau. Positionnez les clous et enfoncez les au travers des trous restants dans les plaques des extrémités. (Si vous avez le montant universel ou de 761mm et utilisez une dimension de porte differérente, référez vous aux intructions de coupe page 4.)


NAIL


CLAVO


CLOU

HEADER NAILER

END PLATE

LISTON PARA CLAVAR

PLACA DEL EXTREMO

DE LA CABECERA LINTEAU

PLAQUE D'EXTREMITE

5

Slip fingers of Floor Plate into Split Studs as shown.

Butt Split Stud against header nailer and nail into place. Nail

other Split Stud midway in "Pocket" opening. Plumb Split Studs between chalk lines and nail to floor. (On masonry, use industrial adhesive or Tapcon fasteners.)

NAIL

CLAVO

CLOU

BUTT AGAINST HEADER NAILER

ALINEADO CONTRA LISTON PARA CLAVAR DE DE LA CABECERA CALEZ CONTRE LE LINTEAU

Encaje las aletas de la Placa del Piso en las Jambas Divididas tal como se muestra. Una a tope la jamba dividida contra el Listón para Clavar de la Cabecera y clavela en su lugar. Clave la otra jamba divididia en la mitad de la abertura de la "Cavidad".

Alinee verticalmente las jambas divididas entre la linea de tiza

y clavelos al piso. (En el caso de mampostería, use un adhesivo de tipo industrial o sujetadores Tapcon.)

Insérez, comme indiqué, les doigts des plaques de sol dans les

montants de séparation. Calez le montant de séparation contre 1/2 le linteau et clouez en place. Clouez l'autre montant de séparation au milieu de l'ouverture "de poche". Mettez d'aplomb les montants entre les lignes tracées à la craie et clouez au sol. (Sur de la maconnerie, utilisez un adhésif industriel ou de boulons Tapcon.)

SPLIT STUDS

PLUMB JAMBAS DIVIDADAS

A PLOMO MONTANTS DE SEPARATION D'APLOMB

1/2

6

Apply desired wall material. Wall material is brought clear to edge of opening.

WARNING: Use nails no longer than necessary. Nails must not

protrude into pocket or door will be damaged. To provide a firm nailing surface, slip a 4-1/8" (105mm) wide board between Split Studs temporarily.

Coloque el material deseado para la pared. El material de la pared debe ser puesto hasta quedar justo al borde de la abertura. ADVERTENCIA: No use clavos mas largos de lo necessario. Los clavos no deben sobresalir en la cavidad o se dañará la puerta. Para proveer una superficie firme para clavar, introduzca temporalmente

una tabla de 105mm de ancho entre las jambas divididas.

Appliquez les matériaux muraux désirés. Le matériau mural est appliqué jusqu'au cadre l'ouverture. ATTENTION: N'utilisez que des clous de longueur adéquate. Les clous ne doivent pas dépasser dans la poche sinon la porte sera endommagée. Afin de clouer sur une surface rigide, insérez temporairement une planche de 105mm de largeur entre les montants de séparation.

7 Seal all edges and face of door panel with paint or sealing stain.

Selle todos los bordes y la superficie del entrepaño de la puerta


con pintura o barniz para sellar.

1513

Recouvrez de peinture ou de teinture tous les cotés et toutes les

faces des panneaux de porte.

8 Fasten 1513 Bumper on back edge of door 40" (1m) from bottom edge.

Coloque el Tope 1513 en el borde de la parte trasera de la puerta y a 1m del borde de abajo. Fixez le butoir réf. 1513 sur coté de la porte à 1m du bas.

Page 2
Image 2
Johnson Hardware 15603068, 1560 Series, 15602668 manual 1513

1560 Series, 15602668, 15603068 specifications

The Johnson Hardware 1560 Series is a premier choice for homeowners and contractors seeking high-quality sliding door hardware solutions. Designed to accommodate various door types, this series boasts an array of features and characteristics that ensure optimal performance and aesthetics.

One of the standout features of the Johnson Hardware 1560 Series is its robust construction. Crafted from high-grade materials, the hardware is built to withstand the rigors of daily use while maintaining a sleek appearance. The components are engineered for durability, ensuring that they remain functional and visually appealing even after years of service.

The 1560 Series includes models such as the 15602668 and 15603068, which offer different lengths and configurations to meet a variety of project requirements. Each model is designed to handle doors weighing up to 150 pounds, making them suitable for both residential and commercial applications. This versatility allows users to select the appropriate hardware for their specific needs, ensuring a perfect fit for any sliding door setup.

Technological innovation is at the forefront of the Johnson Hardware 1560 Series. The smooth-glide track system minimizes friction, ensuring effortless door operation. This feature is especially beneficial in high-traffic areas where frequent use of sliding doors can lead to wear and tear. The precision-engineered rollers are designed to provide silent operation, making the opening and closing of doors a seamless experience.

Installation is another area where the Johnson Hardware 1560 Series excels. The hardware comes with clear instructions and all necessary components, making the installation process straightforward, even for DIY enthusiasts. The adjustable components allow for easy customization during installation, ensuring that the doors hang perfectly and operate smoothly.

Aesthetic appeal is also a key consideration in the design of the 1560 Series. Available in multiple finishes, including brushed nickel and oil-rubbed bronze, these hardware options can complement a wide range of interior styles, from modern to rustic. This variety ensures that homeowners can achieve their desired look without sacrificing functionality.

In summary, the Johnson Hardware 1560 Series, including the models 15602668 and 15603068, stands out for its durability, ease of installation, and innovative technology. These sliding door hardware solutions are perfect for those seeking reliable and stylish options for their homes or businesses, making the 1560 Series a top choice in the marketplace.