Step 4:
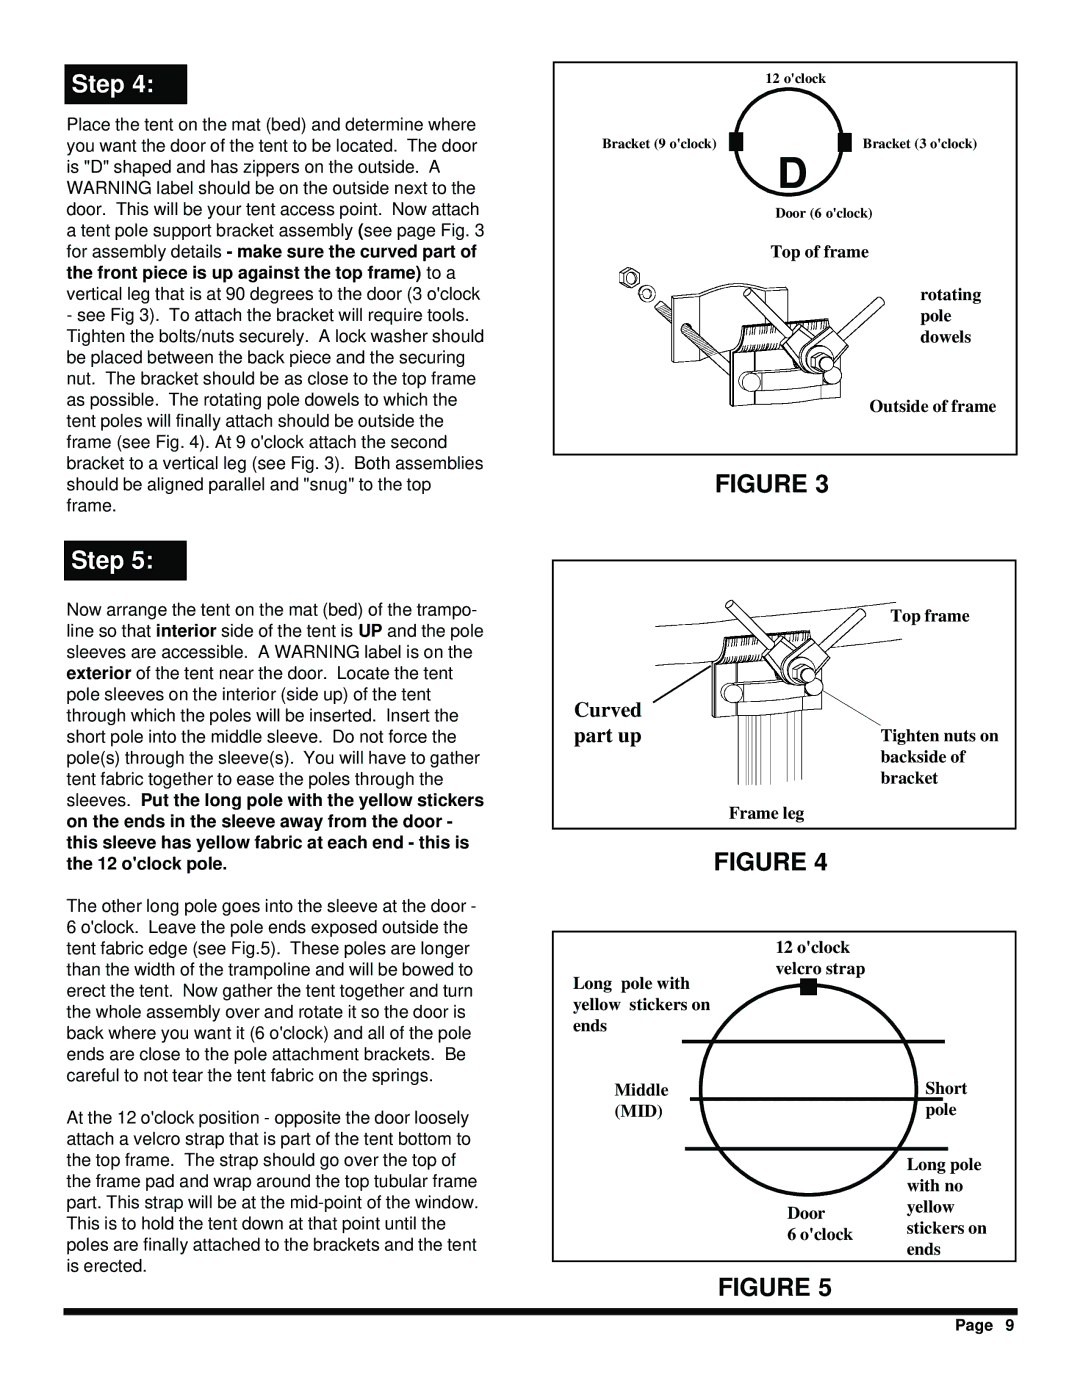
Place the tent on the mat (bed) and determine where you want the door of the tent to be located. The door is "D" shaped and has zippers on the outside. A WARNING label should be on the outside next to the door. This will be your tent access point. Now attach a tent pole support bracket assembly (see page Fig. 3 for assembly details - make sure the curved part of the front piece is up against the top frame) to a vertical leg that is at 90 degrees to the door (3 o'clock
-see Fig 3). To attach the bracket will require tools. Tighten the bolts/nuts securely. A lock washer should be placed between the back piece and the securing nut. The bracket should be as close to the top frame as possible. The rotating pole dowels to which the tent poles will finally attach should be outside the frame (see Fig. 4). At 9 o'clock attach the second bracket to a vertical leg (see Fig. 3). Both assemblies should be aligned parallel and "snug" to the top frame.
Step 5:
Now arrange the tent on the mat (bed) of the trampo- line so that interior side of the tent is UP and the pole sleeves are accessible. A WARNING label is on the exterior of the tent near the door. Locate the tent pole sleeves on the interior (side up) of the tent through which the poles will be inserted. Insert the short pole into the middle sleeve. Do not force the pole(s) through the sleeve(s). You will have to gather tent fabric together to ease the poles through the sleeves. Put the long pole with the yellow stickers on the ends in the sleeve away from the door - this sleeve has yellow fabric at each end - this is the 12 o'clock pole.
The other long pole goes into the sleeve at the door - 6 o'clock. Leave the pole ends exposed outside the tent fabric edge (see Fig.5). These poles are longer than the width of the trampoline and will be bowed to erect the tent. Now gather the tent together and turn the whole assembly over and rotate it so the door is back where you want it (6 o'clock) and all of the pole ends are close to the pole attachment brackets. Be careful to not tear the tent fabric on the springs.
At the 12 o'clock position - opposite the door loosely attach a velcro strap that is part of the tent bottom to the top frame. The strap should go over the top of the frame pad and wrap around the top tubular frame part. This strap will be at the
12 o'clock
Bracket (9 o'clock) |
|
|
| Bracket (3 o'clock) |
|
|
|
|
|
D
Door (6 o'clock)
Top of frame
rotating pole dowels
Outside of frame
FIGURE 3
Top frame
Curved
part up | Tighten nuts on |
| backside of |
| bracket |
| Frame leg |
|
|
| FIGURE 4 |
12 o'clock
velcro strap
Long pole with yellow stickers on
ends
Middle |
|
|
| Short | |||
(MID) |
|
|
|
|
|
| |
|
|
| pole | ||||
|
|
|
|
|
|
|
|
|
|
|
|
| Long pole | ||
|
|
|
|
| with no | ||
|
|
| Door | yellow | |||
|
|
| stickers on | ||||
|
|
| 6 o'clock | ||||
|
|
| ends | ||||
|
|
|
|
| |||
FIGURE 5
Page 9