TUNING

TUNING

DOWN

UP


P. DOWN


P. UP


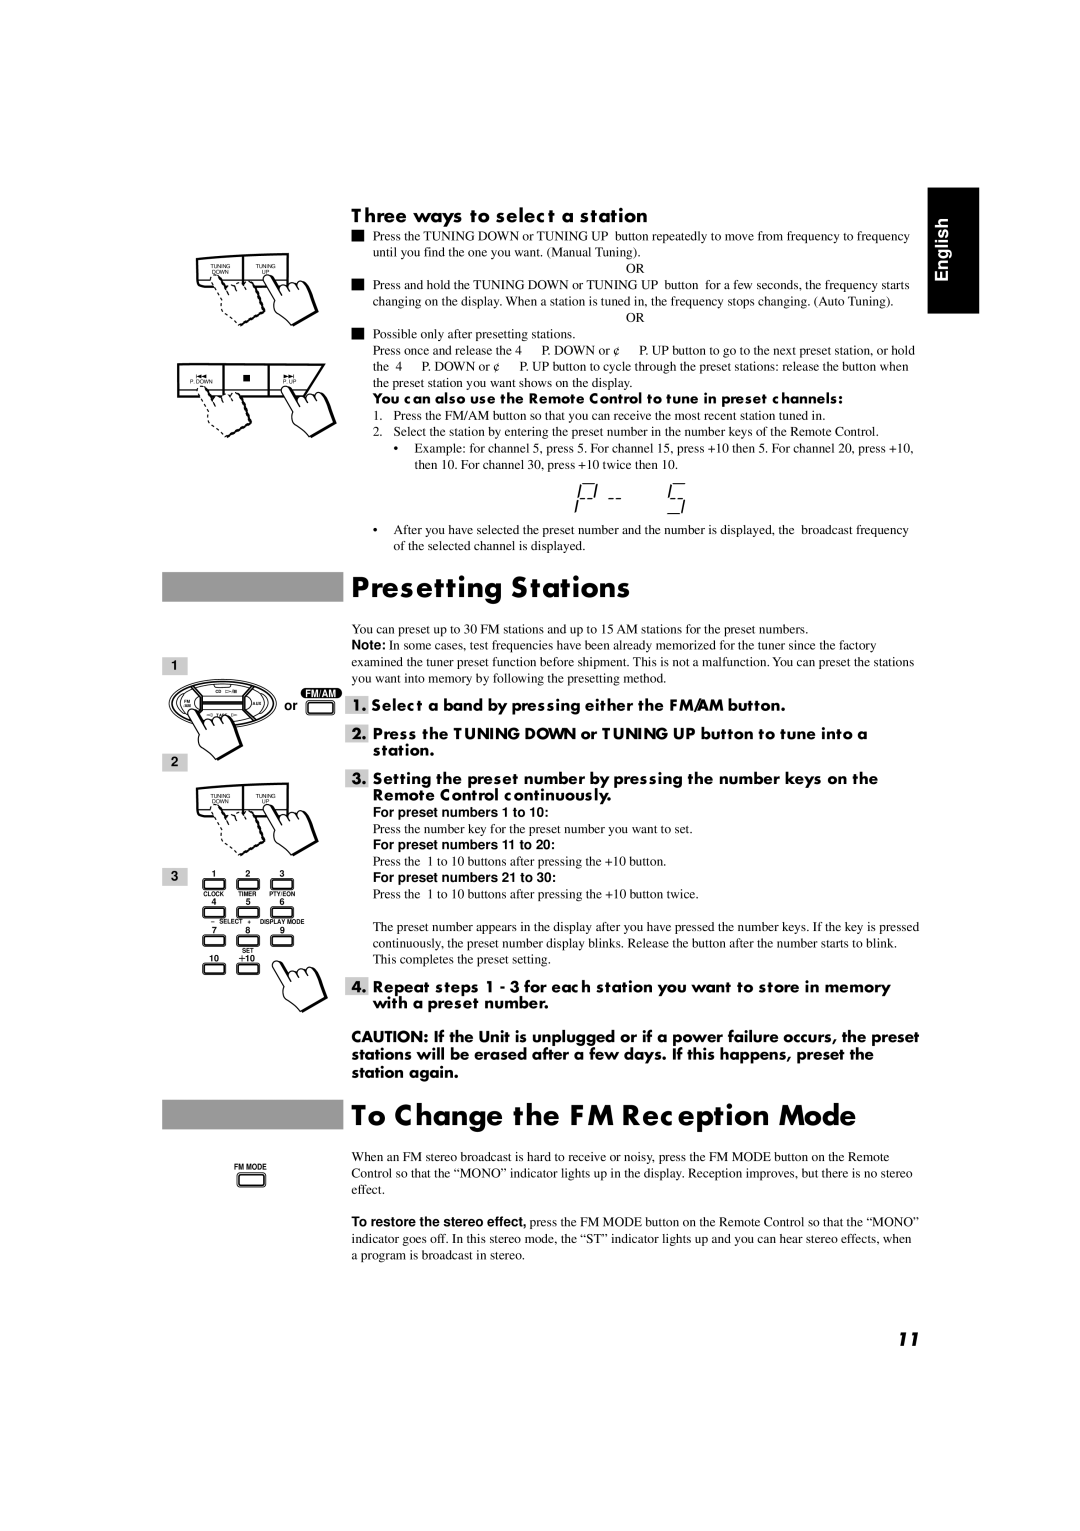
Three ways to select a station

oPress the TUNING DOWN or TUNING UP button repeatedly to move from frequency to frequency until you find the one you want. (Manual Tuning).

OR

o Press and hold the TUNING DOWN or TUNING UP button for a few seconds, the frequency starts changing on the display. When a station is tuned in, the frequency stops changing. (Auto Tuning).

OR

oPossible only after presetting stations.

Press once and release the 4 P. DOWN or ¢P. UP button to go to the next preset station, or hold the 4P. DOWN or ¢ P. UP button to cycle through the preset stations: release the button when the preset station you want shows on the display.

You can also use the Remote Control to tune in preset channels:

1.Press the FM/AM button so that you can receive the most recent station tuned in.

2.Select the station by entering the preset number in the number keys of the Remote Control.

Example: for channel 5, press 5. For channel 15, press +10 then 5. For channel 20, press +10, then 10. For channel 30, press +10 twice then 10.

After you have selected the preset number and the number is displayed, the broadcast frequency of the selected channel is displayed.

English

1

CDFM/AM

FM

AUX

or

/AM


TAPE


2

TUNING

TUNING

DOWN

UP


3 1 2 3

CLOCK TIMER PTY/EON

4 5 6

– SELECT + DISPLAY MODE

7 8 9

SET

10 10

Presetting Stations

You can preset up to 30 FM stations and up to 15 AM stations for the preset numbers.

Note: In some cases, test frequencies have been already memorized for the tuner since the factory examined the tuner preset function before shipment. This is not a malfunction. You can preset the stations you want into memory by following the presetting method.

1.Select a band by pressing either the FM/AM button.

2.Press the TUNING DOWN or TUNING UP button to tune into a station.

3.Setting the preset number by pressing the number keys on the Remote Control continuously.

For preset numbers 1 to 10:

Press the number key for the preset number you want to set.

For preset numbers 11 to 20:

Press the 1 to 10 buttons after pressing the +10 button.

For preset numbers 21 to 30:

Press the 1 to 10 buttons after pressing the +10 button twice.

The preset number appears in the display after you have pressed the number keys. If the key is pressed continuously, the preset number display blinks. Release the button after the number starts to blink. This completes the preset setting.

4.Repeat steps 1 - 3 for each station you want to store in memory with a preset number.

CAUTION: If the Unit is unplugged or if a power failure occurs, the preset stations will be erased after a few days. If this happens, preset the station again.

FM MODE

To Change the FM Reception Mode

When an FM stereo broadcast is hard to receive or noisy, press the FM MODE button on the Remote Control so that the “MONO” indicator lights up in the display. Reception improves, but there is no stereo effect.

To restore the stereo effect, press the FM MODE button on the Remote Control so that the “MONO” indicator goes off. In this stereo mode, the “ST” indicator lights up and you can hear stereo effects, when a program is broadcast in stereo.

11

Page 15
Image 15
JVC CA-D551TR, CA-D351TR, CA-D451TR Presetting Stations, To Change the FM Reception Mode, Three ways to select a station

CA-D451TR, CA-D351TR, CA-D551TR specifications

JVC has long been recognized as a leader in audio technology, and their CA-D series of mini hi-fi systems—specifically the CA-D551TR, CA-D351TR, and CA-D451TR—showcase the brand's commitment to delivering high-quality sound in compact packages. These models combine sleek design with advanced features, making them suitable for a range of listening preferences, from casual enjoyment to more serious audiophile experiences.

The JVC CA-D551TR stands out for its powerful audio output, equipped with a robust amplifier that delivers rich sound across various genres. With a total output of 40 watts, this system ensures that music fills the room with clarity and depth. The integrated CD player is compatible with CD-R and CD-RW formats, allowing users to play their favorite albums or personal compilations. Additionally, this model features FM and AM radio tuners, giving users access to a wide array of live broadcasts.

Moving to the CA-D351TR, this model offers a slightly lower power output but maintains high audio fidelity. Its focused design makes it perfect for smaller spaces, ensuring that even in compact environments, users can enjoy a full-fledged audio experience. The CA-D351TR also comes with a USB port, allowing users to play music directly from flash drives, a significant convenience for those who prefer digital music files over physical media.

The CA-D451TR packs a punch with superior sound quality and enhanced connectivity options. Featuring Bluetooth technology, this model allows users to stream music wirelessly from smartphones and tablets, making it an excellent choice for tech-savvy individuals. The model also includes multiple EQ settings, enabling listeners to tailor the sound to their liking, resulting in an engaging listening experience.

In terms of characteristics, all three models come with a stylish and compact design, making them easy to integrate into any home or office setup. They feature straightforward controls and a bright display, which ensures that users can easily navigate through their music options.

Overall, the JVC CA-D551TR, CA-D351TR, and CA-D451TR mini hi-fi systems exhibit a thoughtful balance of quality, versatility, and style that make them appealing to a broad audience, whether for everyday use or special occasions.