SET

SET

ENTER

CD REC

START

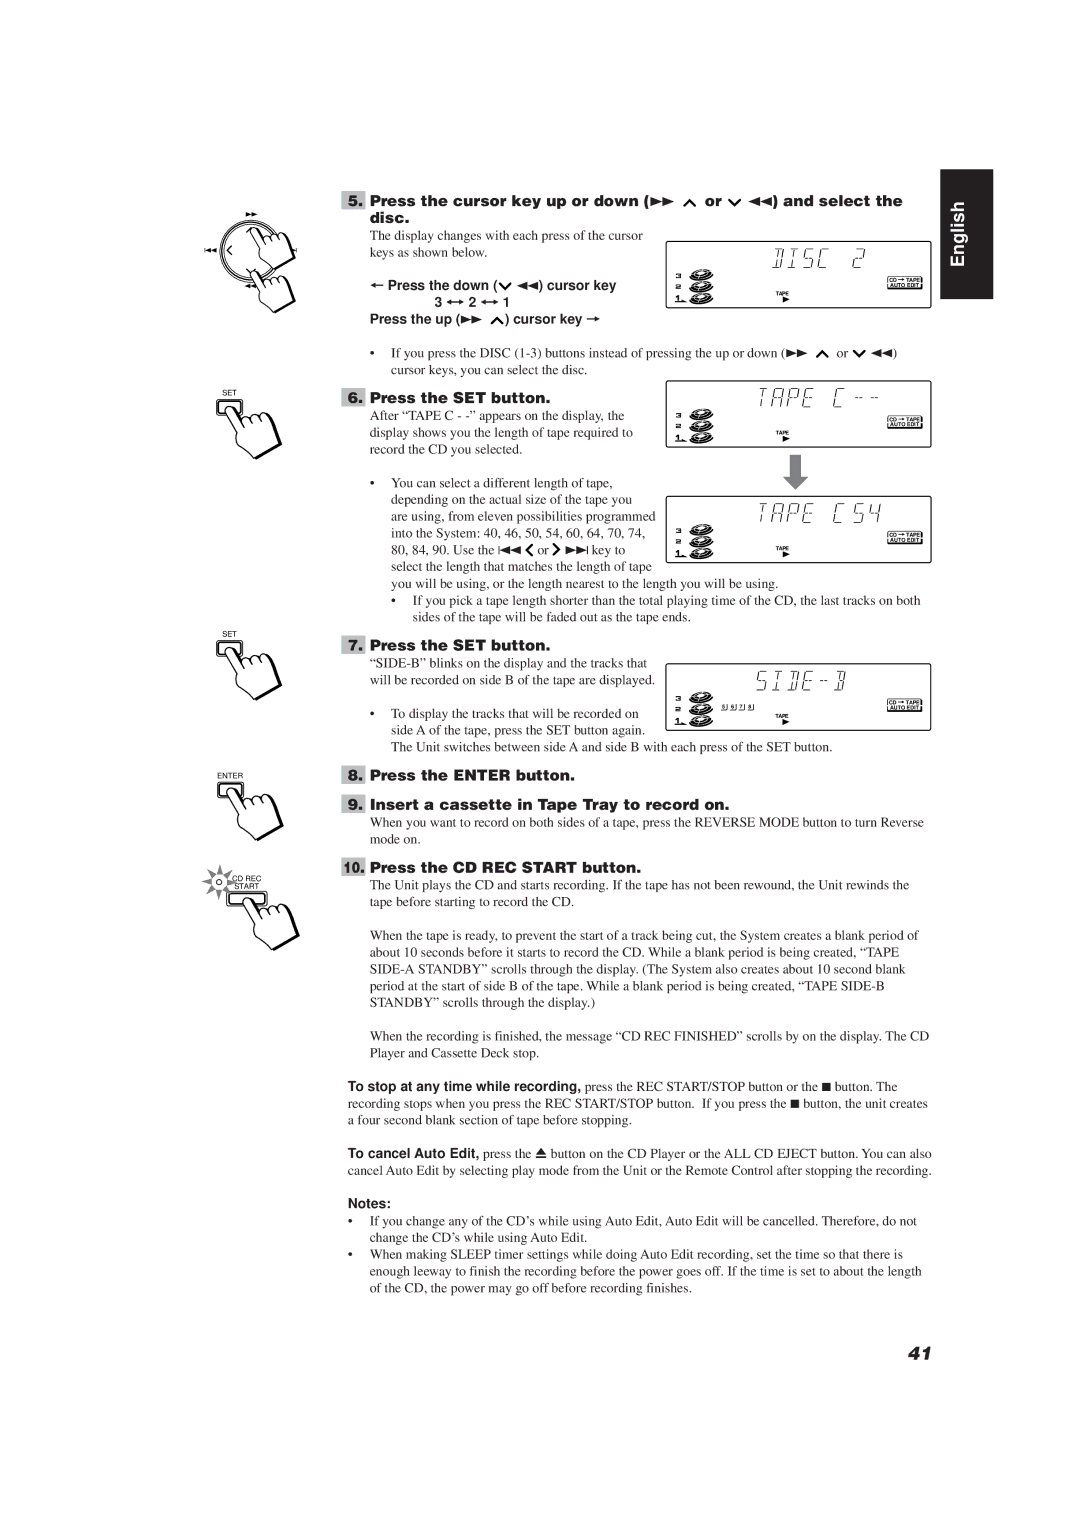
5.Press the cursor key up or down (Á or 1) and select the disc.

The display changes with each press of the cursor keys as shown below.

+ Press the down (

1) cursor key

CD =TAPE

AUTO EDIT


3 ï 2 ï 1

TAPE


Press the up (Á

) cursor key =


If you press the DISC (1-3) buttons instead of pressing the up or down (Á or 1) cursor keys, you can select the disc.

6. Press the SET button.

After “TAPE C - -” appears on the display, the

CD =TAPE

display shows you the length of tape required to

AUTO EDIT

TAPE


record the CD you selected.

\

• You can select a different length of tape,

depending on the actual size of the tape you


are using, from eleven possibilities programmed


into the System: 40, 46, 50, 54, 60, 64, 70, 74,

CD =TAPE

80, 84, 90. Use the 4 or ¢key to

AUTO EDIT

TAPE


select the length that matches the length of tape

you will be using, or the length nearest to the length you will be using.

If you pick a tape length shorter than the total playing time of the CD, the last tracks on both sides of the tape will be faded out as the tape ends.

7.Press the SET button.

“SIDE-B” blinks on the display and the tracks that

will be recorded on side B of the tape are displayed.

5 6 7 8

CD =TAPE

AUTO EDIT

• To display the tracks that will be recorded on

TAPE

side A of the tape, press the SET button again.

The Unit switches between side A and side B with each press of the SET button.

8.Press the ENTER button.

9.Insert a cassette in Tape Tray to record on.

When you want to record on both sides of a tape, press the REVERSE MODE button to turn Reverse mode on.

10.Press the CD REC START button.

The Unit plays the CD and starts recording. If the tape has not been rewound, the Unit rewinds the tape before starting to record the CD.

When the tape is ready, to prevent the start of a track being cut, the System creates a blank period of about 10 seconds before it starts to record the CD. While a blank period is being created, “TAPE SIDE-A STANDBY” scrolls through the display. (The System also creates about 10 second blank period at the start of side B of the tape. While a blank period is being created, “TAPE SIDE-B STANDBY” scrolls through the display.)

When the recording is finished, the message “CD REC FINISHED” scrolls by on the display. The CD Player and Cassette Deck stop.

To stop at any time while recording, press the REC START/STOP button or the 7button. The recording stops when you press the REC START/STOP button. If you press the 7button, the unit creates a four second blank section of tape before stopping.

To cancel Auto Edit, press the 0 button on the CD Player or the ALL CD EJECT button. You can also cancel Auto Edit by selecting play mode from the Unit or the Remote Control after stopping the recording.

Notes:

If you change any of the CD’s while using Auto Edit, Auto Edit will be cancelled. Therefore, do not change the CD’s while using Auto Edit.

When making SLEEP timer settings while doing Auto Edit recording, set the time so that there is enough leeway to finish the recording before the power goes off. If the time is set to about the length

of the CD, the power may go off before recording finishes.

English

41

Page 45
Image 45
JVC E30580-2602A, CA-TD77R manual Press the cursor key up or down Á or 1 and select the disc, + Press the down Cursor key

CA-TD77R, E30580-2602A specifications

The JVC E30580-2602A, also known as the CA-TD77R, is an advanced multimedia system designed to deliver exceptional audio experiences. It combines innovative technologies with user-friendly features, making it a top choice for audio enthusiasts. This versatile unit is primarily known for its rich sound quality, compact design, and robust performance capabilities.

The CA-TD77R is equipped with high-quality speakers that produce clear and powerful sound across a wide range of frequencies. Its powerful amplifier ensures that audio output remains crisp even at higher volumes, making it ideal for various listening environments, whether at home or during outdoor gatherings. With its thorough engineering, users can expect immersive soundscapes that enhance any music or audio content.

One of the standout characteristics of the CA-TD77R is its connectivity options. The unit supports various input methods, including Bluetooth, allowing seamless streaming from smartphones and tablets. This wireless functionality provides convenience, freeing users from the constraints of traditional wired connections. Additionally, the system features USB and auxiliary inputs, accommodating a range of devices for enhanced compatibility.

This multimedia system also boasts a sleek and modern design, making it an attractive addition to any room. Its compact form factor ensures that it does not take up unnecessary space, while its aesthetic appeal complements a variety of interior styles. The user interface is intuitive, with clearly marked controls and an easy-to-navigate menu system that simplifies operation.

Furthermore, the JVC E30580-2602A features various sound modes and equalizer settings, allowing users to customize their listening experience. This personalization enhances audio playback, whether users prefer bass-heavy tracks or more balanced sound profiles.

In terms of durability, the CA-TD77R is built to withstand regular use, utilizing quality materials that ensure longevity. This reliability makes it a suitable choice for both casual listeners and serious audiophiles alike.

In summary, the JVC E30580-2602A, CA-TD77R is a standout multimedia system characterized by its superior sound quality, extensive connectivity options, stylish design, and user-centric features. It offers an exceptional audio experience that caters to a wide audience, from everyday users to dedicated music enthusiasts.