English

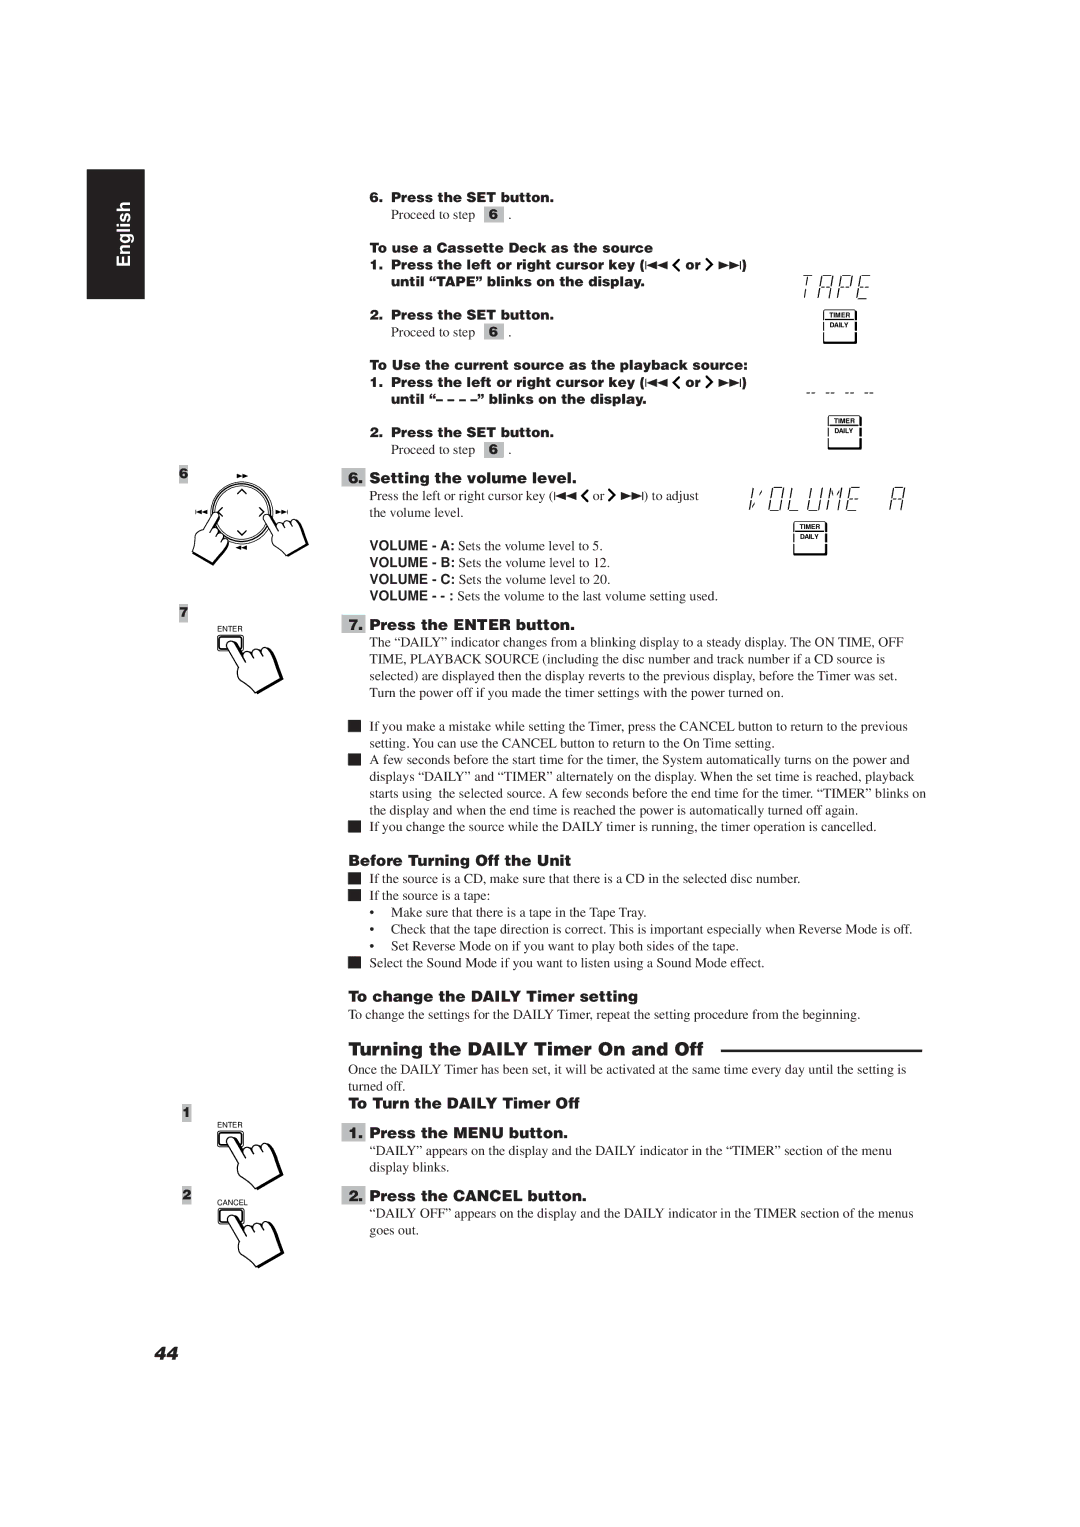
6. Press the SET button.

Proceed to step

6 .

To use a Cassette Deck as the source

1. Press the left or right cursor key (4 or ¢) until “TAPE” blinks on the display.

2. Press the SET button.

TIMER


DAILY

Proceed to step

6

.


To Use the current source as the playback source:

1.Press the left or right cursor key (4 or ¢) until “– – – –” blinks on the display.

2. Press the SET button.

TIMER

DAILY

Proceed to step

6 .


6


6.

Setting the volume level.


Press the left or right cursor key (4 or ¢) to adjust the volume level.

TIMER

DAILY

VOLUME - A: Sets the volume level to 5.

VOLUME - B: Sets the volume level to 12.

VOLUME - C: Sets the volume level to 20.

VOLUME - - :Sets the volume to the last volume setting used.

7

ENTER

7. Press the ENTER button.

1

The “DAILY” indicator changes from a blinking display to a steady display. The ON TIME, OFF TIME, PLAYBACK SOURCE (including the disc number and track number if a CD source is selected) are displayed then the display reverts to the previous display, before the Timer was set. Turn the power off if you made the timer settings with the power turned on.

o If you make a mistake while setting the Timer, press the CANCEL button to return to the previous setting. You can use the CANCEL button to return to the On Time setting.

o A few seconds before the start time for the timer, the System automatically turns on the power and displays “DAILY” and “TIMER” alternately on the display. When the set time is reached, playback starts using the selected source. A few seconds before the end time for the timer. “TIMER” blinks on the display and when the end time is reached the power is automatically turned off again.

o If you change the source while the DAILY timer is running, the timer operation is cancelled.

Before Turning Off the Unit

oIf the source is a CD, make sure that there is a CD in the selected disc number. o If the source is a tape:

Make sure that there is a tape in the Tape Tray.

Check that the tape direction is correct. This is important especially when Reverse Mode is off.

Set Reverse Mode on if you want to play both sides of the tape.

o Select the Sound Mode if you want to listen using a Sound Mode effect.

To change the DAILY Timer setting

To change the settings for the DAILY Timer, repeat the setting procedure from the beginning.

Turning the DAILY Timer On and Off ———————————

Once the DAILY Timer has been set, it will be activated at the same time every day until the setting is turned off.

To Turn the DAILY Timer Off

ENTER

1. Press the MENU button.

“DAILY” appears on the display and the DAILY indicator in the “TIMER” section of the menu display blinks.

2

CANCEL

2. Press the CANCEL button.


“DAILY OFF” appears on the display and the DAILY indicator in the TIMER section of the menus


goes out.

44

Page 48
Image 48
JVC CA-TD77R, E30580-2602A manual Turning the Daily Timer On and Off

CA-TD77R, E30580-2602A specifications

The JVC E30580-2602A, also known as the CA-TD77R, is an advanced multimedia system designed to deliver exceptional audio experiences. It combines innovative technologies with user-friendly features, making it a top choice for audio enthusiasts. This versatile unit is primarily known for its rich sound quality, compact design, and robust performance capabilities.

The CA-TD77R is equipped with high-quality speakers that produce clear and powerful sound across a wide range of frequencies. Its powerful amplifier ensures that audio output remains crisp even at higher volumes, making it ideal for various listening environments, whether at home or during outdoor gatherings. With its thorough engineering, users can expect immersive soundscapes that enhance any music or audio content.

One of the standout characteristics of the CA-TD77R is its connectivity options. The unit supports various input methods, including Bluetooth, allowing seamless streaming from smartphones and tablets. This wireless functionality provides convenience, freeing users from the constraints of traditional wired connections. Additionally, the system features USB and auxiliary inputs, accommodating a range of devices for enhanced compatibility.

This multimedia system also boasts a sleek and modern design, making it an attractive addition to any room. Its compact form factor ensures that it does not take up unnecessary space, while its aesthetic appeal complements a variety of interior styles. The user interface is intuitive, with clearly marked controls and an easy-to-navigate menu system that simplifies operation.

Furthermore, the JVC E30580-2602A features various sound modes and equalizer settings, allowing users to customize their listening experience. This personalization enhances audio playback, whether users prefer bass-heavy tracks or more balanced sound profiles.

In terms of durability, the CA-TD77R is built to withstand regular use, utilizing quality materials that ensure longevity. This reliability makes it a suitable choice for both casual listeners and serious audiophiles alike.

In summary, the JVC E30580-2602A, CA-TD77R is a standout multimedia system characterized by its superior sound quality, extensive connectivity options, stylish design, and user-centric features. It offers an exceptional audio experience that caters to a wide audience, from everyday users to dedicated music enthusiasts.