KD-G456

Installation/Connection Manual °“√µ‘¥µ—Èß/§ŸË¡◊Õ°“√µ‘¥µ—Èß

GET0291-002A

1004DTSMDTJEIN

[UH]

EN, TH

ENGLISH

‰∑¬


This unit is designed to operate on 12 V DC, NEGATIVE ground electrical systems. If your

™ÿ¥¢¢ª√–°Õ∫π’ȉ¥È√—∫°“√ÕÕ°·∫∫¡“‡æ◊ËÕ„™Èß“π°—∫√–∫∫ °√–·‰øøÈ““¬¥‘π¢—È«≈∫°√–·µ√ß12‚«≈∑Ï À“°√∂¬πµÏ¢Õߧÿ≥‰¡Ë

vehicle does not have this system, a voltage inverter is required, which can be purchased at

¥È„™È√–∫∫π’ÈÈÕß„™È‡§√◊ËÕß·ª≈ß°√µ

–·‰ø™Ë«¬´÷Ëß“¡“√∂À“´◊ÈՉȮ“°√È“π¥

¢“¬‡§√◊ËÕ߇’¬ß√∂¬πµÏJVC

JVC car audio dealers.


Parts list for installation and connection

√“¬°“√Ë«πª√–°Õ∫”À√—∫µ‘¥µ—Èß·≈–◊ËÕ¡µËÕ°‡™—π


The following parts are provided for this unit.

ò«πª√–°Õ∫µËÕ‰ªπ’È„ÀÈ¡“°—∫™ÿ¥ª√–°Õ∫π’È À≈—ß®“°µ√«® Õ∫·≈È« ª√—∫µ—È߇§√◊ËÕß„ÀÈ∂Ÿ°µÈÕß

After checking them, please set them correctly.


A / B

C

D


E

F


Hard case/Control panel

Sleeve

Trim plate


Power cord

Washer (ø5)

≈—ß∫√√®ÿ/ÀπÈ“ª—¥

ª≈Õ°ÀÿÈ¡

·ºËπ‚≈À–¢Õ∫·µËß


“¬‡§‡∫‘≈°”≈—ß

ª√–‡°Áπ«ß·À«π(ø5)

G

H

I

J

K

L


Lock nut (M5)

Mounting bolt (M5 x 20 mm)

Rubber cushion

Handles

Remote controller

Battery


πÕµ≈ÁÕ§(M5)

≈—°µ‘¥(M5 x 20 ¡‘≈≈‘‡¡µ√)

¬“ß°—π°√–·∑°

§—π∫—ߧ—∫

√’‚¡µ§Õπ‚∑√≈

·∫µ‡µÕ√’Ë

CR2025


INSTALLATION (IN-DASH MOUNTING)

°“√µ‘¥µ—Èß (°“√ª√–°Õ∫·ºßÀπÈ“ª—∑¡Ï‡¢È“)

The following illustration shows a typical installation. If you have any questions or require information regarding installation kits, consult your JVC car audio dealer or a company supplying kits.

• If you are not sure how to install this unit correctly, have it installed by a qualified technician.

¿“æµ—«Õ¬Ë“ßµËÕ‰ªπ’È·¥ß∂÷ß°“√µ‘¥µ—Èß·∫∫∑—Ë«‰ª À“°§ÿ≥¡’ª—≠À“À√◊ÕµÈÕß°“√¢ÈÕ¡Ÿ≈‡°’ˬ«°—∫™ÿ¥µ‘¥µ—Èß ÿ≥“ª√÷°°√…“°—

∫ºŸÈ¢“¬‡§√◊ËÕ߇’¬ß√∂¬πµÏJVC ¢Õß∑Ë“πÀ√◊Õ∫√‘…—

™ÿ¥ª√–°Õ∫ ∂È“§ÿ≥‰¡Ë·πË„®«Ë“µ‘¥µ—Èß™ÿ¥ª√–°Õ∫π’È∂Ÿ°µÈÕßÀ√◊Õ‰¡Ë „ÀÈÀ“™Ë“ߺŸÈ‡™’ˬ«™“≠‡ªÁπºŸÈµ‘¥µ—Èß

Do the required electrical connections.

µËÕ“¬‰øµ“¡∑’Ë°”À𥉫È∑—ÈßÀ¡¥

*1

When you stand the unit, be careful not to damage the fuse on

the rear.

Bend the appropriate tabs to hold

*1

‡¡◊ËÕ§ÿ≥µ—Èß™ÿ¥ª√–°Õ∫¢÷Èπ √—–«

the sleeve firmly in place.

ßլ˓∑”„ÀÈø‘« ∫√‘‡«≥Ï «π∑È“¬‡Ë ¬À“¬’

ßÕ·ºËπ‡æ◊ËÕ¬÷¥ª≈Õ°„ÀȵËÕ°—π‡¢È“∑’Ë

Removing the unit / °“√∂Õ¥™ÿ¥ª√–°Õ∫

Before removing the unit, release the rear section.

°ËÕπ®–∂Õ¥™ÿ¥ª√–°Õ∫ „ÀȪ≈¥ÀπÈ“µ—¥Ë«π∑È“¬°ËÕπ

Insert the two handles, then pull them as illustrated so that the unit can be removed.

„˧—π∫—ߧ—∫2Õ—π≈ß„π√ËÕß”À√—∫„™Èæ—π≈«¥ ¥—ß¿“æ ®“°π—Èπ ȇ≈◊ËÕπ™ÿ„À ¥ª√–°Õ∫ÕÕ° „π¢≥–∑’˧լ

Ê¥÷ߧ—π∫—ߧ—∫∑—Èß Õß—πÕÕ°®“°°—π

When using the optional stay /

When installing the unit without using the sleeve /

‡¡◊ËÕ„™Èµ—«¬÷¥·∫∫‡≈◊Õ°‰¥

Stay (option)

‡¡◊ËÕµ‘¥µß™ÿÈ— ¥ª√–°Õ∫‚¥¬‰¡Ë„™Èª≈Õ°ÀÿÈ¡


Fire wall

First remove the car radio and install the unit in its place.

ºπß°—π‰ø—


µ—«¬÷¥ (‡≈◊Õ°‰¥È) °ËÕπÕ◊Ëπ¢Õ„ÀÈ∂Õ¥™ÿ¥‡§√◊ËÕ߇’¬ß√∂¬πµÏÕÕ° ·≈È«µ‘¥µ—È߇§√◊ËÕ߇ȓ∑¢


Dashboard


Flat type screws


* Not included with this unit.


(M5 x 8 mm)*


* ‰¡Ë‰¥È„ÀÈ¡“°—∫™ÿ¥ª√–°Õ∫π

·ºßÀπÈ“ª∑¡á—


°√ŸÀ—«‡√’¬∫

Bracket*


Screw (option)

(M5 x 8 ¡‘≈≈‘‡¡µ√)*

·∑Ëπ√Õß√—∫*

Flat type screws


°√Ÿ (‡≈◊Õ°‰¥È)


(M5 x 8 mm)*


Pocket

Bracket*

°√ŸÀ—«‡√’¬∫


°–‡ª“–

(M5 x 8 ¡‘≈≈‘‡¡µ√)*


·∑Ëπ√Õß√—∫*


Note

: When installing the unit on the mounting bracket, make sure to use

Install the unit at an angle of


the 8 mm-long screws. If longer screws are used, they could

less than 30˚.


damage the unit.


µ‘¥µ—Èß™ÿ¥ª√–°Õ∫∑’Ë¡ÿ µË”°«Ë“30 Õß»“

À¡“¬‡Àµ

: ‡¡◊ËÕµ‘¥µ—Èß™ÿ¥ª√–°Õ∫≈ß„π·∑Ëπ√Õß√—∫‰«È „ÀÈ„™È°√Ÿ¬“«¢π“¥8 ¡‘≈≈‘‡¡µ√


∂È“„™È°√Ÿ¬“«°«Ë“π’ÈÕ“®∑”„ÀÈ™ÿ¥ª√–°Õ∫‡’¬À“¬‰¥ô


PRECAUTIONS on power supply and speaker connections:

DO NOT connect the speaker leads of the power cord to the car battery; otherwise, the unit will be seriously damaged.

BEFORE connecting the speaker leads of the power cord to the speakers, check the speaker wiring in your car.

¢ÈÕ§«√√–—«ß”À√—∫°“√µËÕ·À≈Ë߮˓¬°”≈—ß·≈–≈”‚æß:

լ˓µËÕ “¬µ–°—Ë«‡§‡∫‘≈°”≈—ߢÕß≈”‚æ߇¢È“°—∫·∫µ‡µÕ√’Ë√∂¬πµÏ ¡‘©–π—Èπÿ™¥ª√–°Õ∫®–‰¥È√— ∫§«“¡‡ ¬À“¬¡“°’

°ËÕπ∑’Ë®ËÕ“¬µ––°—Ë«‡§‡∫‘≈°”≈—ߢÕß≈”‚æ߇¢È“°—∫≈”‚æß „Àȵ√«®Õ∫°“√‡¥‘𓬉ø≈”‚æß„π√∂¢Õߧÿ≥„Àȇ√’¬∫√ÈÕ¬‡’¬°ËÕπ

TROUBLESHOOTING

°“√µ√«®Õ∫ª—≠À“¢—¥¢ÈÕß

The fuse blows.

* Are the red and black leads connected correctly?

Power cannot be turned on. * Is the yellow lead connected?

No sound from the speakers.

* Is the speaker output lead short-circuited?

Sound is distorted.

*Is the speaker output lead grounded?

*Are the “–” terminals of L and R speakers grounded in common?

Noise interfere with sounds.

* Is the rear ground terminal connected to the car’s chassis using shorter and thicker cords?

Unit becomes hot.

*Is the speaker output lead grounded?

*Are the “–” terminals of L and R speakers grounded in common?

This unit does not work at all. * Have you reset your unit?

ø‘« ú¢“¥

*¡’°“√‡™◊ËÕ¡ “¬µ–°«Ë— ¥’”·≈– ·’¥ßլ˓ß∂Ÿ°µÈÕßÀ√◊Õ‰¡ò

‰¡Ë “¡“√∂‡ª‘¥‡§√◊ËÕ߉ȥ

*¡’°“√‡™◊ËÕ¡ “¬µ—–°Ë«’‡À≈◊ÕßÀ√◊Õ‰¡ò

‰¡Ë¡’‡’¬ßÕÕ°®“°≈”‚æß

*“¬µ–°—Ë«Ë«π∑’ËÕÕ°∑“ß≈”‚æ߇°‘¥‰øøÈ“≈—¥«ß®√À√◊Õ‰¡Ë

‡ ’¬ß‡æ’Ȭπ

*“¬µ–°—Ë«Ë«π∑’ËÕÕ°∑“ß≈”‚æßµËÕ≈ߥ‘πÀ√◊Õ‰¡Ë

*“¬¢—È«≈∫“–”¢Õß≈”‚æߥȓπ´È“¬·≈–¢«“µËÕ≈ߥ‘πµ“¡ª°µ‘À√◊Õ‰¡Ë

‡ ’¬ß√∫°«π

*¡’°“√„™È“¬—ÈπÊ ◊ÕÀπ“ÊÀ√ µËÕ®“°‡§√◊ËÕßò«π∑’˵‘¥µ—Èß È∫πæ◊Èπ‰« È“πÀ≈¥ —ß°—∫µ—«∂—ß√∂¬πµÏÀ√◊Õ‰¡Ë

™ÿ¥ª√–°Õ∫√ÈÕπ¢÷Èπ

*“¬µ–°—Ë«Ë«π∑’ËÕÕ°∑“ß≈”‚æßµËÕ≈ߥ‘πÀ√◊Õ‰¡Ë

*“¬¢—È«≈∫“–”¢Õß≈”‚æߥȓπ´È“¬·≈–¢«“µËÕ≈ߥ‘πµ“¡ª°µ‘À√◊Õ‰¡Ë

‡§√◊•ËÕß„™Èß“π‰¡Ë‰¥È‡ ¬

1 * ∑Ë“π‰¥Èµ—È߇§√◊ËÕß„À¡ËÀÈ√◊Õ¬—ß

Page 37
Image 37
JVC GET0291-002A, GET0291-001A, KD-G456 manual Fuse blows, Sound is distorted, Noise interfere with sounds, Unit becomes hot

GET0291-002A, GET0291-001A, KD-G456 specifications

The JVC KD-G456 is a versatile car stereo that stands out for its impressive features and user-friendly design. Engineered to elevate your in-car audio experience, this model combines functionality with cutting-edge technology. One of the standout features of the KD-G456 is its ability to play multiple formats. It supports CD, CD-R, and CD-RW playback, allowing you to enjoy your favorite tunes without limitations. Additionally, it features a front USB input, enabling easy access to your digital music library straight from your USB drive.

The unit also incorporates a built-in AM/FM tuner, offering a wide range of radio stations to choose from. With 18 FM and 6 AM presets, you can effortlessly navigate through your favorite channels. The KD-G456's high-performance sound is marked by its 50 watts per channel peak power output, ensuring crystal clear audio quality that can fill your vehicle with vibrant sound. Furthermore, the unit is equipped with a 3-band parametric equalizer, allowing you to customize the sound profile according to your preferences.

The JVC KD-G456 also emphasizes connectivity and compatibility. It features an auxiliary input that accommodates external devices, such as smartphones and portable media players. This flexibility allows for streaming music from various sources, enhancing your auditory experience while on the road. Its sleek design is complemented by a vibrant LCD display, providing visibility and ease of use both day and night.

The KD-G456 is accompanied by a couple of model variations: GET0291-001A and GET0291-002A. These models share many similar features, including the USB and auxiliary inputs, ensuring that users have a range of options for integrating their devices. Whether you prefer to listen via Bluetooth, USB, or even through traditional CD playback, these models offer seamless integration.

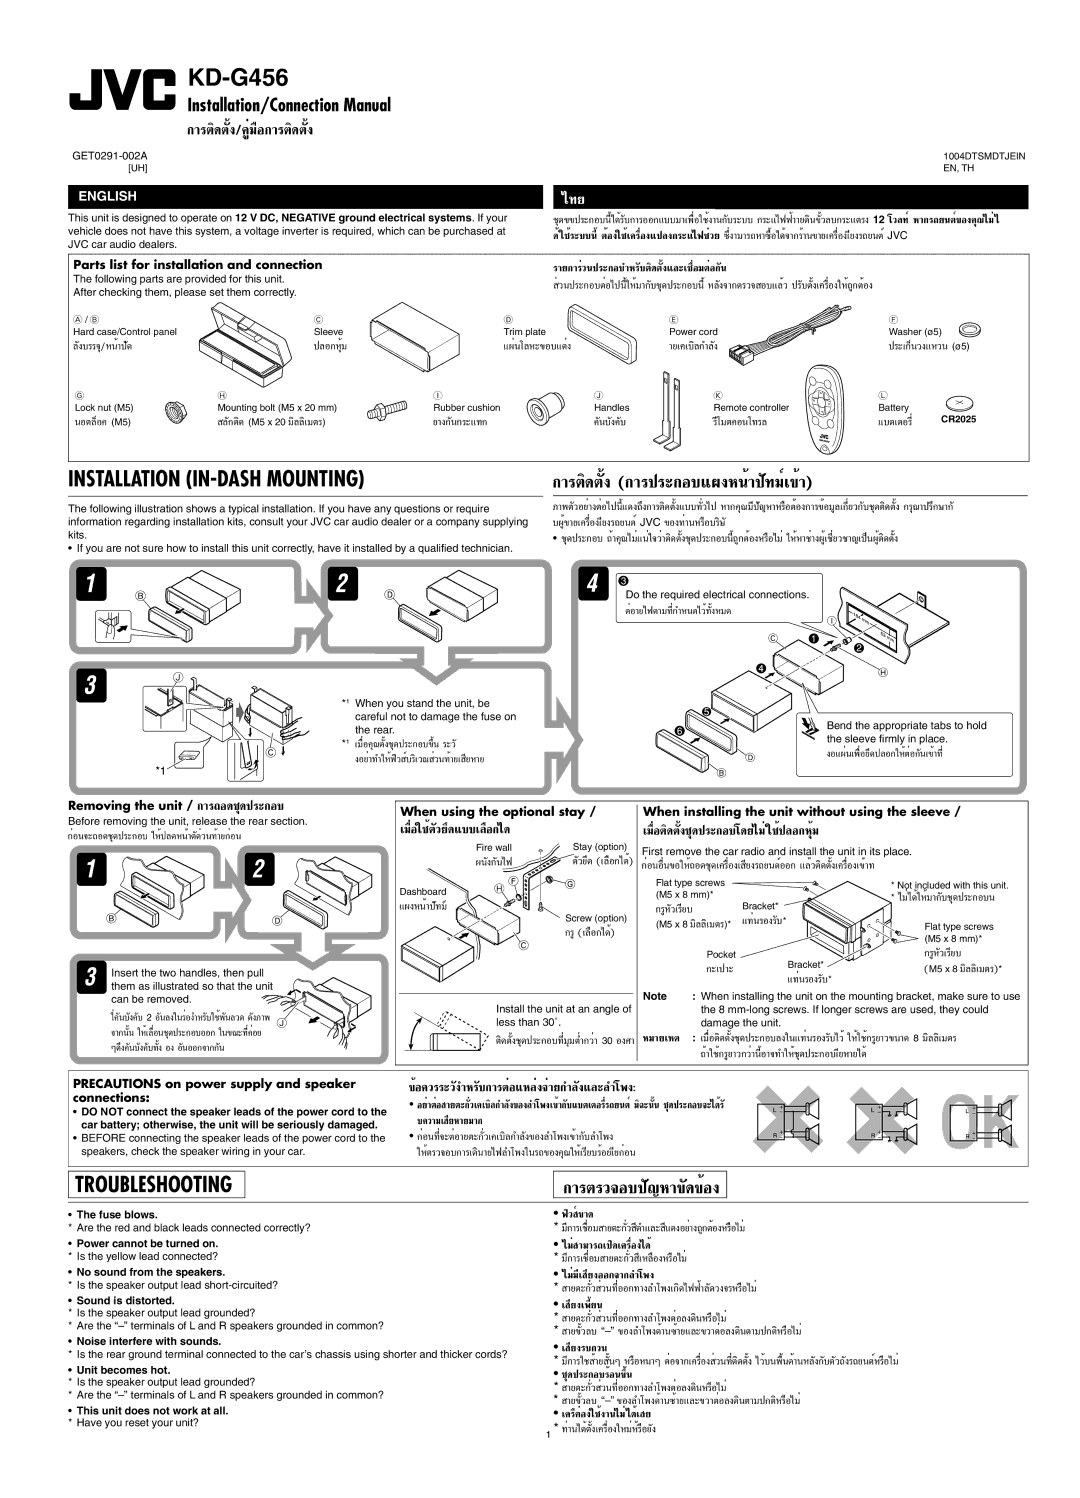
In terms of installation, the KD-G456 is designed to fit most standard vehicle dashboards. It comes with a wiring harness and supports various mounting options, making it accessible for both DIY enthusiasts and professional installers. Overall, the JVC KD-G456, along with its variations, represents a balanced combination of innovative technology, superior sound quality, and user-focused design, making it a great choice for music lovers who prioritize performance and convenience while driving.