Heat sink
·ºËπ√–∫“¬§«“¡√ÈÕπ

ENGLISH

ELECTRICAL CONNECTIONS

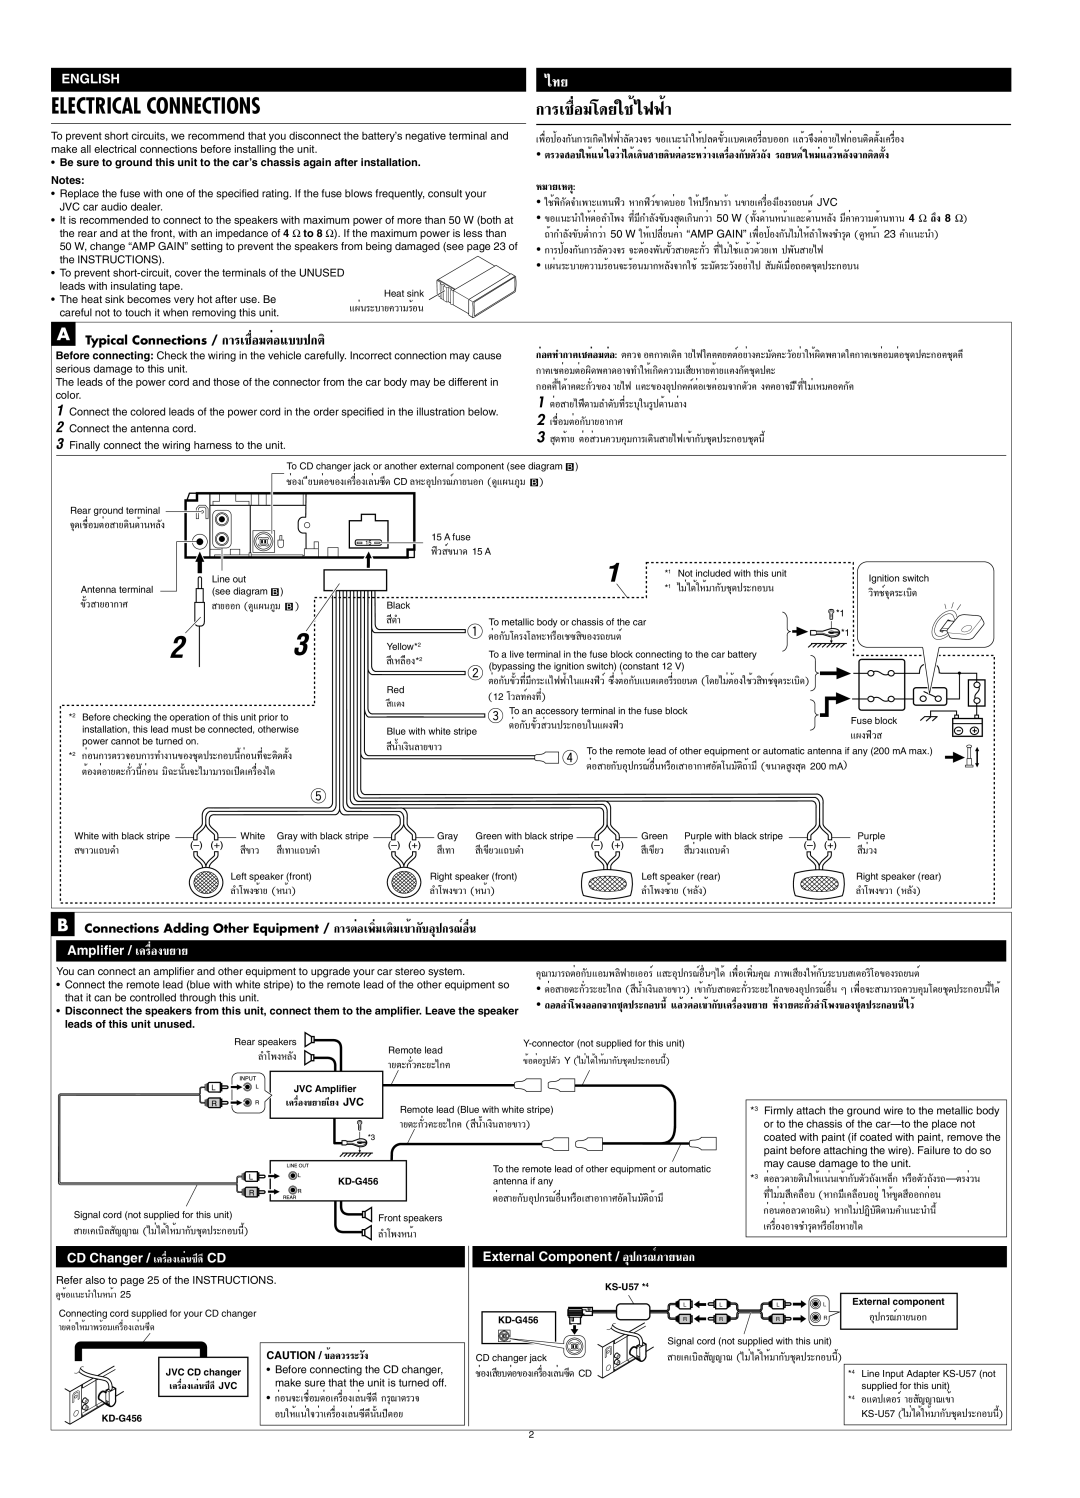
To prevent short circuits, we recommend that you disconnect the battery’s negative terminal and make all electrical connections before installing the unit.

Be sure to ground this unit to the car’s chassis again after installation.

Notes:

Replace the fuse with one of the specified rating. If the fuse blows frequently, consult your JVC car audio dealer.

It is recommended to connect to the speakers with maximum power of more than 50 W (both at

the rear and at the front, with an impedance of 4 to 8 ). If the maximum power is less than 50 W, change “AMP GAIN” setting to prevent the speakers from being damaged (see page 23 of the INSTRUCTIONS).

• To prevent short-circuit, cover the terminals of the UNUSED leads with insulating tape.

• The heat sink becomes very hot after use. Be careful not to touch it when removing this unit.

‰∑¬

°“√‡™◊ËÕ¡‚¥¬„™È‰øøÈ“

‡æ◊ËÕªÈÕß°π°“√‡°‘— ¥‰øøÈ“≈¥—«ß®√ ¢Õ·π–π”„ÀȪ≈¥¢«·∫µ‡µÕ√’Ë≈∫ÕÕ°È—·≈È«®÷ßµËÕ“¬‰ø°ËÕ𵑥µß‡§√◊ËÕßÈ—

µ√«® Õ∫„ÀÈ·πË„®«Ë“‰¥È‡¥‘𠓬¥‘πµËÕ√–À«Ë“߇§√◊ËÕß°∫µ—«∂—ß— √∂¬πµÏ„À¡Ë·≈È«À≈ß®“°µ‘— ¥µßÈ—

À¡“¬‡Àµÿ:

„™Èæ‘°¥—®”‡æ“–·∑πø‘« À“°ø‘«Ï¢“¥∫ËÕ¬ „ÀȪ√÷°…“√È“ π¢“¬‡§√◊ËÕ߇’¬ß√∂¬πµÏJVC

¢Õ·π–π”„ÀȵËÕ≈”‚æß ∑’Ë¡’°”≈ß—¢∫ß— ¥ÿ‡°‘π°«Ë“ 50 W (∑ßÈ—¥È“πÀπÈ“·≈–¥È“πÀ≈ß— ¡’§Ë“§«“¡µÈ“π∑“π 4 ∂÷ß 8 )

∂È“°”≈ß—¢∫µË”°«Ë“— 50 W „Àȇª≈’ˬπ§Ë“ “AMP GAIN” ‡æ◊ËÕªÈÕß°π‰¡Ë„ÀÈ≈”‚æß™”√ÿ—¥ (¥ŸÀπÈ“ 23 §”·π–π”)

°“√ªÈÕß°π°“√≈—¥—«ß®√ ®–µÈÕßæπ—¢«È— “¬µ–°«Ë— ∑’ˉ¡Ë„™È·≈È«¥È«¬‡∑ ªæπ— “¬‰ø

·ºËπ√–∫“¬§«“¡√ÈÕπ®–√ÈÕπ¡“°À≈ß®“°„™È—√–¡¥—√–«ßլ˓‰ª— ¡º— ‡¡◊ËÕ∂Õ— ¥™ÿ¥ª√–°Õ∫π

A Typical Connections / °“√‡™◊ËÕ¡µËÕ·∫∫ª°µ‘

Before connecting: Check the wiring in the vehicle carefully. Incorrect connection may cause serious damage to this unit.

The leads of the power cord and those of the connector from the car body may be different in color.

1Connect the colored leads of the power cord in the order specified in the illustration below.

2Connect the antenna cord.

3Finally connect the wiring harness to the unit.

°ËÕ•∑”°“•‡™•ËÕ¡µËÕ: µ•«®†Õ•°“•‡¥‘•†“¬‰ø„•••¬•µÏլ˓ߕ–¡¥—•–«Õ¬Ë“„ÀȺ‘— ¥æ•“¥„•°“•‡™•ËÕ¡µËÕ™ÿ¥ª•–°Õ•™ÿ¥•’

°“•‡™•ËÕ¡µËÕº‘¥æ•“¥Õ“®∑”„Àȇ°‘¥§«“¡‡ ¬À“¬•È“¬·•ß°’ •™ÿ— ¥ª•–

°Õ••’ȉ¥È“•µ–°«Ë—¢Õ߆“¬‰ø ·•–¢ÕßÕÿª°••ÏµËÕ‡™•ËÕ¡®“°µ«•— ß••Õ“®¡’†’∑’ˉ¡Ë‡À¡•Õ•°•— 1 µËÕ “¬‰ø’µ“¡≈”¥∫∑’Ë√— –∫ÿ„π√Ÿª¥È“π≈Ë“ß

2‡™◊ËÕ¡µËÕ°∫“¬Õ“°“»—

3¥ÿ∑È“¬ µËÕ «π§«∫§ÿ¡°“√‡ò ¥‘𠓬‰ø‡¢È“°∫™ÿ— ¥ª√–°Õ∫™ÿ¥π’È

To CD changer jack or another external component (see diagram )

Rear ground terminal

®ÿ¥‡™◊ËÕ¡µËÕ “¬¥‘π¥È“πÀ≈ß—

Antenna terminal

¢«È— “¬Õ“°“»

™ËÕ߇ ’¬∫µËÕ¢Õ߇§√◊ËÕ߇≈Ëπ´’¥ CD ≈À–Õÿª°√≥Ï¿“¬πÕ° (¥Ÿ·ºπ¿Ÿ¡ )


15 A fuse


ø‘«

Ï¢π“¥ 15 A


Line out


*1

Not included with this unit


*1

‰¡Ë‰¥È„ÀÈ¡“°∫™ÿ— ¥ª√–°Õ∫π

(see diagram )


“¬ÕÕ° (¥Ÿ·ºπ¿Ÿ¡ )

Black


’¥”

To metallic body or chassis of the car


Yellow*2

µËÕ°∫‚§√ß‚≈À—–À√◊Õ‡™´ ¢‘Õß√∂¬πµÏ


To a live terminal in the fuse block connecting to the car battery


’‡À≈◊Õß*2


(bypassing the ignition switch) (constant 12 V)

Ignition switch

«‘∑™Ï®ÿ¥√–‡∫‘¥

*2 Before checking the operation of this unit prior to installation, this lead must be connected, otherwise power cannot be turned on.

*2 °ËÕπ°“√µ√«®Õ∫°“√∑”ß“π¢Õß™ÿ¥ª√–°Õ∫π’È°ËÕπ∑’Ë®–µ‘¥µßÈ—

µÈÕßµËÕ“¬µ–°«π’È°ËÕπË— ¡‘©–ππ®È—–‰¡“¡“√∂‡ª‘¥‡§√◊ËÕ߉¥

Red

‡‡ï¥ß

Blue with white stripe

’πÈ”‡ß‘π≈“¬¢“«

µËÕ°∫—¢—È«∑’Ë¡’°√–·‰øøÈ“„π·ºßø‘«Ï´÷ËßµËÕ°∫·∫µ‡µÕ√’Ë√∂¬πµ— (‚¥¬‰¡ËµÈÕß„™È« ‘∑™Ï®ÿ¥√–‡∫‘¥) (12 ‚«≈∑ϧß∑’Ë)

To an accessory terminal in the fuse block


Fuse block

µËÕ°∫—¢—È« ò«πª√–°Õ∫„π·ºßø‘«


·ºßø‘«

To the remote lead of other equipment or automatic antenna if any (200 mA max.)

µËÕ “¬°∫Õÿª°√≥ÏÕ◊ËπÀ√◊Õ‡— “Õ“°“»Õµ‚π¡—µ‘∂È“¡’—(¢π“¥ ߟ ¥ÿ 200 mA)

White with black stripe

White

Gray with black stripe

Gray

Green with black stripe

Green

Purple with black stripe

Purple

¢“«·∂∫¥”

’¢“«

‡∑“·∂∫’

¥”

’‡∑“

‡’¢’¬«·∂∫¥”

‡’¢’¬«

¡Ë«ß·∂∫’

¥”

¡Ë«ß’


Left speaker (front)

Right speaker (front)

Left speaker (rear)


Right speaker (rear)


≈”‚æß´È“¬ (ÀπÈ“)


≈”‚æߢ«“ (ÀπÈ“)

≈”‚æß´È“¬ (À≈ß)—


≈”‚æߢ«“ (À≈ß)—

B Connections Adding Other Equipment / °“√µËÕ‡æ‘Ë¡‡µ‘¡‡¢È“°∫Õÿª°√≥ÏÕ◊Ëπ—

Amplifier / ‡§√◊ËÕߢ¬“¬

You can connect an amplifier and other equipment to upgrade your car stereo system.

Connect the remote lead (blue with white stripe) to the remote lead of the other equipment so that it can be controlled through this unit.

Disconnect the speakers from this unit, connect them to the amplifier. Leave the speaker leads of this unit unused.

§ÿ≥“¡“√∂µËÕ°∫·Õ¡æ≈‘ø“¬‡ÕÕ√Ï—· –Õÿª°√≥ÏÕ◊òπʉ¥ô‡æ◊ËÕ‡æ‘Ë¡§ÿ≥ ¿“æ‡ ¬ß„ÀÈ°’ ∫√— –∫∫ ‡µÕ√‘‚Õ¢Õß√∂¬πµÏ

µËÕ “¬µ–°«√Ë—–¬–‰°≈ ( πÈ”‡ß‘π≈“¬’ ¢“«) ‡¢È“°∫— “¬µ–°«√Ë—–¬–‰°≈¢ÕßÕÿª°√≥ÏÕ◊Ëπ Ê ‡æ◊ËÕ®– “¡“√∂§«∫§ÿ¡‚¥¬™ÿ¥ª√–°Õ∫π’ȉ¥È

∂Õ¥≈”‚æßÕÕ°®“°™ÿ¥ª√–°Õ∫π’È·≈È«µËÕ‡¢È“°∫‡§√◊ËÕß— ¢¬“¬ ∑‘Èß“¬µ–°«≈”‚æßË— ¢Õß™ÿ¥ª√–°Õ∫π’ȉ«È


Rear speakers

Remote lead


Y-connector (not supplied for this unit)


≈”‚æßÀ≈ß—


¢ÈÕµËÕ√Ÿªµ«— Y (‰¡Ë‰¥È„ÀÈ¡“°∫™ÿ— ¥ª√–°Õ∫π’È)


“¬µ–°«•Ë—–¬–‰°•


JVC Amplifier


‡§√◊ËÕߢ¬“¬‡’¬ß JVC

Remote lead (Blue with white stripe)


*3

Firmly attach the ground wire to the metallic body


“¬µ–°«•Ë—–¬–‰°• (

πÈ”‡ß‘π≈“¬’

¢“«)


or to the chassis of the car—to the place not


coated with paint (if coated with paint, remove the


paint before attaching the wire). Failure to do so


To the remote lead of other equipment or automatic


may cause damage to the unit.


*3

µËÕ≈«¥“¬¥‘π„ÀÈ·πËπ‡¢È“°∫µ—«∂—߇À≈Á°— À√◊Õµ«∂—ß√∂—µ√ßË«π


KD-G456


antenna if any


µËÕ “¬°∫Õÿª°√≥ÏÕ◊ËπÀ√◊Õ‡—

“Õ“°“»Õµ‚π¡—µ‘∂È“¡’—


∑’ˉ¡Ë¡ ‡§≈◊Õ∫’

(À“°¡’‡§≈◊Õ∫Õ¬ŸË„ÀÈ¢Ÿ¥ ÕÕ°°ËÕπ’

Signal cord (not supplied for this unit)

Front speakers


°ËÕπµËÕ≈«¥“¬¥‘π) À“°‰¡ËªØ‘∫µ‘µ“¡§”·π—–π”π’È

“¬‡§‡∫‘≈ ≠≠“≥—

(‰¡Ë‰¥È„ÀÈ¡“°∫™ÿ— ¥ª√–°Õ∫π’È)


‡§√◊ËÕßÕ“®™”√ÿ¥À√◊Õ‡’¬À“¬‰¥

≈”‚æßÀπÈ“


CD Changer / ‡§√◊ËÕ߇≈Ëπ´’¥’CD


External Component / Õÿª°√≥Ï¿“¬πÕ°


Refer also to page 25 of the INSTRUCTIONS.


KS-U57 *4


¥Ÿ¢ÈÕ·π–π”„πÀπÈ“ 25


L

L


L

L

External component

Connecting cord supplied for your CD changer


KD-G456

R

R


R

R

Õÿª°√≥Ï¿“¬πÕ°

“¬µËÕ„ÀÈ¡“æ√ÈÕ¡‡§√◊ËÕ߇≈Ëπ´’¥


Signal cord (not supplied with this unit)


CAUTION / ¢ÈÕ§«√√–«ß—

CD changer jack

“¬‡§‡∫‘≈ ≠≠“≥—

(‰¡Ë‰¥È„ÀÈ¡“°∫™ÿ— ¥ª√–°Õ∫π’È)


JVC CD changer

• Before connecting the CD changer,

™ËÕ߇ ¬∫µËÕ’ ¢Õ߇§√◊ËÕ߇≈Ëπ´’¥ CD


*4

Line Input Adapter KS-U57 (not

‡§√◊ËÕ߇≈Ëπ´’¥’JVC

make sure that the unit is turned off.


supplied for this unit)


°ËÕπ®–‡™◊ËÕ¡µËÕ‡§√◊ËÕ߇≈Ëπ´’¥’°√ÿ≥“µ√«®


*4

Õ·¥ª‡µÕ√Ï“¬ ≠≠“≥‡—

¢È“

KD-G456

Õ∫„ÀÈ·πË„®«Ë“‡§√◊ËÕ߇≈Ëπ´’¥’ππª‘È— ¥Õ¬


KS-U57(‰¡Ë‰¥È„ÀÈ¡“°∫™ÿ— ¥ª√–°Õ∫π’È)


2


Page 38
Image 38
JVC KD-G456, GET0291-001A, GET0291-002A manual KS-U57 *4

GET0291-002A, GET0291-001A, KD-G456 specifications

The JVC KD-G456 is a versatile car stereo that stands out for its impressive features and user-friendly design. Engineered to elevate your in-car audio experience, this model combines functionality with cutting-edge technology. One of the standout features of the KD-G456 is its ability to play multiple formats. It supports CD, CD-R, and CD-RW playback, allowing you to enjoy your favorite tunes without limitations. Additionally, it features a front USB input, enabling easy access to your digital music library straight from your USB drive.

The unit also incorporates a built-in AM/FM tuner, offering a wide range of radio stations to choose from. With 18 FM and 6 AM presets, you can effortlessly navigate through your favorite channels. The KD-G456's high-performance sound is marked by its 50 watts per channel peak power output, ensuring crystal clear audio quality that can fill your vehicle with vibrant sound. Furthermore, the unit is equipped with a 3-band parametric equalizer, allowing you to customize the sound profile according to your preferences.

The JVC KD-G456 also emphasizes connectivity and compatibility. It features an auxiliary input that accommodates external devices, such as smartphones and portable media players. This flexibility allows for streaming music from various sources, enhancing your auditory experience while on the road. Its sleek design is complemented by a vibrant LCD display, providing visibility and ease of use both day and night.

The KD-G456 is accompanied by a couple of model variations: GET0291-001A and GET0291-002A. These models share many similar features, including the USB and auxiliary inputs, ensuring that users have a range of options for integrating their devices. Whether you prefer to listen via Bluetooth, USB, or even through traditional CD playback, these models offer seamless integration.

In terms of installation, the KD-G456 is designed to fit most standard vehicle dashboards. It comes with a wiring harness and supports various mounting options, making it accessible for both DIY enthusiasts and professional installers. Overall, the JVC KD-G456, along with its variations, represents a balanced combination of innovative technology, superior sound quality, and user-focused design, making it a great choice for music lovers who prioritize performance and convenience while driving.