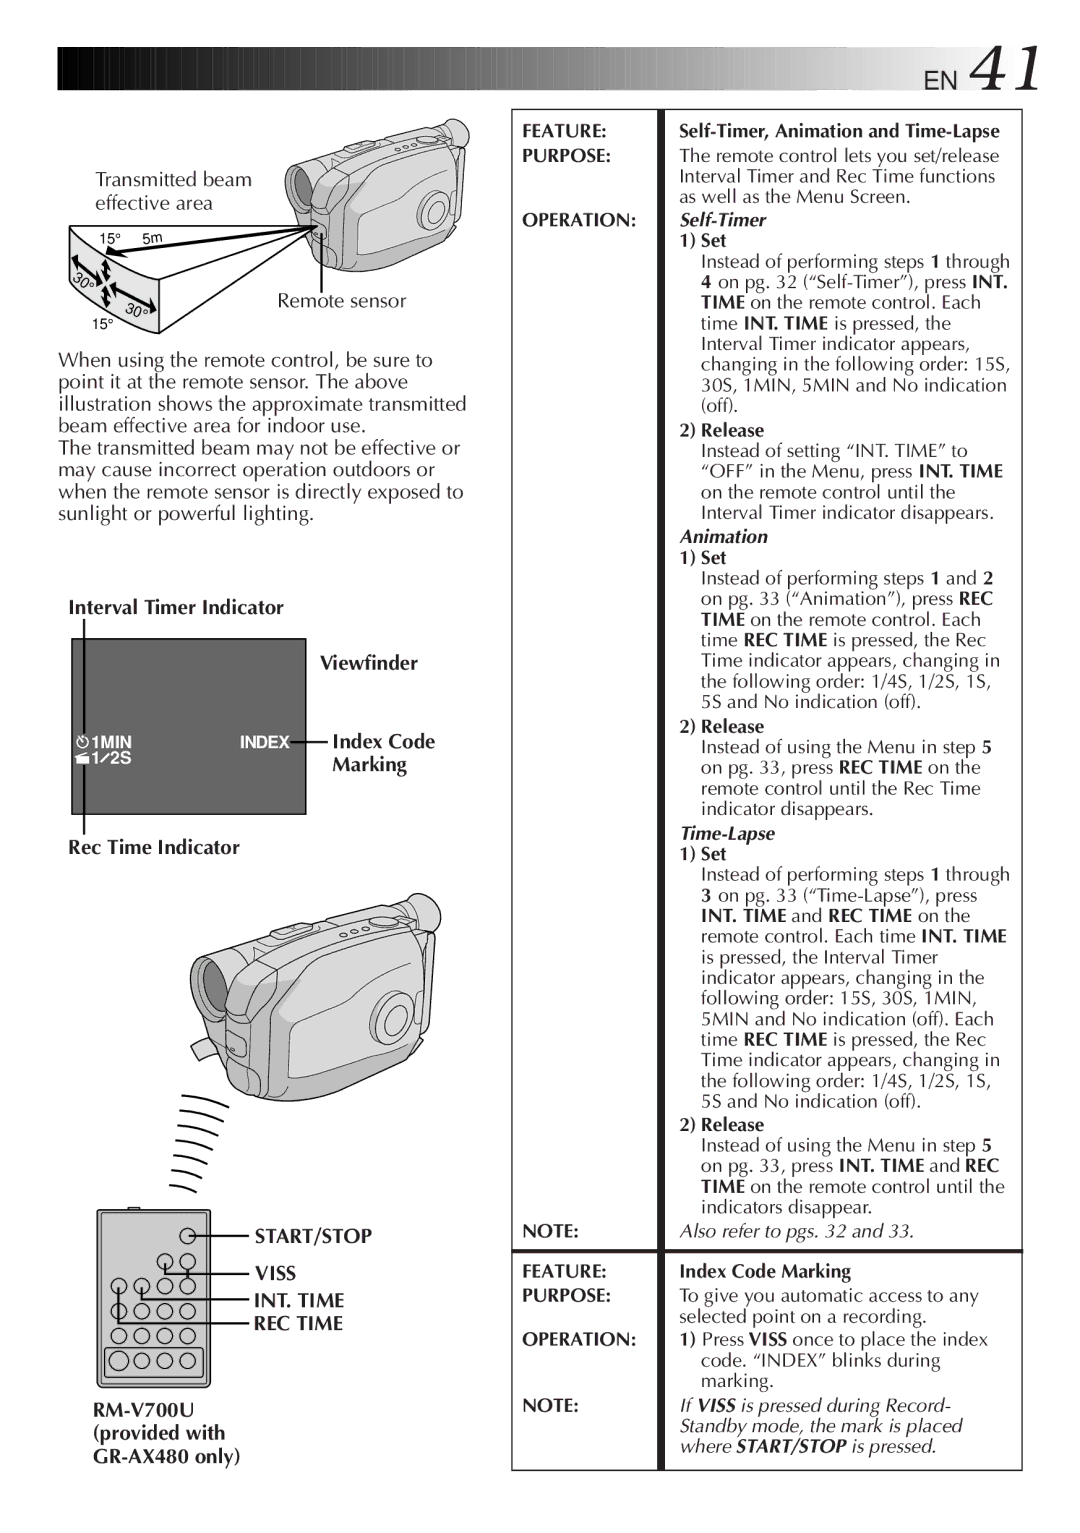
Transmitted beam effective area

15°

5m

30


°


30°

15°


Remote sensor


EN


41


FEATURE:

Self-Timer, Animation and Time-Lapse


PURPOSE:

The remote control lets you set/release


Interval Timer and Rec Time functions


as well as the Menu Screen.


OPERATION:

Self-Timer


1) Set


Instead of performing steps 1 through


4 on pg. 32 (“Self-Timer”), press INT.


TIME on the remote control. Each


time INT. TIME is pressed, the


Interval Timer indicator appears,

When using the remote control, be sure to point it at the remote sensor. The above illustration shows the approximate transmitted beam effective area for indoor use.

The transmitted beam may not be effective or may cause incorrect operation outdoors or when the remote sensor is directly exposed to sunlight or powerful lighting.

changing in the following order: 15S,

30S, 1MIN, 5MIN and No indication

(off).

2) Release

Instead of setting “INT. TIME” to

“OFF” in the Menu, press INT. TIME

on the remote control until the

Interval Timer indicator disappears.

Animation

1) Set

Instead of performing steps 1 and 2

on pg. 33 (“Animation”), press REC

Interval Timer Indicator


1MIN

INDEX


1 2S


Viewfinder

Index Code Marking

TIME on the remote control. Each

time REC TIME is pressed, the Rec

Time indicator appears, changing in

the following order: 1/4S, 1/2S, 1S,

5S and No indication (off).

2) Release

Instead of using the Menu in step 5

on pg. 33, press REC TIME on the

remote control until the Rec Time

indicator disappears.

Time-Lapse

Rec Time Indicator

START/STOP

VISS

INT. TIME

REC TIME

RM-V700U (provided with GR-AX480 only)


1) Set


Instead of performing steps 1 through


3 on pg. 33 (“Time-Lapse”), press


INT. TIME and REC TIME on the


remote control. Each time INT. TIME


is pressed, the Interval Timer


indicator appears, changing in the


following order: 15S, 30S, 1MIN,


5MIN and No indication (off). Each


time REC TIME is pressed, the Rec


Time indicator appears, changing in


the following order: 1/4S, 1/2S, 1S,


5S and No indication (off).


2) Release


Instead of using the Menu in step 5


on pg. 33, press INT. TIME and REC


TIME on the remote control until the


indicators disappear.

NOTE:

Also refer to pgs. 32 and 33.


FEATURE:

Index Code Marking

PURPOSE:

To give you automatic access to any


selected point on a recording.

OPERATION:

1) Press VISS once to place the index


code. “INDEX” blinks during


marking.

NOTE:

If VISS is pressed during Record-


Standby mode, the mark is placed


where START/STOP is pressed.

Page 41
Image 41
JVC GR-AX280, GR-AX480 specifications Interval Timer Indicator, START/STOP Viss INT. Time REC Time

GR-AX280, GR-AX480 specifications

The JVC GR-AX480 and GR-AX280 are compact and versatile camcorders that became popular in the late 1990s and early 2000s, providing users with the opportunity to capture memories with ease and quality. Both models feature a combination of innovative technologies that made them stand out in the crowded market of consumer camcorders of that era.

At the core of these camcorders is JVC's advanced video recording system, which employs VHS-C format. This allowed for convenient video playback on standard VHS players using an adapter. The GR-AX480 and GR-AX280 are equipped with 700,000-pixel CCD sensors that contribute to the clarity and vibrancy of the recorded footage, ensuring decent image quality even in less favorable lighting conditions.

One of the defining characteristics of these camcorders is their optical zoom capabilities. The GR-AX480 offers a 20x optical zoom lens, allowing users to zoom in on distant subjects without losing image quality. Meanwhile, the GR-AX280 features a slightly less powerful 16x optical zoom. Both models come with a digital zoom feature, significantly extending their zoom range for more flexibility in different shooting scenarios.

User convenience is a prominent design element in both models. The camcorders are equipped with a 2.5-inch LCD screen that provides an intuitive interface for monitoring and playback. The GR-AX480 model features a color LCD while the GR-AX280 has a similar-sized monochrome display, making it easier to frame shots accurately.

In terms of audio, the characteristics of these models include an integrated microphone that captures sound effectively during recordings, ensuring that the audio quality matches the visuals. Additionally, both camcorders support high-quality playback through a range of available outputs, including an S-Video output for enhanced picture quality.

Portability is another significant advantage of the GR-AX480 and GR-AX280. Their compact size and lightweight design make them easy to carry and handle, appealing to both amateur filmmakers and casual users. The user-friendly controls allow for easy operation, making it accessible to a wide audience.

In conclusion, the JVC GR-AX480 and GR-AX280 camcorders encapsulated the technological advancements and consumer-friendly features of their time. With their reliable recording capabilities, effective zoom lenses, and user-friendly designs, these camcorders were instrumental in helping users capture cherished moments on video.