NOTES:
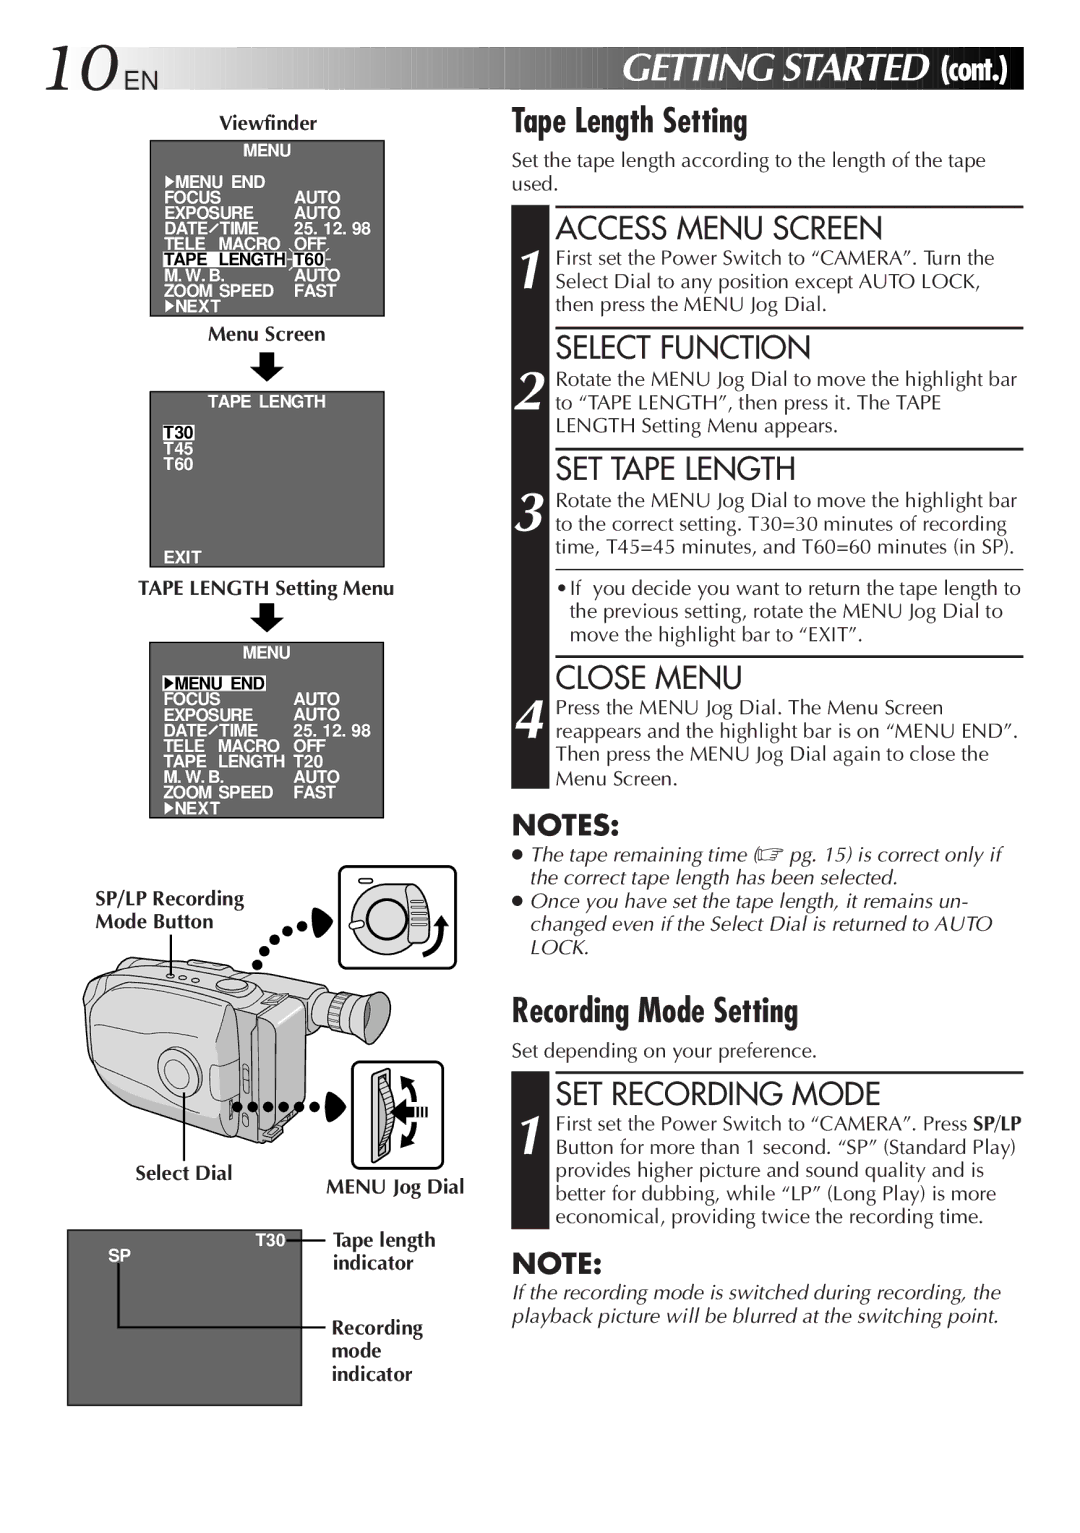
Press the MENU Jog Dial. The Menu Screen reappears and the highlight bar is on “MENU END”. Then press the MENU Jog Dial again to close the Menu Screen.
4
SET TAPE LENGTH
3 Rotate the MENU Jog Dial to move the highlight bar to the correct setting. T30=30 minutes of recording time, T45=45 minutes, and T60=60 minutes (in SP).
•If you decide you want to return the tape length to the previous setting, rotate the MENU Jog Dial to move the highlight bar to “EXIT”.
CLOSE MENU
Rotate the MENU Jog Dial to move the highlight bar to “TAPE LENGTH”, then press it. The TAPE LENGTH Setting Menu appears.
SELECT FUNCTION
1 First set the Power Switch to “CAMERA”. Turn the Select Dial to any position except AUTO LOCK, then press the MENU Jog Dial.
2
Tape Length Setting
Set the tape length according to the length of the tape used.
ACCESS MENU SCREEN
GETTING STARTED
(cont.)

10EN

Viewfinder

MENU


4MENU END

AUTO


FOCUS


EXPOSURE

AUTO


DATE

TIME

25. 12. 98


TELE

MACRO

OFF


TAPE LENGTH


T60


M. W. B.


AUTO


ZOOM SPEED

FAST


4NEXT


Menu Screen


TAPE LENGTH


T30


T45


T60


EXIT


TAPE LENGTH Setting Menu


MENU


4MENU END

AUTO


FOCUS


EXPOSURE

AUTO


DATE

TIME

25. 12. 98


TELE

MACRO

OFF


TAPE LENGTH

T20


M. W. B.

AUTO


ZOOM SPEED

FAST


4NEXT


SP/LP Recording


Mode Button


The tape remaining time (pg. 15) is correct only if the correct tape length has been selected.

Once you have set the tape length, it remains un- changed even if the Select Dial is returned to AUTO LOCK.

Select Dial

T30

SP

MENU Jog Dial

Tape length indicator

Recording mode indicator

Recording Mode Setting

Set depending on your preference.

SET RECORDING MODE

1 First set the Power Switch to “CAMERA”. Press SP/LP Button for more than 1 second. “SP” (Standard Play) provides higher picture and sound quality and is better for dubbing, while “LP” (Long Play) is more economical, providing twice the recording time.

NOTE:

If the recording mode is switched during recording, the playback picture will be blurred at the switching point.

Page 10
Image 10
JVC GR-AX480, GR-AX280 Recording Mode Setting, SET Recording Mode, Menu Jog Dial, Set depending on your preference

GR-AX280, GR-AX480 specifications

The JVC GR-AX480 and GR-AX280 are compact and versatile camcorders that became popular in the late 1990s and early 2000s, providing users with the opportunity to capture memories with ease and quality. Both models feature a combination of innovative technologies that made them stand out in the crowded market of consumer camcorders of that era.

At the core of these camcorders is JVC's advanced video recording system, which employs VHS-C format. This allowed for convenient video playback on standard VHS players using an adapter. The GR-AX480 and GR-AX280 are equipped with 700,000-pixel CCD sensors that contribute to the clarity and vibrancy of the recorded footage, ensuring decent image quality even in less favorable lighting conditions.

One of the defining characteristics of these camcorders is their optical zoom capabilities. The GR-AX480 offers a 20x optical zoom lens, allowing users to zoom in on distant subjects without losing image quality. Meanwhile, the GR-AX280 features a slightly less powerful 16x optical zoom. Both models come with a digital zoom feature, significantly extending their zoom range for more flexibility in different shooting scenarios.

User convenience is a prominent design element in both models. The camcorders are equipped with a 2.5-inch LCD screen that provides an intuitive interface for monitoring and playback. The GR-AX480 model features a color LCD while the GR-AX280 has a similar-sized monochrome display, making it easier to frame shots accurately.

In terms of audio, the characteristics of these models include an integrated microphone that captures sound effectively during recordings, ensuring that the audio quality matches the visuals. Additionally, both camcorders support high-quality playback through a range of available outputs, including an S-Video output for enhanced picture quality.

Portability is another significant advantage of the GR-AX480 and GR-AX280. Their compact size and lightweight design make them easy to carry and handle, appealing to both amateur filmmakers and casual users. The user-friendly controls allow for easy operation, making it accessible to a wide audience.

In conclusion, the JVC GR-AX480 and GR-AX280 camcorders encapsulated the technological advancements and consumer-friendly features of their time. With their reliable recording capabilities, effective zoom lenses, and user-friendly designs, these camcorders were instrumental in helping users capture cherished moments on video.