52EN

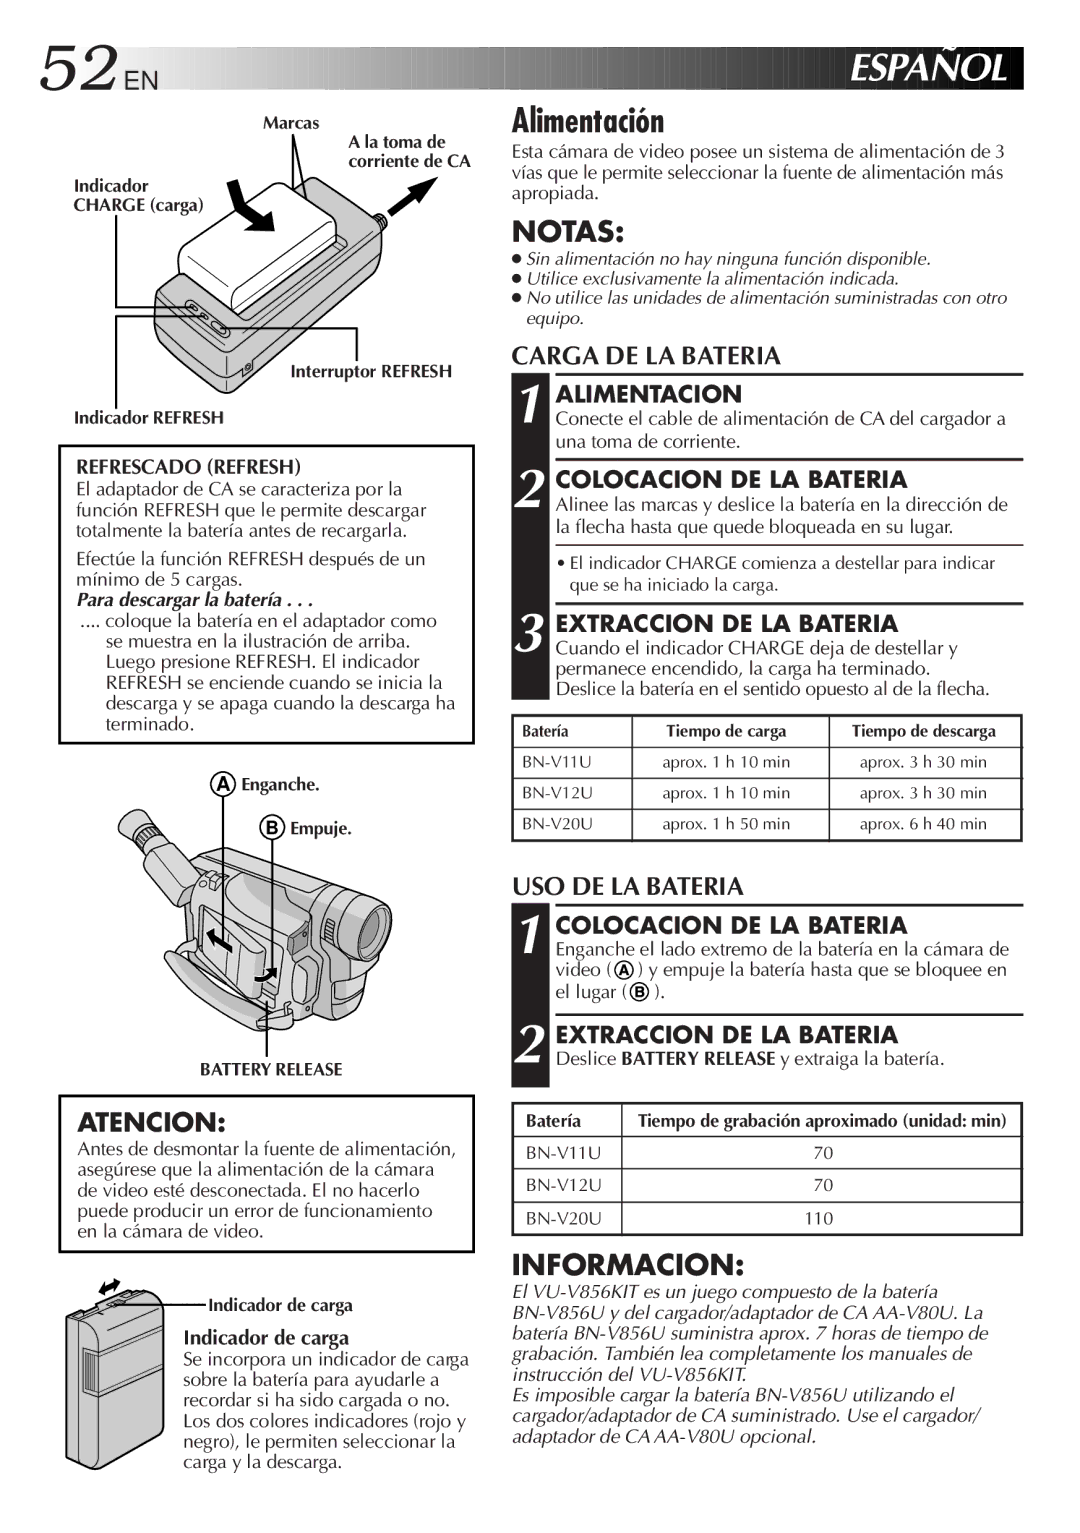
Marcas

A la toma de

corriente de CA

Indicador

CHARGE (carga)

Interruptor REFRESH

Indicador REFRESH

REFRESCADO (REFRESH)

El adaptador de CA se caracteriza por la función REFRESH que le permite descargar totalmente la batería antes de recargarla.

Efectúe la función REFRESH después de un mínimo de 5 cargas.

Para descargar la batería . . .

.... coloque la batería en el adaptador como

se muestra en la ilustración de arriba. Luego presione REFRESH. El indicador REFRESH se enciende cuando se inicia la descarga y se apaga cuando la descarga ha terminado.

AEnganche.

B Empuje.

ESPAÑOL

Alimentación

Esta cámara de video posee un sistema de alimentación de 3 vías que le permite seleccionar la fuente de alimentación más apropiada.

NOTAS:

Sin alimentación no hay ninguna función disponible.

Utilice exclusivamente la alimentación indicada.

No utilice las unidades de alimentación suministradas con otro equipo.

CARGA DE LA BATERIA

1 ALIMENTACION

Conecte el cable de alimentación de CA del cargador a una toma de corriente.

2 COLOCACION DE LA BATERIA

Alinee las marcas y deslice la batería en la dirección de la flecha hasta que quede bloqueada en su lugar.

El indicador CHARGE comienza a destellar para indicar que se ha iniciado la carga.

3 EXTRACCION DE LA BATERIA Cuando el indicador CHARGE deja de destellar y permanece encendido, la carga ha terminado. Deslice la batería en el sentido opuesto al de la flecha.

Batería

Tiempo de carga

Tiempo de descarga


BN-V11U

aprox. 1 h 10 min

aprox. 3 h 30 min


BN-V12U

aprox. 1 h 10 min

aprox. 3 h 30 min


BN-V20U

aprox. 1 h 50 min

aprox. 6 h 40 min


BATTERY RELEASE

ATENCION:

Antes de desmontar la fuente de alimentación, asegúrese que la alimentación de la cámara de video esté desconectada. El no hacerlo puede producir un error de funcionamiento en la cámara de video.

Indicador de carga

Indicador de carga

Se incorpora un indicador de carga sobre la batería para ayudarle a recordar si ha sido cargada o no. Los dos colores indicadores (rojo y negro), le permiten seleccionar la carga y la descarga.

USO DE LA BATERIA

COLOCACION DE LA BATERIA

1 Enganche el lado extremo de la batería en la cámara de

video (

) y empuje la batería hasta que se bloquee en

el lugar (

).

2 EXTRACCION DE LA BATERIA Deslice BATTERY RELEASE y extraiga la batería.

Batería

Tiempo de grabación aproximado (unidad: min)


BN-V11U

70


BN-V12U

70


BN-V20U

110


INFORMACION:

El VU-V856KIT es un juego compuesto de la batería BN-V856U y del cargador/adaptador de CA AA-V80U. La batería BN-V856U suministra aprox. 7 horas de tiempo de grabación. También lea completamente los manuales de instrucción del VU-V856KIT.

Es imposible cargar la batería BN-V856U utilizando el cargador/adaptador de CA suministrado. Use el cargador/ adaptador de CA AA-V80U opcional.

Page 52
Image 52
JVC GR-AX640 manual Alimentación, Alimentacion, Colocacion DE LA Bateria, Indicador de carga

GR-AX640 specifications

The JVC GR-AX640 is a compact and versatile camcorder that was particularly popular during the transition era from analog to digital video recording. Launched in the mid-1990s, this model combines user-friendly features with a range of advanced technologies for its time, making it a preferred choice for amateur videographers and families alike.

One of the standout features of the GR-AX640 is its lightweight and portable design, making it easy to carry for on-the-go recording. With its built-in 16x optical zoom lens, users can capture distant subjects with clarity, while the 700x digital zoom provides additional magnification for close-ups. This camcorder offers impressive image stabilization technology, which minimizes the shake and blur that can occur during handheld operation, ensuring smooth and stable footage even in dynamic situations.

The camcorder is equipped with a 3-inch LCD screen, allowing users to easily frame their shots and navigate the settings. This feature enhances the ease of use, particularly for those unfamiliar with camcorder controls. Additionally, the GR-AX640 provides a range of recording options, including both SP and LP modes, allowing users to maximize tape usage with extended recording times.

In terms of audio, the GR-AX640 features a built-in microphone that captures clear sound, and there is an option for an external microphone input, providing flexibility for users who require enhanced audio quality. The camcorder also includes a variety of effects and transition features, which add creative flair to recordings, catering to those looking to produce more polished videos.

Another notable characteristic of the GR-AX640 is its compatibility with VHS-C tapes, making it easy to integrate into existing collections of home videos. It also offers an array of connectivity options, including an AV output for easy playback on a television and a battery life that is commendable for extended shooting sessions.

In summary, the JVC GR-AX640 is a well-rounded camcorder that effectively meets the needs of everyday users with its combination of portability, advanced features, and ease of use. Although it may be considered vintage in the current digital age, it remains a memorable device for many who captured their cherished moments during its heyday.