14

RECORDING Basic Recording

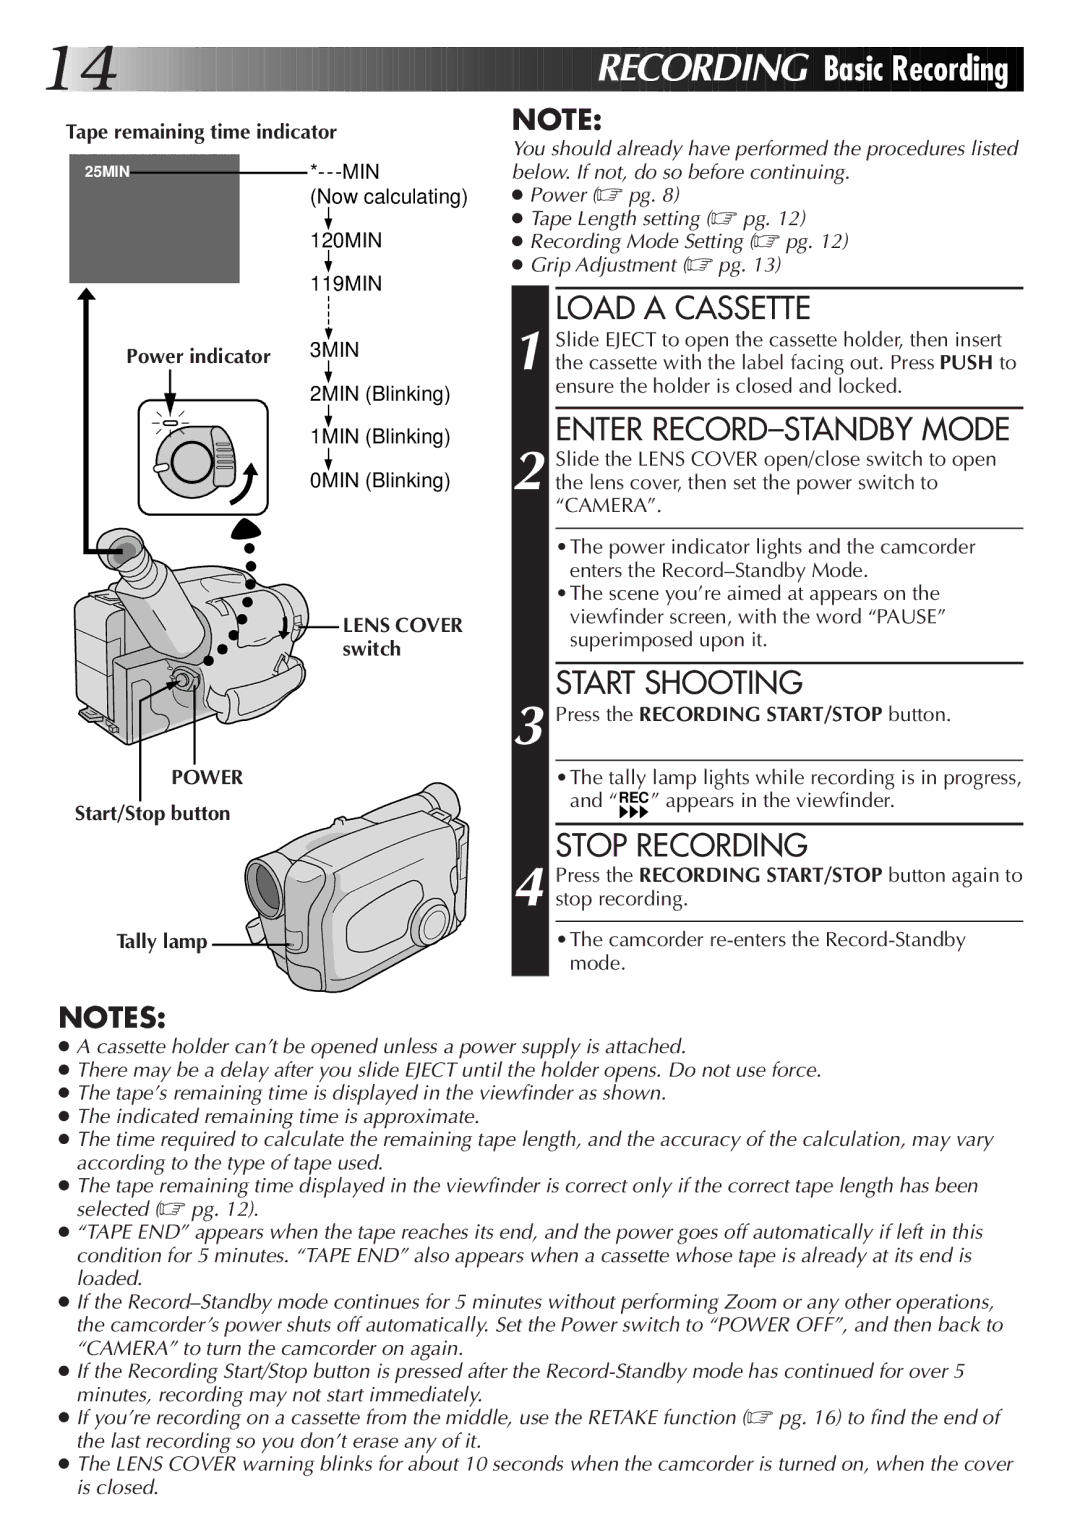
Tape remaining time indicator

25MIN

*---MIN


(Now calculating)


120MIN


119MIN

Power indicator

3MIN


2MIN (Blinking)


1MIN (Blinking)


0MIN (Blinking)

LENS COVER switch

POWER

Start/Stop button

Tally lamp

NOTE:

You should already have performed the procedures listed below. If not, do so before continuing.

Power (pg. 8)

Tape Length setting (pg. 12)

Recording Mode Setting (pg. 12)

Grip Adjustment (pg. 13)

LOAD A CASSETTE

1 Slide EJECT to open the cassette holder, then insert the cassette with the label facing out. Press PUSH to ensure the holder is closed and locked.

ENTER RECORD–STANDBY MODE

2 Slide the LENS COVER open/close switch to open the lens cover, then set the power switch to “CAMERA”.

•The power indicator lights and the camcorder enters the Record–Standby Mode.

•The scene you’re aimed at appears on the viewfinder screen, with the word “PAUSE” superimposed upon it.

START SHOOTING

3 Press the RECORDING START/STOP button.

•The tally lamp lights while recording is in progress, and “REC ” appears in the viewfinder.

STOP RECORDING

4 Press the RECORDING START/STOP button again to stop recording.

•The camcorder re-enters the Record-Standby mode.

NOTES:

A cassette holder can’t be opened unless a power supply is attached.

There may be a delay after you slide EJECT until the holder opens. Do not use force.

The tape’s remaining time is displayed in the viewfinder as shown.

The indicated remaining time is approximate.

The time required to calculate the remaining tape length, and the accuracy of the calculation, may vary according to the type of tape used.

The tape remaining time displayed in the viewfinder is correct only if the correct tape length has been selected (pg. 12).

“TAPE END” appears when the tape reaches its end, and the power goes off automatically if left in this condition for 5 minutes. “TAPE END” also appears when a cassette whose tape is already at its end is loaded.

If the Record–Standby mode continues for 5 minutes without performing Zoom or any other operations, the camcorder’s power shuts off automatically. Set the Power switch to “POWER OFF”, and then back to “CAMERA” to turn the camcorder on again.

If the Recording Start/Stop button is pressed after the Record-Standby mode has continued for over 5 minutes, recording may not start immediately.

If you’re recording on a cassette from the middle, use the RETAKE function (pg. 16) to find the end of the last recording so you don’t erase any of it.

The LENS COVER warning blinks for about 10 seconds when the camcorder is turned on, when the cover is closed.

Page 14
Image 14
JVC GR-AX46, GR-AX76, GR-AX26 manual Load a Cassette, Enter RECORD-STANDBY Mode, Start Shooting, Stop Recording

GR-AX76, GR-AX46, GR-AX26 specifications

The JVC GR-AX26, GR-AX46, and GR-AX76 are part of JVC's lineup of compact camcorders that were designed to cater to both amateur videographers and more experienced users looking for versatility and quality in a small form factor. These models bear witness to the evolution of portable video technology, showcasing an array of useful features and specifications.

At the core of these camcorders is JVC's advanced cassette technology, allowing users to record video in the widely used VHS format. This makes transferring footage to other devices simple, as this format is recognized across various platforms. The GR-AX26, GR-AX46, and GR-AX76 all feature a powerful zoom lens, with the GR-AX76 boasting a more advanced zoom capability that allows for captivating close-up shots without sacrificing image quality.

Another standout feature of these models is their optical image stabilization technology. This feature significantly reduces the effects of camera shake, which is particularly valuable when shooting handheld. It ensures smoother video playback even when the user is in motion, making them ideal for events or outdoor activities. High-quality video output is further enhanced by the incorporation of JVC’s Super VHS quality image processing, which provides clearer and sharper images under a variety of lighting conditions.

The GR-AX series also includes easy-to-navigate controls and a user-friendly interface, catering to users at different skill levels. The LCD screens on these models offer a convenient preview of recordings, allowing for precise framing and composition in real-time. Some models also come equipped with a built-in light feature for low-light shooting conditions, ensuring versatility wherever one chooses to record.

In terms of build characteristics, the camcorders are designed to be lightweight and compact, making them easy to carry around during various outings and events. The sleek design is accompanied by a durable casing that protects the internal components while maintaining a professional appearance.

While specific features may vary across the different models in the GR-AX series, they collectively represent a blend of technology, versatility, and ease of use. Whether capturing family moments or documenting adventures, the JVC GR-AX26, GR-AX46, and GR-AX76 provide users with reliable tools for preserving memories through video.