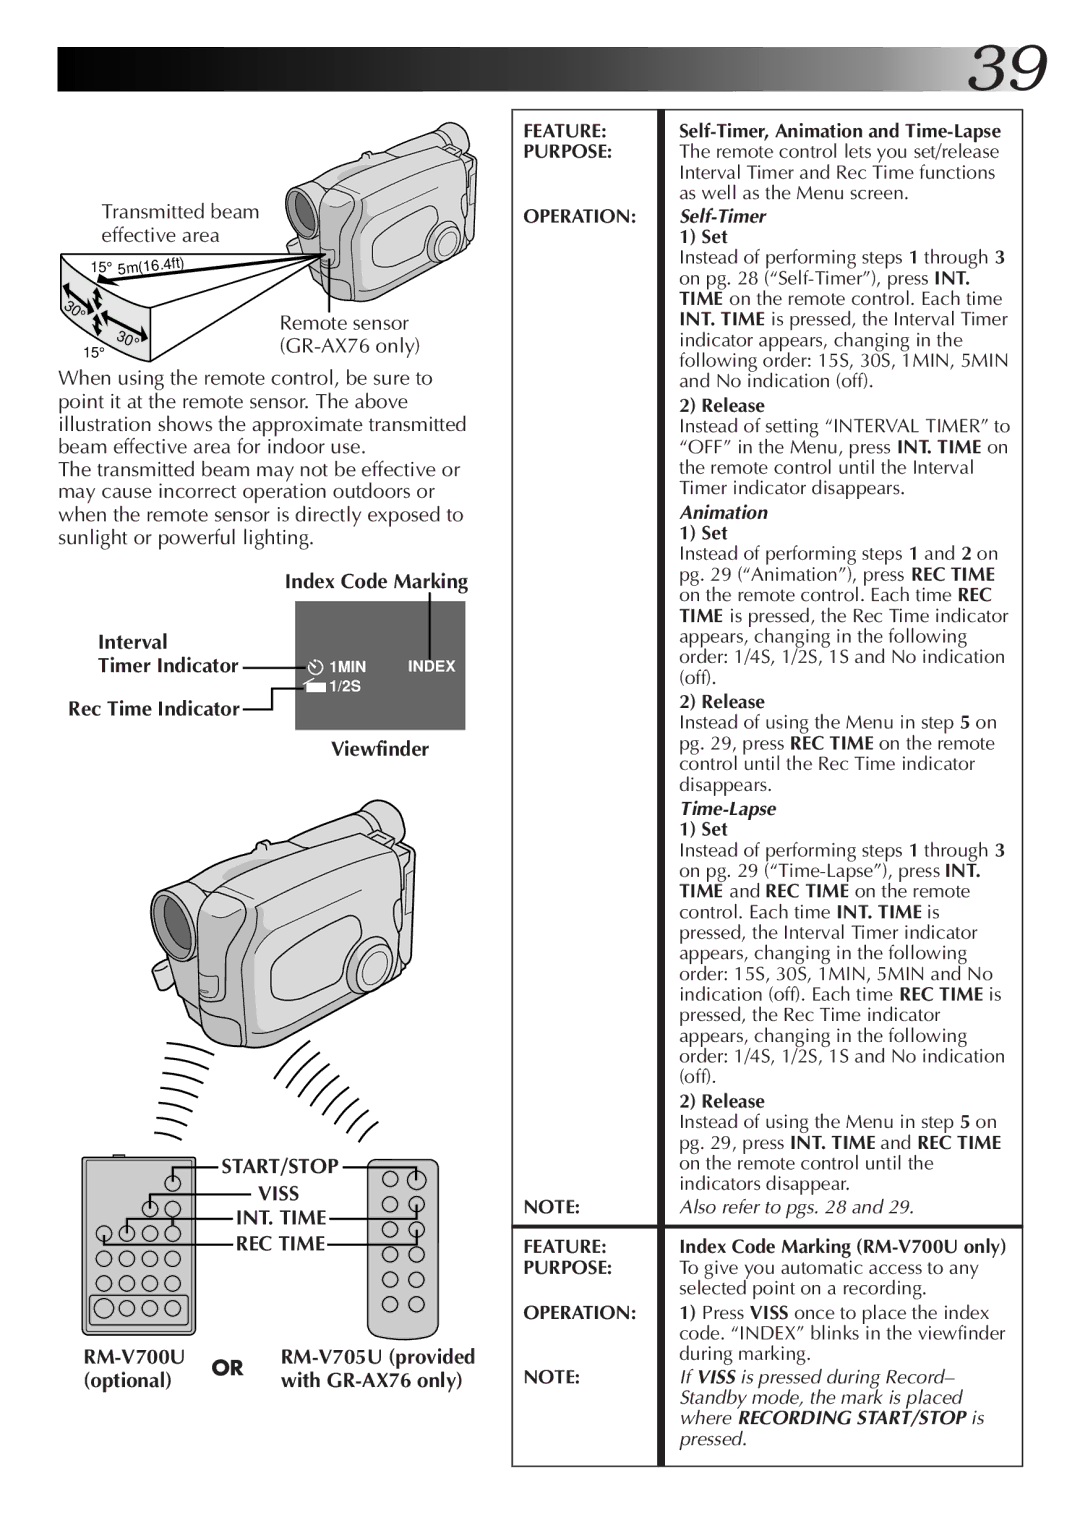
JVC GR-AX76 Transmitted beam effective area, Rem ote sensor, START/STOP Viss INT. Time REC Time

Models: GR-AX76 GR-AX46 GR-AX26

1 56
Download 56 pages 55.63 Kb
Page 39
Image 39

Transmitted beam effective area


.4ft)


15° 5m(16


30


°


Remote sensor


30°

15°

(GR-AX76 only)


When using the remote control, be sure to point it at the remote sensor. The above illustration shows the approximate transmitted beam effective area for indoor use.

The transmitted beam may not be effective or may cause incorrect operation outdoors or when the remote sensor is directly exposed to sunlight or powerful lighting.


Index Code Ma


ing


rk

Interval


Timer Indicator


1MIN

INDEX


Rec Time Indicator


1/2S


Viewfinder

START/STOP

VISS

INT. TIME

REC TIME

RM-V700U

OR

RM-V705U (provided

(optional)


with GR-AX76 only)


39

FEATURE:

Self-Timer, Animation and Time-Lapse


PURPOSE:

The remote control lets you set/release


Interval Timer and Rec Time functions


as well as the Menu screen.


OPERATION:

Self-Timer


1) Set


Instead of performing steps 1 through 3


on pg. 28 (“Self-Timer”), press INT.


TIME on the remote control. Each time


INT. TIME is pressed, the Interval Timer


indicator appears, changing in the


following order: 15S, 30S, 1MIN, 5MIN


and No indication (off).


2) Release


Instead of setting “INTERVAL TIMER” to


“OFF” in the Menu, press INT. TIME on


the remote control until the Interval


Timer indicator disappears.


Animation


1) Set


Instead of performing steps 1 and 2 on


pg. 29 (“Animation”), press REC TIME


on the remote control. Each time REC


TIME is pressed, the Rec Time indicator


appears, changing in the following


order: 1/4S, 1/2S, 1S and No indication


(off).


2) Release


Instead of using the Menu in step 5 on


pg. 29, press REC TIME on the remote


control until the Rec Time indicator


disappears.


Time-Lapse


1) Set


Instead of performing steps 1 through 3


on pg. 29 (“Time-Lapse”), press INT.


TIME and REC TIME on the remote


control. Each time INT. TIME is


pressed, the Interval Timer indicator


appears, changing in the following


order: 15S, 30S, 1MIN, 5MIN and No


indication (off). Each time REC TIME is


pressed, the Rec Time indicator


appears, changing in the following


order: 1/4S, 1/2S, 1S and No indication


(off).


2) Release


Instead of using the Menu in step 5 on


pg. 29, press INT. TIME and REC TIME


on the remote control until the


indicators disappear.


NOTE:

Also refer to pgs. 28 and 29.


FEATURE:

Index Code Marking (RM-V700U only)


PURPOSE:

To give you automatic access to any


selected point on a recording.


OPERATION:

1) Press VISS once to place the index


code. “INDEX” blinks in the viewfinder


during marking.


NOTE:

If VISS is pressed during Record–


Standby mode, the mark is placed


where RECORDING START/STOP is


pressed.


Page 39
Image 39
JVC GR-AX76 manual Transmitted beam effective area, Rem ote sensor, START/STOP Viss INT. Time REC Time, RM-V700U, Optional

GR-AX76, GR-AX46, GR-AX26 specifications

The JVC GR-AX26, GR-AX46, and GR-AX76 are part of JVC's lineup of compact camcorders that were designed to cater to both amateur videographers and more experienced users looking for versatility and quality in a small form factor. These models bear witness to the evolution of portable video technology, showcasing an array of useful features and specifications.

At the core of these camcorders is JVC's advanced cassette technology, allowing users to record video in the widely used VHS format. This makes transferring footage to other devices simple, as this format is recognized across various platforms. The GR-AX26, GR-AX46, and GR-AX76 all feature a powerful zoom lens, with the GR-AX76 boasting a more advanced zoom capability that allows for captivating close-up shots without sacrificing image quality.

Another standout feature of these models is their optical image stabilization technology. This feature significantly reduces the effects of camera shake, which is particularly valuable when shooting handheld. It ensures smoother video playback even when the user is in motion, making them ideal for events or outdoor activities. High-quality video output is further enhanced by the incorporation of JVC’s Super VHS quality image processing, which provides clearer and sharper images under a variety of lighting conditions.

The GR-AX series also includes easy-to-navigate controls and a user-friendly interface, catering to users at different skill levels. The LCD screens on these models offer a convenient preview of recordings, allowing for precise framing and composition in real-time. Some models also come equipped with a built-in light feature for low-light shooting conditions, ensuring versatility wherever one chooses to record.

In terms of build characteristics, the camcorders are designed to be lightweight and compact, making them easy to carry around during various outings and events. The sleek design is accompanied by a durable casing that protects the internal components while maintaining a professional appearance.

While specific features may vary across the different models in the GR-AX series, they collectively represent a blend of technology, versatility, and ease of use. Whether capturing family moments or documenting adventures, the JVC GR-AX26, GR-AX46, and GR-AX76 provide users with reliable tools for preserving memories through video.