MENU SETTINGS

1 Set the Power Switch 0 to ”.

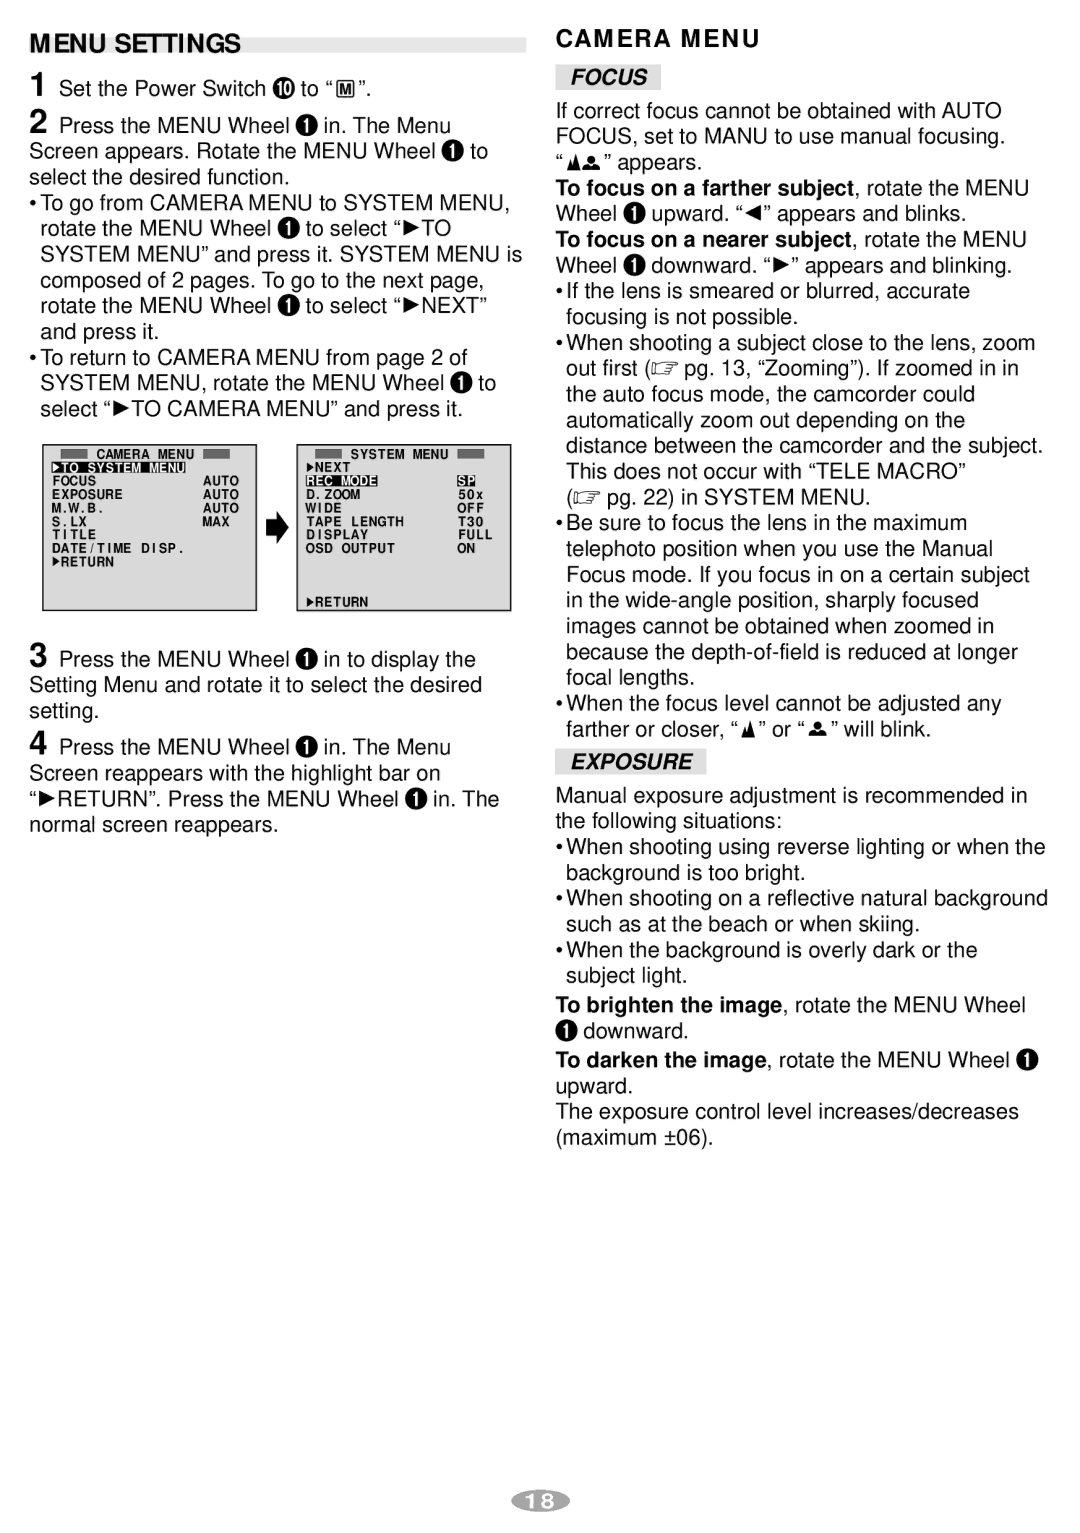
2 Press the MENU Wheel 1 in. The Menu Screen appears. Rotate the MENU Wheel 1 to select the desired function.

To go from CAMERA MENU to SYSTEM MENU, rotate the MENU Wheel 1 to select “4TO SYSTEM MENU” and press it. SYSTEM MENU is composed of 2 pages. To go to the next page, rotate the MENU Wheel 1 to select “4NEXT” and press it.

To return to CAMERA MENU from page 2 of SYSTEM MENU, rotate the MENU Wheel 1 to select “4TO CAMERA MENU” and press it.


CAMERA MENU


SYS T EM MENU


 TO SYS T EM MENU


AUTO

NEX T


FOCUS


REC MODE

SP

EXPOSURE

AUTO

D . ZOOM

5 0 x

M . W . B .

AUTO

W I DE

OF F

S . L X

MAX

TAPE L ENGTH

T 3 0

T I T L E


D I SP LAY

FUL L

DAT E / T I ME D I SP .


OSD OUT PUT

ON

RE TURN


RE TURN

3 Press the MENU Wheel 1 in to display the Setting Menu and rotate it to select the desired setting.

4 Press the MENU Wheel 1 in. The Menu Screen reappears with the highlight bar on “4RETURN”. Press the MENU Wheel 1 in. The normal screen reappears.

CAMERA MENU

FOCUS

If correct focus cannot be obtained with AUTO FOCUS, set to MANU to use manual focusing.

” appears.

To focus on a farther subject, rotate the MENU Wheel 1 upward. “1” appears and blinks.

To focus on a nearer subject, rotate the MENU Wheel 1 downward. “4” appears and blinking.

If the lens is smeared or blurred, accurate focusing is not possible.

When shooting a subject close to the lens, zoom out first ( pg. 13, “Zooming”). If zoomed in in the auto focus mode, the camcorder could automatically zoom out depending on the distance between the camcorder and the subject.

This does not occur with “TELE MACRO” ( pg. 22) in SYSTEM MENU.

Be sure to focus the lens in the maximum telephoto position when you use the Manual Focus mode. If you focus in on a certain subject in the wide-angle position, sharply focused images cannot be obtained when zoomed in because the depth-of-field is reduced at longer focal lengths.

When the focus level cannot be adjusted any farther or closer, “ ” or “ ” will blink.

EXPOSURE

Manual exposure adjustment is recommended in the following situations:

When shooting using reverse lighting or when the background is too bright.

When shooting on a reflective natural background such as at the beach or when skiing.

When the background is overly dark or the subject light.

To brighten the image, rotate the MENU Wheel

1downward.

To darken the image, rotate the MENU Wheel 1 upward.

The exposure control level increases/decreases (maximum ±06).

18

Page 18
Image 18
JVC GR-AX770 manual Menu Settings, Camera Menu, Focus, Exposure

GR-AX770 specifications

The JVC GR-AX770 is a camcorder that emerged in the late '90s, notable for its compact design, versatility, and array of features tailored for both amateur videographers and professionals. This model is part of JVC's renowned line of compact camcorders that aimed to deliver high-quality video while maintaining ease of use.

One of the defining characteristics of the JVC GR-AX770 is its lightweight design, making it highly portable. Weighing in at around 1.5 kilograms, it is designed for users who want to capture memories on the go without the burden of heavy equipment. The camcorder features a sleek, user-friendly interface that allows for effortless operation, ensuring that even those new to videography can easily capture stunning footage.

The GR-AX770 boasts a powerful 700x digital zoom and a 34x optical zoom, providing flexibility for capturing distant subjects without sacrificing image quality. With its 3CCD imaging system, this camcorder captures vibrant colors and sharp details, significantly improving overall video quality compared to traditional single-chip systems. The advanced image stabilization technology also helps reduce shaky footage, an essential feature for handheld shooting.

Another key feature of the GR-AX770 is its ability to record in Super VHS format, which offers enhanced resolution and dynamic range compared to standard VHS. This allows users to achieve professional-grade results in their recordings. Additionally, the camcorder supports analog output, enabling seamless connectivity to television sets and other playback devices, allowing for easy viewing of your creations.

The GR-AX770 includes built-in effects and transitions, which enhance creative possibilities for videographers. With a selection of digital effects, users can experiment with unique looks that add flair and personalization to their videos. The camcorder also supports various lighting conditions, thanks to its built-in flash and low-light capabilities, allowing for quality recordings in challenging environments.

In summary, the JVC GR-AX770 encapsulates the innovation of its era, marrying portability with advanced technology. Its combination of features such as optical and digital zoom, 3CCD imaging, Super VHS recording, and creative effects make it a noteworthy choice for anyone looking to delve into the world of video recording. Whether capturing family events, travel memories, or creative projects, the GR-AX770 remains a beloved piece of equipment for many enthusiasts.