80EN

TROUBLESHOOTING(cont.)

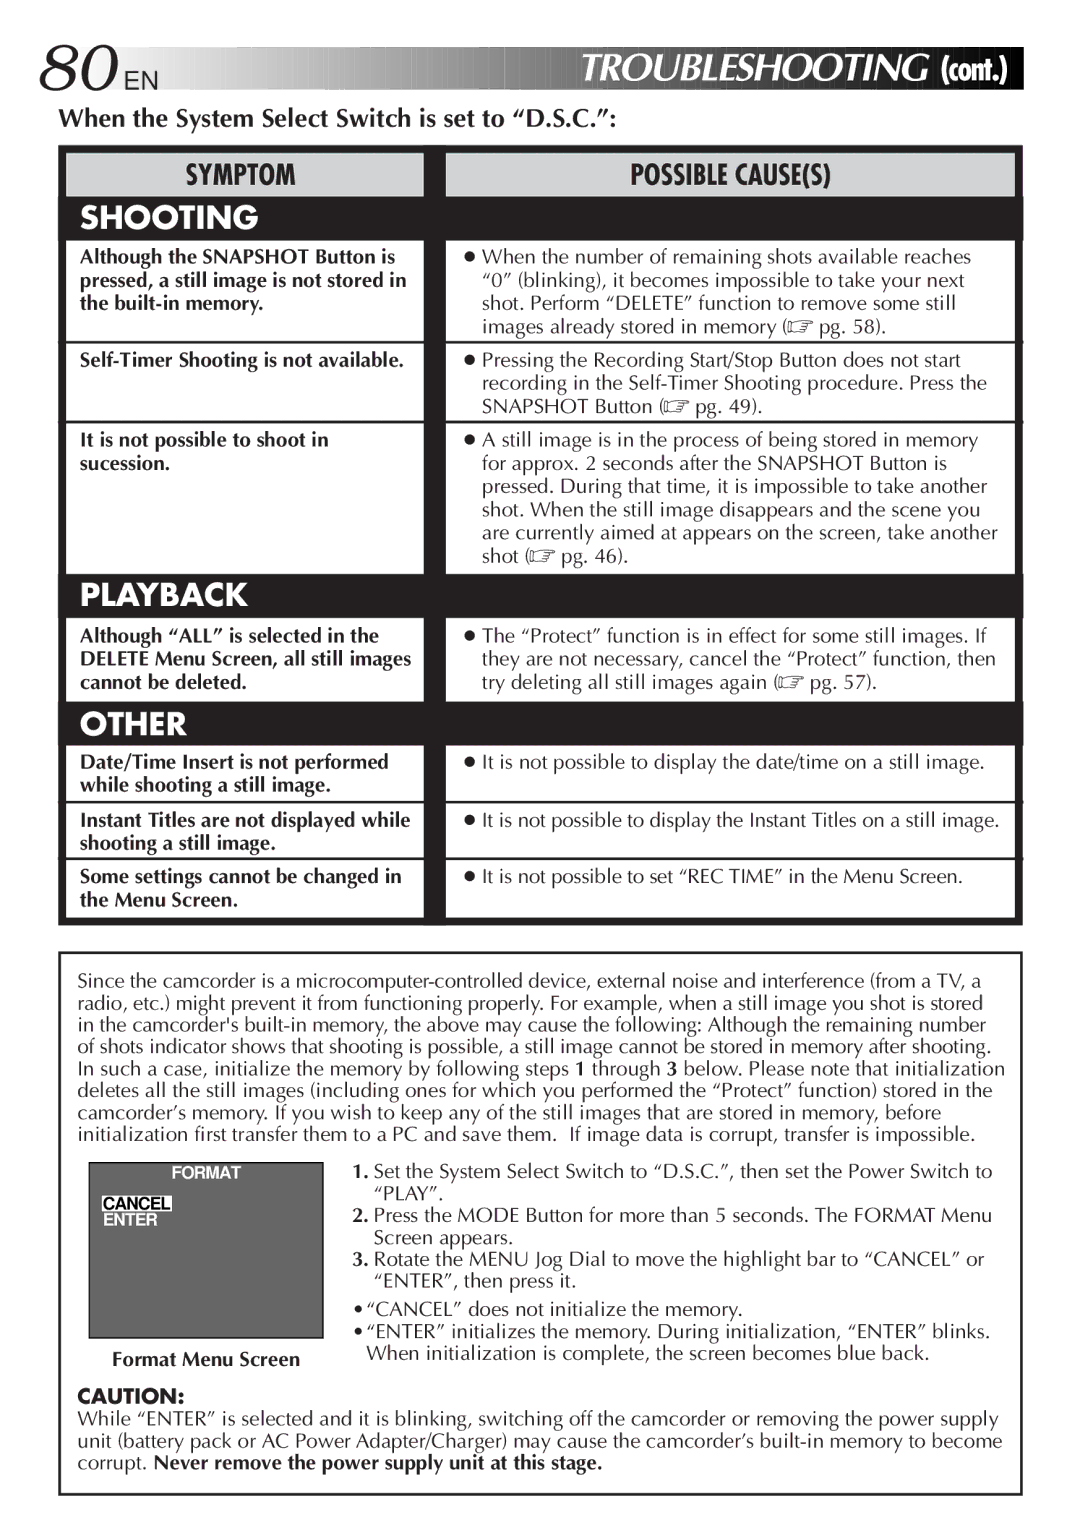
When the System Select Switch is set to “D.S.C.”:

SYMPTOM

SHOOTING

Although the SNAPSHOT Button is pressed, a still image is not stored in the built-in memory.

Self-Timer Shooting is not available.

It is not possible to shoot in sucession.

PLAYBACK

Although “ALL” is selected in the DELETE Menu Screen, all still images cannot be deleted.

OTHER

Date/Time Insert is not performed while shooting a still image.

Instant Titles are not displayed while shooting a still image.

Some settings cannot be changed in the Menu Screen.

POSSIBLE CAUSE(S)

When the number of remaining shots available reaches “0” (blinking), it becomes impossible to take your next

shot. Perform “DELETE” function to remove some still images already stored in memory (pg. 58).

Pressing the Recording Start/Stop Button does not start

recording in the Self-Timer Shooting procedure. Press the SNAPSHOT Button (pg. 49).

A still image is in the process of being stored in memory for approx. 2 seconds after the SNAPSHOT Button is pressed. During that time, it is impossible to take another shot. When the still image disappears and the scene you

are currently aimed at appears on the screen, take another shot (pg. 46).

The “Protect” function is in effect for some still images. If

they are not necessary, cancel the “Protect” function, then try deleting all still images again (pg. 57).

It is not possible to display the date/time on a still image.

It is not possible to display the Instant Titles on a still image.

It is not possible to set “REC TIME” in the Menu Screen.

Since the camcorder is a microcomputer-controlled device, external noise and interference (from a TV, a radio, etc.) might prevent it from functioning properly. For example, when a still image you shot is stored in the camcorder's built-in memory, the above may cause the following: Although the remaining number of shots indicator shows that shooting is possible, a still image cannot be stored in memory after shooting.

In such a case, initialize the memory by following steps 1 through 3 below. Please note that initialization deletes all the still images (including ones for which you performed the “Protect” function) stored in the camcorder’s memory. If you wish to keep any of the still images that are stored in memory, before initialization first transfer them to a PC and save them. If image data is corrupt, transfer is impossible.

FORMAT

CANCEL

ENTER

Format Menu Screen

1.Set the System Select Switch to “D.S.C.”, then set the Power Switch to “PLAY”.

2.Press the MODE Button for more than 5 seconds. The FORMAT Menu Screen appears.

3.Rotate the MENU Jog Dial to move the highlight bar to “CANCEL” or “ENTER”, then press it.

•“CANCEL” does not initialize the memory.

•“ENTER” initializes the memory. During initialization, “ENTER” blinks. When initialization is complete, the screen becomes blue back.

CAUTION:

While “ENTER” is selected and it is blinking, switching off the camcorder or removing the power supply unit (battery pack or AC Power Adapter/Charger) may cause the camcorder’s built-in memory to become corrupt. Never remove the power supply unit at this stage.

Page 80
Image 80
JVC GR-AX999UM, LYT0108-001A manual Troubleshooting, Format Menu Screen

LYT0108-001A, GR-AX999UM specifications

The JVC GR-AX999UM, LYT0108-001A, is a compact and versatile video camcorder that has captured the attention of amateur and professional videographers alike. This model is renowned for its user-friendly design and advanced technology, making it an excellent choice for various recording needs.

One of the standout features of the GR-AX999UM is its impressive 20x optical zoom lens. This enables users to capture detailed shots from a distance, making it ideal for recording events such as sports games or outdoor activities. The lens is complemented by a 700x digital zoom, providing additional flexibility in capturing distant subjects, although users should be cautious to maintain image clarity at higher zoom levels.

The camcorder is equipped with a 1/6-inch CCD image sensor, which plays a crucial role in delivering high-quality video output. The sensor, combined with its advanced signal processing, ensures that the GR-AX999UM performs well in various lighting conditions, producing bright and vibrant colors. An automatic white balance feature further enhances the recording quality by adapting to different lighting situations.

The GR-AX999UM supports various recording formats, including standard VHS-C tapes, which offers convenience for users who prefer a more traditional recording medium. Additionally, it includes a variety of video effects and scene modes, allowing creators to experiment with their recordings and add a professional touch to their videos.

In terms of design, the JVC GR-AX999UM is lightweight and compact, making it easily portable for on-the-go filming. Its ergonomic grip and user-friendly button layout keep the operation straightforward, even for beginners. The camcorder features a built-in LCD screen that displays critical information, allowing users to compose shots effectively.

For audio, the GR-AX999UM includes a built-in microphone and an option for an external microphone for improved sound quality. This flexibility ensures that users can capture clear audio to accompany their videos effectively.

Overall, the JVC GR-AX999UM, LYT0108-001A represents an excellent blend of advanced features and practical design, making it suitable for a wide range of video recording applications. From family gatherings to travel vlogs, this camcorder provides a reliable and capable solution for capturing life's precious moments.