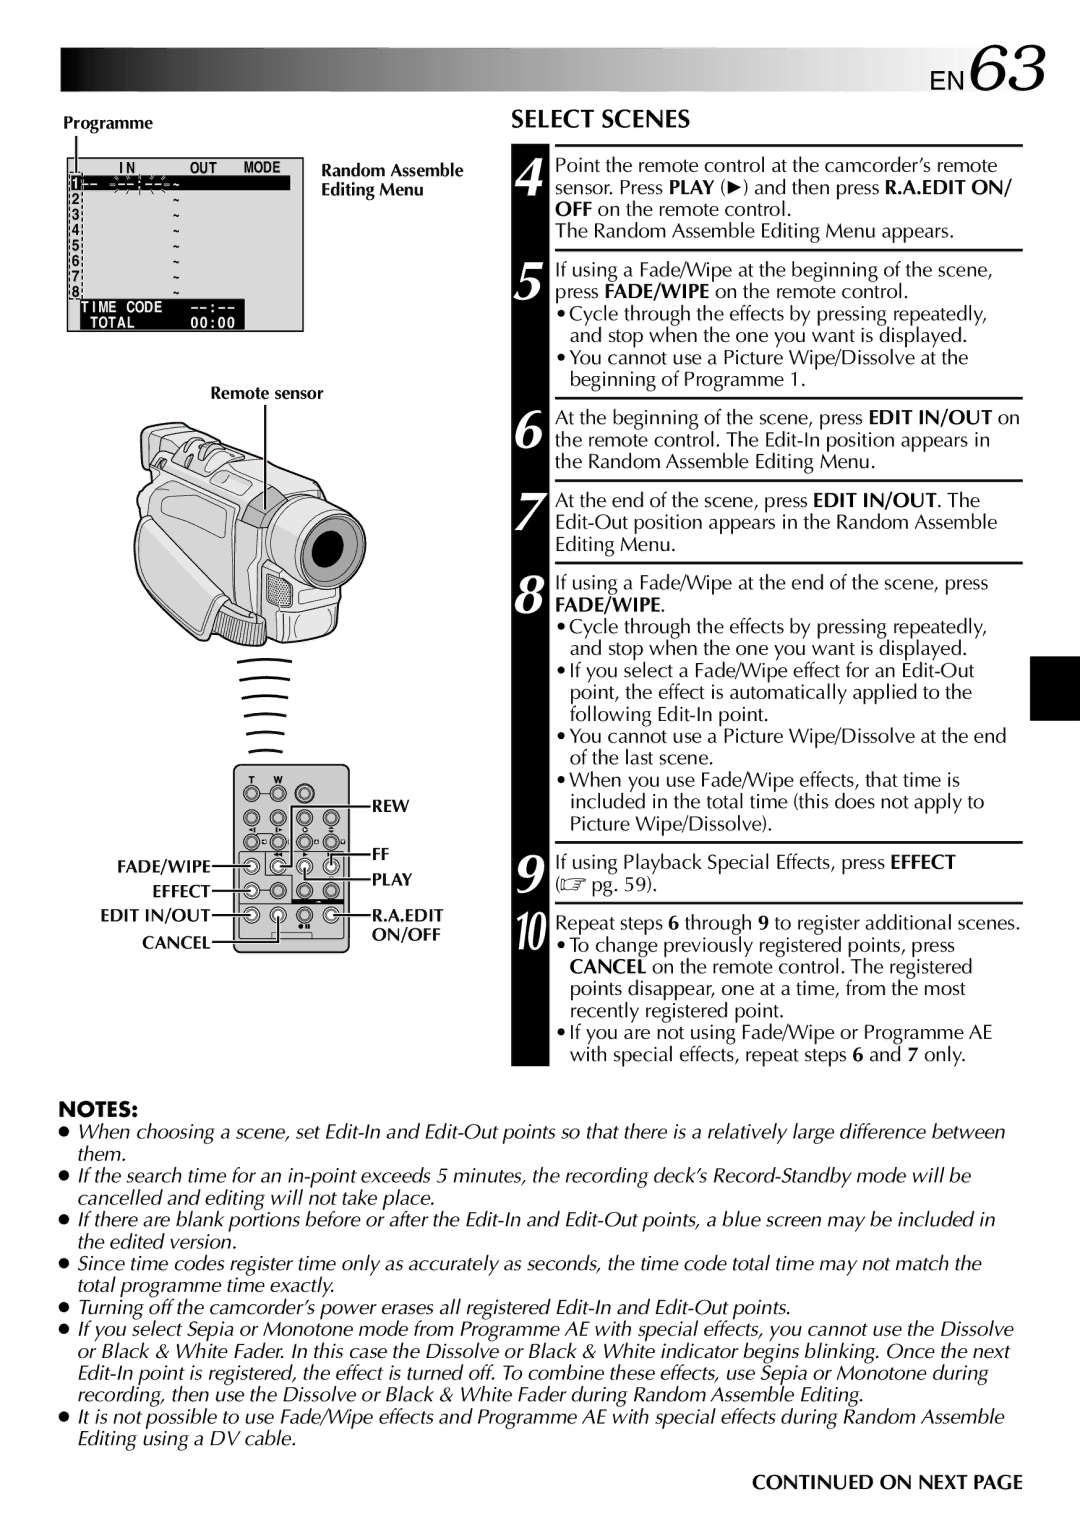
If using a Fade/Wipe at the end of the scene, press FADE/WIPE.
•Cycle through the effects by pressing repeatedly, and stop when the one you want is displayed.
•If you select a Fade/Wipe effect for an Edit-Out point, the effect is automatically applied to the following Edit-In point.
•You cannot use a Picture Wipe/Dissolve at the end of the last scene.
•When you use Fade/Wipe effects, that time is included in the total time (this does not apply to Picture Wipe/Dissolve).
Point the remote control at the camcorder’s remote sensor. Press PLAY (4) and then press R.A.EDIT ON/ OFF on the remote control.
The Random Assemble Editing Menu appears.
If using a Fade/Wipe at the beginning of the scene, press FADE/WIPE on the remote control.
•Cycle through the effects by pressing repeatedly, and stop when the one you want is displayed.
•You cannot use a Picture Wipe/Dissolve at the beginning of Programme 1.
At the beginning of the scene, press EDIT IN/OUT on the remote control. The Edit-In position appears in the Random Assemble Editing Menu.
At the end of the scene, press EDIT IN/OUT. The Edit-Out position appears in the Random Assemble Editing Menu.

EN63

Programme

SELECT SCENES


I N

OUT MODE

Random Assemble


1 – –

– : – –

~


Editing Menu

2


~


3


~


4


~


5


~


6


~


7


~


8


~


T I ME

CODE

– : – –


TOTAL

00 : 00


Remote sensor

4

5

6

7

8


REW


FADE/WIPE

FF

9

If using Playback Special Effects, press EFFECT

PLAY

EFFECT

( pg. 59).


EDIT IN/OUT

R.A.EDIT

10

Repeat steps 6 through 9 to register additional scenes.

CANCEL

ON/OFF

•To change previously registered points, press


CANCEL on the remote control. The registered


points disappear, one at a time, from the most


recently registered point.


•If you are not using Fade/Wipe or Programme AE


with special effects, repeat steps 6 and 7 only.

NOTES:

When choosing a scene, set Edit-In and Edit-Out points so that there is a relatively large difference between them.

If the search time for an in-point exceeds 5 minutes, the recording deck’s Record-Standby mode will be cancelled and editing will not take place.

If there are blank portions before or after the Edit-In and Edit-Out points, a blue screen may be included in the edited version.

Since time codes register time only as accurately as seconds, the time code total time may not match the total programme time exactly.

Turning off the camcorder’s power erases all registered Edit-In and Edit-Out points.

If you select Sepia or Monotone mode from Programme AE with special effects, you cannot use the Dissolve or Black & White Fader. In this case the Dissolve or Black & White indicator begins blinking. Once the next Edit-In point is registered, the effect is turned off. To combine these effects, use Sepia or Monotone during recording, then use the Dissolve or Black & White Fader during Random Assemble Editing.

It is not possible to use Fade/Wipe effects and Programme AE with special effects during Random Assemble Editing using a DV cable.

CONTINUED ON NEXT PAGE

Page 63
Image 63
JVC GR-DVL210A, GR-DVL210EA, GR-DVL313A, GR-DVL910A, GR-DVL910EA, GR-DVL510A, GR-DVL510EA, GR-DVL450A, GR-DVL310A EN63

GR-DVL210EA, GR-DVL910EA, GR-DVL313A, GR-DVL510A, GR-DVL510EA specifications

The JVC GR-DVL210A, GR-DVL910A, GR-DVL450A, GR-DVL310A, and GR-DVL510EA represent a significant leap in the evolution of digital camcorders. These models are renowned for their user-friendly features, advanced technologies, and versatile characteristics, making them popular choices for both amateur videographers and seasoned professionals.

The JVC GR-DVL210A is a compact and lightweight digital camcorder that boasts a 1/6 inch CCD sensor, producing high-quality video recordings at 520 lines of resolution. Equipped with a 10x optical zoom and 800x digital zoom, this model allows users to capture detailed footage from a distance, while the image stabilization technology reduces blurriness caused by hand movement. Additionally, the GR-DVL210A features a 2.5-inch LCD screen that provides a clear view of the subject, enhancing the shooting experience.

Moving up the range, the GR-DVL910A offers enhanced features including a 1/4 inch CCD sensor, enabling improved light sensitivity for better performance in low-light conditions. This model is equipped with a 16:9 aspect ratio capability, making it suitable for capturing widescreen videos. The GR-DVL910A also includes advanced digital effects, allowing users to add creative touches to their recordings, along with a built-in digital still camera that captures high-resolution images.

The GR-DVL450A strikes a balance between performance and affordability. This model enhances image quality with a 1.5-inch LCD screen and improved 3D noise reduction technology. It comes with a powerful 20x optical zoom and 800x digital zoom, solidifying its place as a versatile option for capturing dynamic events.

The GR-DVL310A is notable for its ease of use, making it an ideal choice for beginners. Featuring automatic settings, this camcorder simplifies the filming process, allowing users to focus on creativity rather than getting bogged down by technicalities. Its digital effects and transition features make it perfect for those looking to enhance their video projects.

Finally, the GR-DVL510EA combines advanced features with an user-friendly interface. It includes a larger 3.5-inch LCD screen and multiple connectivity options, including USB 2.0 for easy file transfers. Capable of recording in various formats, the GR-DVL510EA appeals to a broad audience seeking a versatile camcorder.

In summary, the JVC GR-DVL series camcorders stand out for their technology and features, providing users with flexible filming options, clear video quality, and user-friendly designs, catering to a wide range of videography needs.