40 EN

Fade/Wipe Effects

These effects let you make pro-style scene transitions. Use them to spice up the transition from one scene to the next. You can also vary transitions from scene to scene.

IMPORTANT:

Some Fade/Wipe Effects cannot be used with certain modes of Programme AE with special effects ( pg. 38, 39). If an unusable Fade/ Wipe Effect is selected, its indicator blinks or goes out.

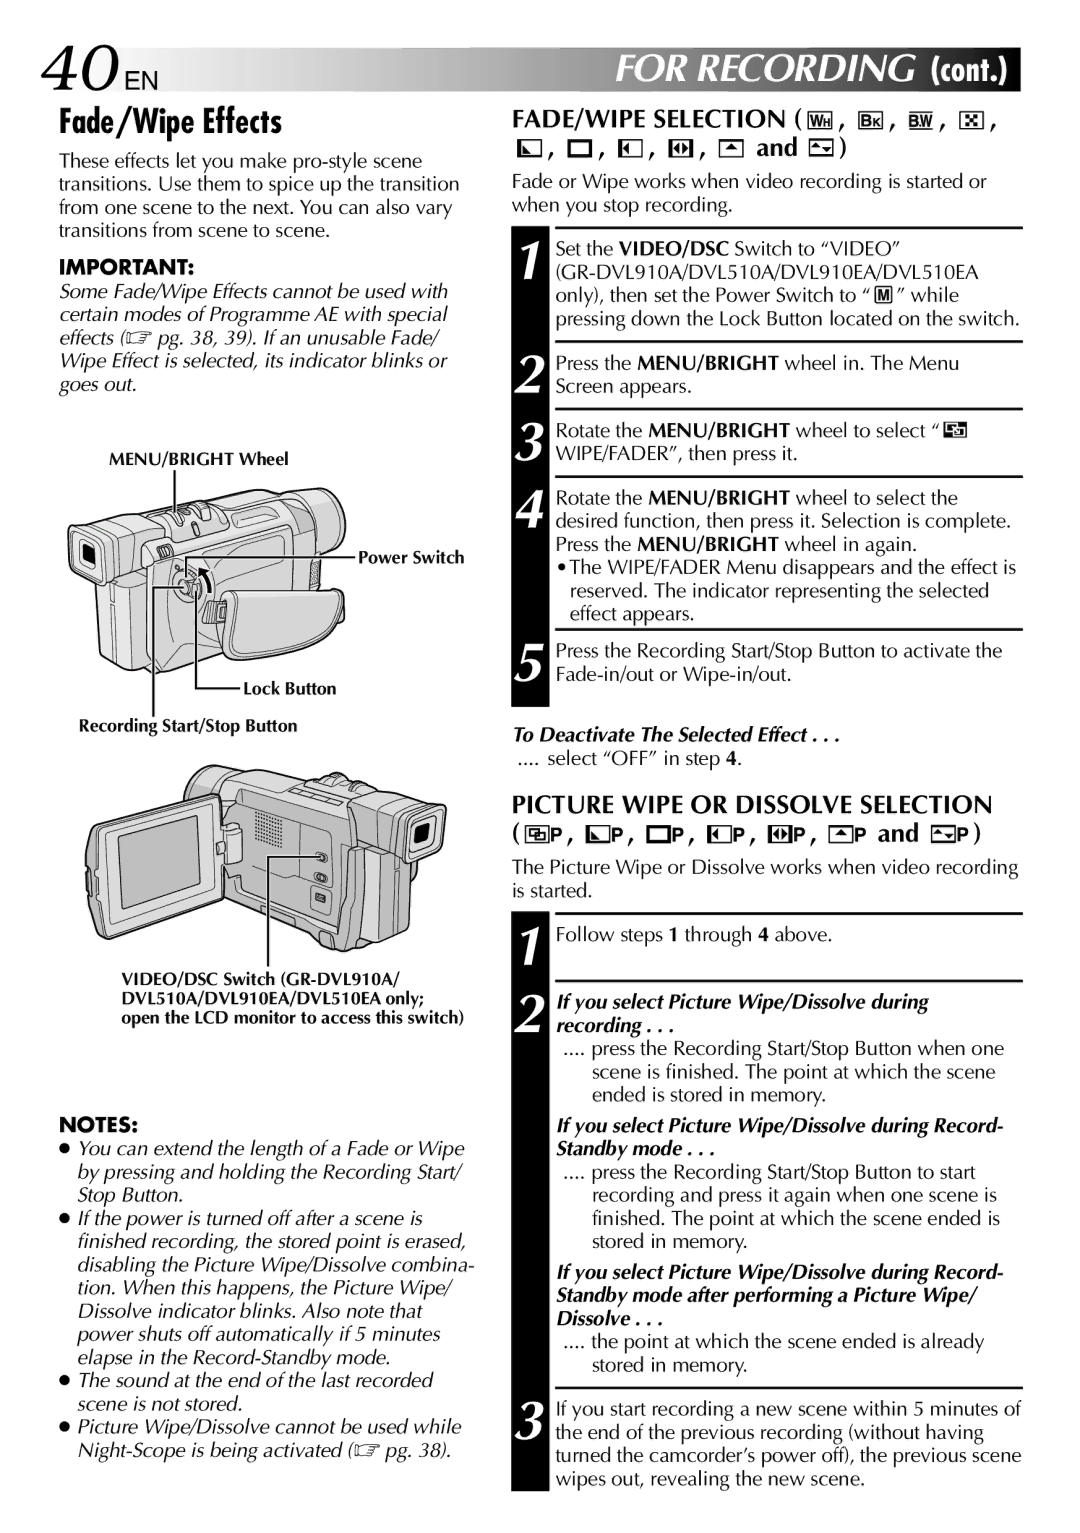
MENU/BRIGHT Wheel

Power Switch

Lock Button

Recording Start/Stop Button

VIDEO/DSC Switch (GR-DVL910A/ DVL510A/DVL910EA/DVL510EA only; open the LCD monitor to access this switch)

NOTES:

You can extend the length of a Fade or Wipe by pressing and holding the Recording Start/ Stop Button.

If the power is turned off after a scene is finished recording, the stored point is erased, disabling the Picture Wipe/Dissolve combina- tion. When this happens, the Picture Wipe/ Dissolve indicator blinks. Also note that power shuts off automatically if 5 minutes elapse in the Record-Standby mode.

The sound at the end of the last recorded scene is not stored.

Picture Wipe/Dissolve cannot be used while Night-Scope is being activated (  pg. 38).

FOR RECORDING (cont.)

FADE/WIPE SELECTION (

,

,

,

,

,

,

,

,

and

)


Fade or Wipe works when video recording is started or when you stop recording.

1 Set the VIDEO/DSC Switch to “VIDEO” (GR-DVL910A/DVL510A/DVL910EA/DVL510EA only), then set the Power Switch to “ ” while pressing down the Lock Button located on the switch.

2 Press the MENU/BRIGHT wheel in. The Menu Screen appears.

3 Rotate the MENU/BRIGHT wheel to select “ WIPE/FADER”, then press it.

4 Rotate the MENU/BRIGHT wheel to select the desired function, then press it. Selection is complete. Press the MENU/BRIGHT wheel in again.

•The WIPE/FADER Menu disappears and the effect is reserved. The indicator representing the selected effect appears.

5 Press the Recording Start/Stop Button to activate the Fade-in/out or Wipe-in/out.

To Deactivate The Selected Effect . . .

.... select “OFF” in step 4.

PICTURE WIPE OR DISSOLVE SELECTION

( , , , , , and )

The Picture Wipe or Dissolve works when video recording is started.

1 Follow steps 1 through 4 above.

2 If you select Picture Wipe/Dissolve during recording . . .

.... press the Recording Start/Stop Button when one

scene is finished. The point at which the scene ended is stored in memory.

If you select Picture Wipe/Dissolve during Record- Standby mode . . .

.... press the Recording Start/Stop Button to start

recording and press it again when one scene is finished. The point at which the scene ended is stored in memory.

If you select Picture Wipe/Dissolve during Record- Standby mode after performing a Picture Wipe/ Dissolve . . .

.... the point at which the scene ended is already

stored in memory.

3 If you start recording a new scene within 5 minutes of the end of the previous recording (without having turned the camcorder’s power off), the previous scene wipes out, revealing the new scene.

Page 40
Image 40
JVC GR-DVL910EA, GR-DVL210A, GR-DVL210EA 40 EN, Fade/Wipe Effects, FADE/WIPE Selection, Picture Wipe or Dissolve Selection

GR-DVL210EA, GR-DVL910EA, GR-DVL313A, GR-DVL510A, GR-DVL510EA specifications

The JVC GR-DVL210A, GR-DVL910A, GR-DVL450A, GR-DVL310A, and GR-DVL510EA represent a significant leap in the evolution of digital camcorders. These models are renowned for their user-friendly features, advanced technologies, and versatile characteristics, making them popular choices for both amateur videographers and seasoned professionals.

The JVC GR-DVL210A is a compact and lightweight digital camcorder that boasts a 1/6 inch CCD sensor, producing high-quality video recordings at 520 lines of resolution. Equipped with a 10x optical zoom and 800x digital zoom, this model allows users to capture detailed footage from a distance, while the image stabilization technology reduces blurriness caused by hand movement. Additionally, the GR-DVL210A features a 2.5-inch LCD screen that provides a clear view of the subject, enhancing the shooting experience.

Moving up the range, the GR-DVL910A offers enhanced features including a 1/4 inch CCD sensor, enabling improved light sensitivity for better performance in low-light conditions. This model is equipped with a 16:9 aspect ratio capability, making it suitable for capturing widescreen videos. The GR-DVL910A also includes advanced digital effects, allowing users to add creative touches to their recordings, along with a built-in digital still camera that captures high-resolution images.

The GR-DVL450A strikes a balance between performance and affordability. This model enhances image quality with a 1.5-inch LCD screen and improved 3D noise reduction technology. It comes with a powerful 20x optical zoom and 800x digital zoom, solidifying its place as a versatile option for capturing dynamic events.

The GR-DVL310A is notable for its ease of use, making it an ideal choice for beginners. Featuring automatic settings, this camcorder simplifies the filming process, allowing users to focus on creativity rather than getting bogged down by technicalities. Its digital effects and transition features make it perfect for those looking to enhance their video projects.

Finally, the GR-DVL510EA combines advanced features with an user-friendly interface. It includes a larger 3.5-inch LCD screen and multiple connectivity options, including USB 2.0 for easy file transfers. Capable of recording in various formats, the GR-DVL510EA appeals to a broad audience seeking a versatile camcorder.

In summary, the JVC GR-DVL series camcorders stand out for their technology and features, providing users with flexible filming options, clear video quality, and user-friendly designs, catering to a wide range of videography needs.