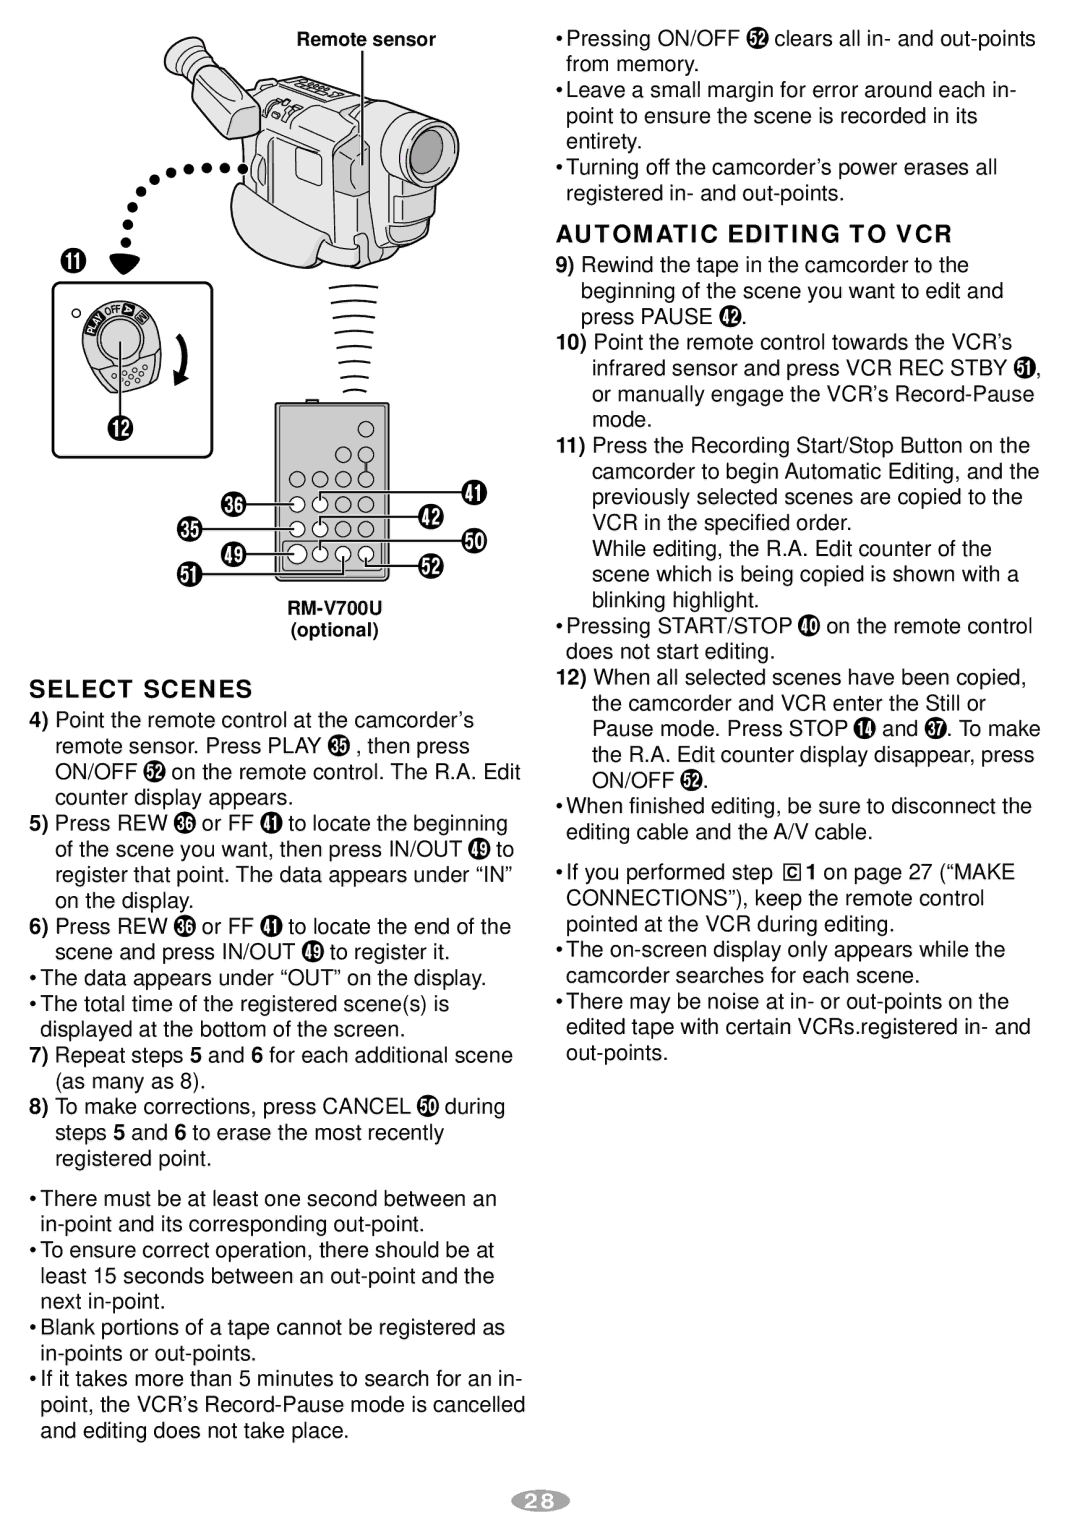
Remote sensor

!


OF

A


Y

F


M

L

A


P


@

T Ys a

A lS ;

RM-V700U (optional)

SELECT SCENES

4)Point the remote control at the camcorder’s remote sensor. Press PLAY T , then press ON/OFF S on the remote control. The R.A. Edit counter display appears.

5)Press REW Y or FF a to locate the beginning of the scene you want, then press IN/OUT l to register that point. The data appears under “IN” on the display.

6)Press REW Y or FF a to locate the end of the scene and press IN/OUT l to register it.

The data appears under “OUT” on the display.

The total time of the registered scene(s) is displayed at the bottom of the screen.

7)Repeat steps 5 and 6 for each additional scene (as many as 8).

8)To make corrections, press CANCEL ; during steps 5 and 6 to erase the most recently registered point.

There must be at least one second between an in-point and its corresponding out-point.

To ensure correct operation, there should be at least 15 seconds between an out-point and the next in-point.

Blank portions of a tape cannot be registered as in-points or out-points.

If it takes more than 5 minutes to search for an in- point, the VCR’s Record-Pause mode is cancelled and editing does not take place.

Pressing ON/OFF S clears all in- and out-points from memory.

Leave a small margin for error around each in- point to ensure the scene is recorded in its entirety.

Turning off the camcorder’s power erases all registered in- and out-points.

AUTOMATIC EDITING TO VCR

9)Rewind the tape in the camcorder to the

beginning of the scene you want to edit and press PAUSE s.

10)Point the remote control towards the VCR’s infrared sensor and press VCR REC STBY A, or manually engage the VCR’s Record-Pause mode.

11)Press the Recording Start/Stop Button on the camcorder to begin Automatic Editing, and the previously selected scenes are copied to the VCR in the specified order.

While editing, the R.A. Edit counter of the scene which is being copied is shown with a

blinking highlight.

Pressing START/STOP P on the remote control does not start editing.

12)When all selected scenes have been copied, the camcorder and VCR enter the Still or Pause mode. Press STOP $ and U. To make the R.A. Edit counter display disappear, press

ON/OFF S.

When finished editing, be sure to disconnect the editing cable and the A/V cable.

If you performed step 1 on page 27 (“MAKE CONNECTIONS”), keep the remote control pointed at the VCR during editing.

The on-screen display only appears while the camcorder searches for each scene.

There may be noise at in- or out-points on the edited tape with certain VCRs.registered in- and out-points.

28

Page 28
Image 28
JVC GR-SXM87ED, GR-SX37ED, GR-SXM67ED manual Select Scenes, Automatic Editing to VCR

GR-SXM67ED, GR-SXM87ED, GR-SX37ED specifications

The JVC GR-SX37ED, GR-SXM87ED, and GR-SXM67ED are part of JVC's innovative line of camcorders that showcase impressive features and technologies, designed for a wide range of users from amateur videographers to more seasoned filmmakers. Each model offers a unique combination of specifications, making them suitable for various shooting environments and needs.

The GR-SX37ED is equipped with a compact design, making it incredibly portable and easy to handle. With its 700x digital zoom capability, users can capture detailed images from a distance, while the Advanced Image Stabilization feature ensures steady shots, minimizing the chances of shaky footage. This model also boasts a 3-inch LCD screen that provides a clear and bright viewfinder for composition and playback, allowing for intuitive operation.

On the other hand, the GR-SXM87ED steps up in terms of performance with its higher-quality zoom optics. Featuring an 800x digital zoom, this camcorder brings subjects closer without compromising on image clarity. It is also equipped with JVC's proprietary Super High Bandwidth technology, which enhances video quality significantly. The GR-SXM87ED includes additional features like a built-in microphone with a windscreen, which significantly improves audio capture for outdoor filming.

The GR-SXM67ED offers a middle ground between the other two models. While it maintains many features present in the GR-SX37ED for ease of use, it comes with an enhanced zoom capability of 750x, balancing quality with performance. This model also prioritizes battery life, ensuring longer filming sessions without frequent recharges, making it particularly appealing for events or trips.

All three camcorders are designed with user-friendly controls and an intuitive interface, ensuring even novice users can easily navigate through settings and capture high-quality videos. In addition to their robust design, they support various recording formats, allowing users to choose the one that best fits their needs. With features like time-lapse recording and digital effects, these camcorders provide creative options for storytelling.

In conclusion, the JVC GR-SX37ED, GR-SXM87ED, and GR-SXM67ED represent a versatile lineup, catering to different shooting preferences and styles. Each model brings its unique set of technologies and characteristics, ensuring that shooters have the necessary tools to capture memorable moments in stunning detail. Whether you’re recording family events or pursuing a filmmaking hobby, these camcorders deliver reliability and impressive performance.