Set the System Select Switch to “D.S.C.” or “VIDEO”, and set the Power Switch to “PRO.”.
Follow steps 1 through 4 of the white balance adjustment, and select “MWB”.

38EN

White Balance Adjustment

RECORDINGAdvancedFeatures(cont.)

Manual White Balance Operation

A term that refers to the correctness of color reproduction under various lighting. If the white balance is correct, all other colors will be accurately reproduced.

The white balance is usually adjusted automatically. However, more advanced camcorder operators control this function manually to achieve a more professional color/tint reproduction.

1

2 Press MENU. The Menu Screen appears.

3 Rotate the Select Wheel to move the highlight bar to “M.W.B.”, then press it. The Menu Screen disappears and the M.W.B. Menu appears.

4 Rotate the Select Wheel to move the highlight bar to the desired setting.

AUTO

White balance is adjusted automatically (factory preset).

: FINE

Outdoors on a sunny day.

: CLOUD” Outdoors on a cloudy day.

: HALOGEN

A video light or similar type of lighting is used.

MWB

White balance is set manually.

5 Press the Select Wheel. The Menu Screen reappears with the highlight bar on “RETURN”. Press the Select Wheel again to close the Menu Screen.

To Return To Automatic White Balance . . .

.... select “AUTO” in step 4. Or set the Power

Switch to “AUTO”.

NOTE:

White balance cannot be used when Sepia (pg. 29) is activated.

Perform Manual White Balance when shooting under various types of lighting.

1

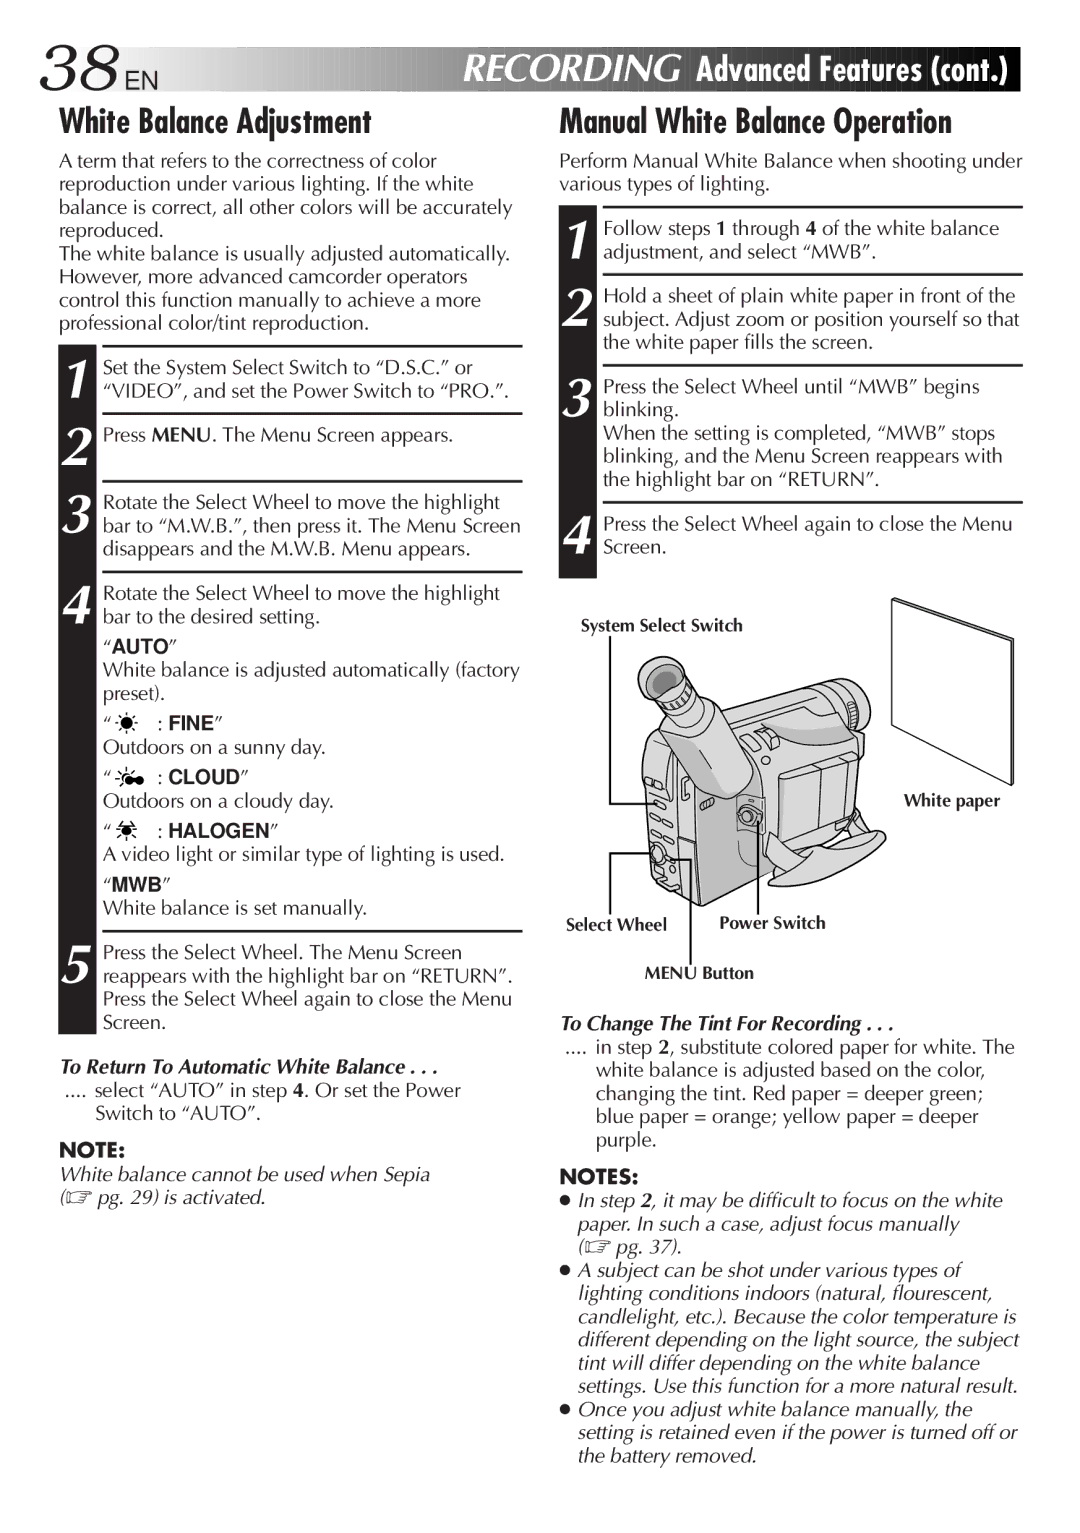
2 Hold a sheet of plain white paper in front of the subject. Adjust zoom or position yourself so that the white paper fills the screen.

3 Press the Select Wheel until “MWB” begins blinking.

When the setting is completed, “MWB” stops blinking, and the Menu Screen reappears with the highlight bar on “RETURN”.

4 Press the Select Wheel again to close the Menu Screen.

System Select Switch

White paper


Select Wheel

Power Switch


MENU Button

To Change The Tint For Recording . . .

.... in step 2, substitute colored paper for white. The

white balance is adjusted based on the color, changing the tint. Red paper = deeper green; blue paper = orange; yellow paper = deeper purple.

NOTES:

In step 2, it may be difficult to focus on the white

paper. In such a case, adjust focus manually (pg. 37).

A subject can be shot under various types of lighting conditions indoors (natural, flourescent, candlelight, etc.). Because the color temperature is different depending on the light source, the subject tint will differ depending on the white balance settings. Use this function for a more natural result.

Once you adjust white balance manually, the setting is retained even if the power is turned off or the battery removed.

Page 38
Image 38
JVC GR-SXM920 38 EN, White Balance Adjustment, Manual White Balance Operation, To Return To Automatic White Balance

GR-SXM920 specifications

The JVC GR-SXM920 is a compact and versatile camcorder that exemplifies the best of portable video recording technology. Designed for amateur videographers and enthusiasts alike, this model combines ease of use with impressive performance, making it an excellent choice for capturing family events, travel experiences, or creative projects.

One of the standout features of the JVC GR-SXM920 is its advanced Super VHS (S-VHS) capability. This technology significantly enhances video quality, providing sharper images and greater detail compared to standard VHS. The camcorder supports S-VHS recording, allowing users to create high-resolution tapes with improved color fidelity and reduced noise.

In terms of design, the GR-SXM920 is compact and lightweight, making it easily portable. Its ergonomic grip and intuitive controls ensure comfortable handling during extended recording sessions. The camcorder features a 20x optical zoom lens, providing excellent versatility for capturing subjects both near and far. Users can achieve stunning close-ups without sacrificing image quality, thanks to the optical zoom feature combined with digital zoom capabilities.

The camcorder is equipped with a 3.5-inch LCD screen that provides a clear view of the recording scene, enabling users to frame shots accurately. The screen can be tilted for adaptability, enhancing the user experience in various shooting conditions. Additionally, the GR-SXM920 supports night vision recording, making it an excellent tool for shooting in low-light situations. This feature utilizes infrared technology to capture clear images even in complete darkness.

Audio quality is another area where the GR-SXM920 excels. It includes a built-in stereo microphone that captures clear sound, essential for producing high-quality videos. Users can also connect external microphones for enhanced audio options, making it suitable for a variety of recording environments.

The battery life of the GR-SXM920 is commendable, allowing for extended shooting sessions without frequent recharges. Its easy-to-navigate menu system simplifies accessing settings and features, making it user-friendly for beginners.

Overall, the JVC GR-SXM920 stands out for its combination of advanced S-VHS recording technology, portability, and user-friendly design. Whether for recording cherished family moments or embarking on creative projects, this camcorder offers functionality and performance to meet diverse videography needs. With its impressive features, it remains a notable option for those seeking a reliable and efficient video recording solution.