INSTALLINGYOURNEWRECORDER

3

Basic Connections

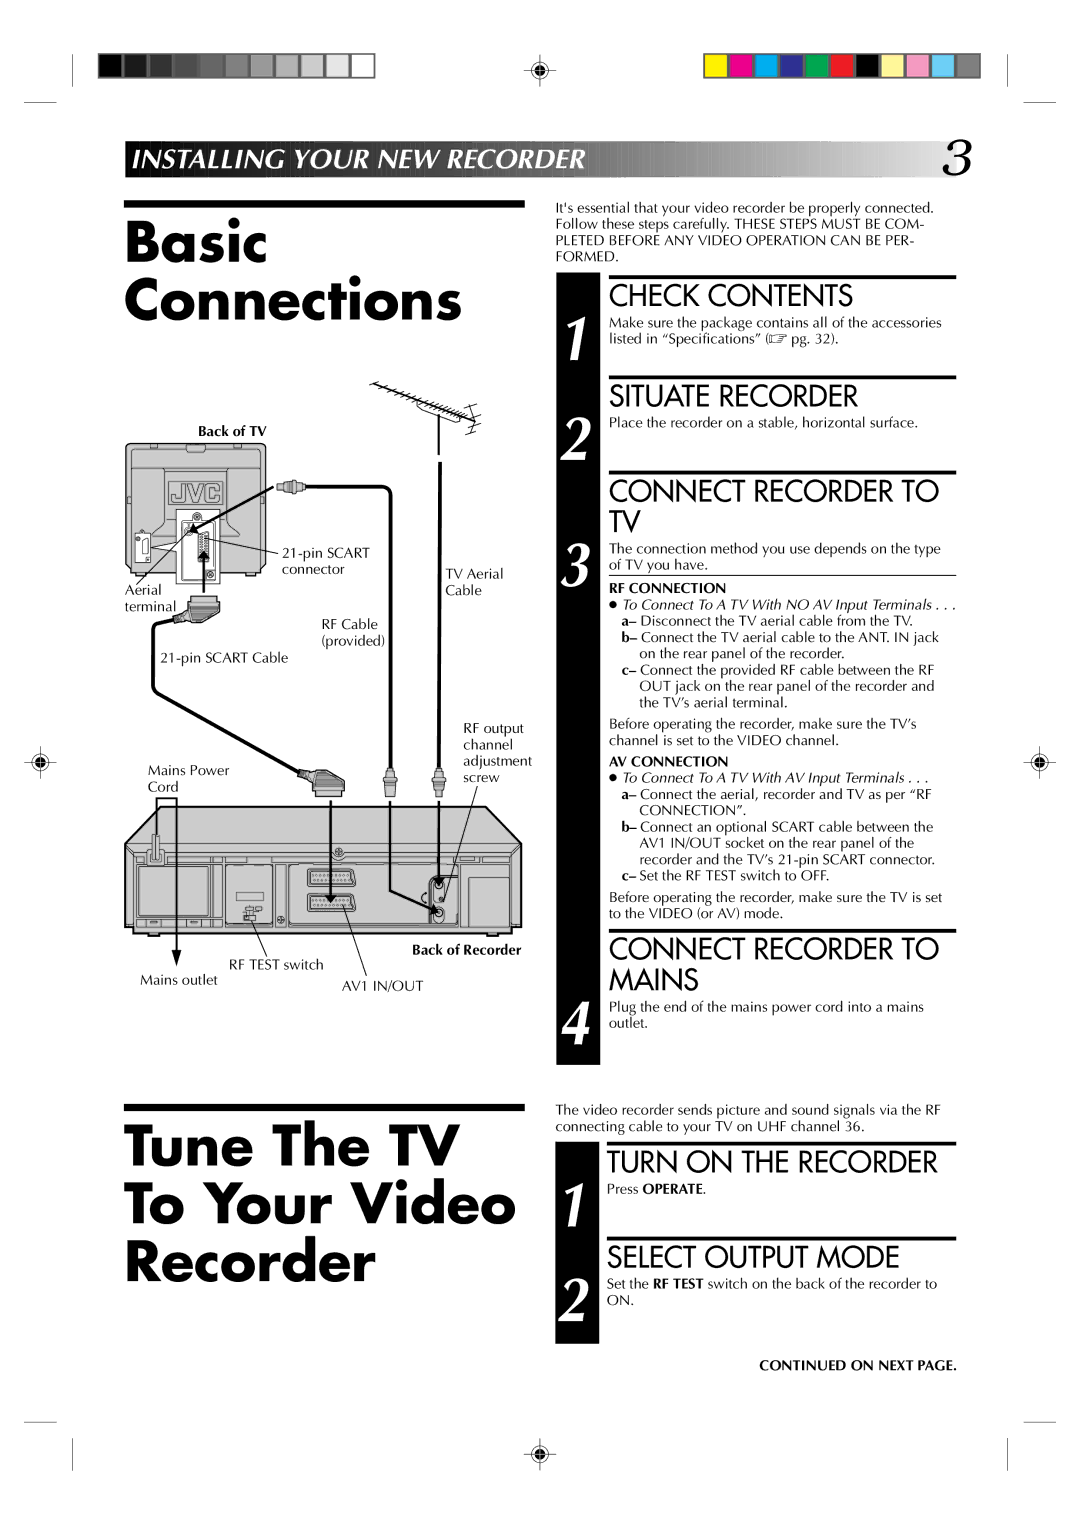
Back of TV

21-pin SCART


connector

TV Aerial

Aerial

Cable

terminal


RF Cable


(provided)


21-pin SCART Cable


RF output


channel

Mains Power

adjustment

screw

Cord


Back of Recorder


Mains outlet

RF TEST switch


AV1 IN/OUT


It's essential that your video recorder be properly connected. Follow these steps carefully. THESE STEPS MUST BE COM-

PLETED BEFORE ANY VIDEO OPERATION CAN BE PER- FORMED.


CHECK CONTENTS


Make sure the package contains all of the accessories

1 listed in “Specifications” (pg. 32).


SITUATE RECORDER

2 Place the recorder on a stable, horizontal surface.


CONNECT RECORDER TO

3

TV

The connection method you use depends on the type

of TV you have.

RF CONNECTION

To Connect To A TV With NO AV Input Terminals . . .

a– Disconnect the TV aerial cable from the TV.

b– Connect the TV aerial cable to the ANT. IN jack on the rear panel of the recorder.

c– Connect the provided RF cable between the RF OUT jack on the rear panel of the recorder and the TV’s aerial terminal.

**Before operating the recorder, make sure the TV’s channel is set to the VIDEO channel.

AV CONNECTION

To Connect To A TV With AV Input Terminals . . .

a– Connect the aerial, recorder and TV as per “RF

CONNECTION”.

b– Connect an optional SCART cable between the

AV1 IN/OUT socket on the rear panel of the recorder and the TV’s 21-pin SCART connector.

c– Set the RF TEST switch to OFF.

Before operating the recorder, make sure the TV is set to the VIDEO (or AV) mode.

CONNECT RECORDER TO MAINS

4 Plug the end of the mains power cord into a mains outlet.

Tune The TV

To Your Video

Recorder

The video recorder sends picture and sound signals via the RF connecting cable to your TV on UHF channel 36.

1


TURN ON THE RECORDER


Press OPERATE.

2


SELECT OUTPUT MODE


Set the RF TEST switch on the back of the recorder to


ON.


CONTINUED ON NEXT PAGE.

Page 3
Image 3
JVC HR-A237E, HR-A437E, HR-A433E, HR-A430E, HR-A233E, HR-A230E Basic Connections, Tune The TV To Your Video Recorder

HR-A430E, HR-A233E, HR-A237E, HR-A437E, HR-A230E specifications

The JVC HR-A433E, HR-A230E, HR-A437E, HR-A237E, and HR-A233E are part of JVC's esteemed lineup of VHS video cassette recorders that were popular in the late 1990s to early 2000s. Each model brought forward a unique array of features and cutting-edge technologies that catered to the needs of home video enthusiasts.

The HR-A433E is particularly noted for its high-quality video playback and recording capabilities. It features JVC's Super VHS technology, which enhances image clarity and detail when compared to standard VHS. With its built-in TBC (Time Base Corrector), users can expect consistent playback quality, minimizing jitter and improving the viewing experience. Additionally, the model supports various recording speeds, allowing for flexible usage based on user preferences.

In contrast, the HR-A230E is a more entry-level model designed to make VCR technology accessible to a broader audience. Although it lacks some of the advanced features of its counterparts, it still delivers reliable performance for basic recording and playback needs. The machine is renowned for its user-friendly interface, making it easy for anyone to operate, whether they're recording a family event or watching favorite shows.

The HR-A437E and HR-A237E models closely mirror the functionality of the HR-A433E and HR-A230E but come with additional enhancements. The HR-A437E includes Dolby Surround audio for an immersive sound quality that enhances the overall viewing experience. On the other hand, the HR-A237E focuses on delivering solid performance with simplified features that appeal to casual users who want effective recording without complexities.

Finally, the HR-A233E serves as an affordable mid-range option that balances performance and budget. With features such as auto timer recording and a variety of playback options, it is ideal for users who want reliable functionality without breaking the bank.

Overall, JVC’s VHS recorders are characterized by their durability, ease of use, and commitment to quality. They incorporate various technologies aimed at improving playback and recording, ensuring that whether capturing a cherished moment or reliving favorite films, users receive a satisfying home entertainment experience. Collectively, these models represent the pinnacle of VCR technology from JVC during their prime, serving as enduring nostalgic devices in a digital age.