JVC HR-J4009UM manual Timer Recording, Watching one program while recording another, Enter

Models: HR-J4009UM

1 16
Download 16 pages 53.16 Kb
Page 9
Image 9

– Recording –

Recording Features

Specifying recording length

- One Touch Timer Recording (OTR)

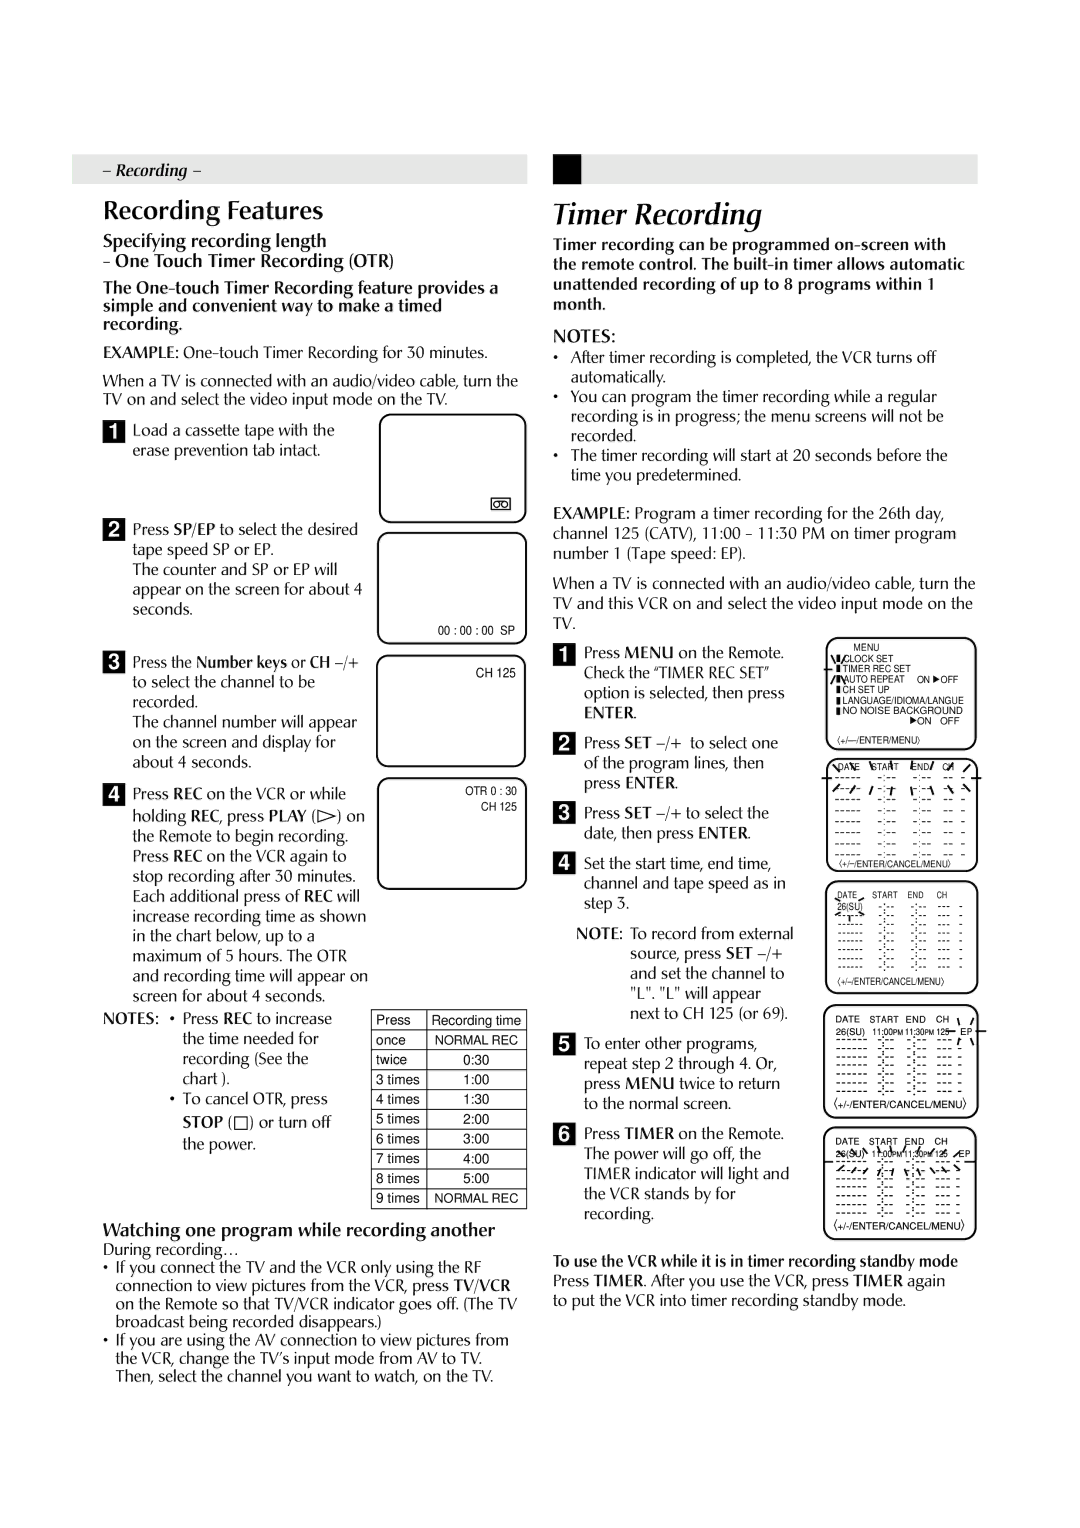
The One-touch Timer Recording feature provides a simple and convenient way to make a timed recording.

EXAMPLE: One-touch Timer Recording for 30 minutes.

When a TV is connected with an audio/video cable, turn the TV on and select the video input mode on the TV.

1Load a cassette tape with the erase prevention tab intact.

2Press SP/EP to select the desired tape speed SP or EP.

The counter and SP or EP will appear on the screen for about 4 seconds.

00 : 00 : 00 SP

Timer Recording

Timer recording can be programmed on-screen with the remote control. The built-in timer allows automatic unattended recording of up to 8 programs within 1 month.

NOTES:

After timer recording is completed, the VCR turns off automatically.

You can program the timer recording while a regular recording is in progress; the menu screens will not be recorded.

The timer recording will start at 20 seconds before the time you predetermined.

EXAMPLE: Program a timer recording for the 26th day, channel 125 (CATV), 11:00 - 11:30 PM on timer program number 1 (Tape speed: EP).

When a TV is connected with an audio/video cable, turn the TV and this VCR on and select the video input mode on the TV.

3 Press the Number keys or CH –/+

1 Press MENU on the Remote.

MENU

CLOCK SET

to select the channel to be recorded.

CH 125

Check the “TIMER REC SET”

option is selected, then press

ENTER.

TIMER REC SET

AUTO REPEAT ON OFF CH SET UP

LANGUAGE/IDIOMA/LANGUE NO NOISE BACKGROUND

The channel number will appear on the screen and display for about 4 seconds.

2 Press SET –/+ to select one

of the program lines, then

press ENTER.

ON OFF

+/— /ENTER/MENU

DATE

START

END

CH

– – – – –

–: – –

–: – –

– – –

4Press REC on the VCR or while holding REC, press PLAY () on the Remote to begin recording. Press REC on the VCR again to stop recording after 30 minutes. Each additional press of REC will increase recording time as shown in the chart below, up to a maximum of 5 hours. The OTR and recording time will appear on screen for about 4 seconds.

NOTES: • Press REC to increase the time needed for recording (See the chart ).

To cancel OTR, press

STOP ( ) or turn off the power.

OTR 0 : 30

CH 125

Press

Recording time

once

NORMAL REC


twice

0:30


3 times

1:00

4 times

1:30


5 times

2:00

6 times

3:00


7 times

4:00


8 times

5:00


9 times

NORMAL REC


3

Press SET –/+ to select the


date, then press ENTER.


4

Set the start time, end time,


channel and tape speed as in


step 3.

NOTE: To record from external source, press SET –/+ and set the channel to "L". "L" will appear next to CH 125 (or 69).

5To enter other programs, repeat step 2 through 4. Or, press MENU twice to return to the normal screen.

6Press TIMER on the Remote. The power will go off, the TIMER indicator will light and the VCR stands by for recording.

– – – – –

–: – –

–: – –

– – –

– – – – –

–: – –

–: – –

– – –

– – – – –

–: – –

–: – –

– – –

– – – – –

–: – –

–: – –

– – –

– – – – –

–: – –

–: – –

– – –

– – – – –

–: – –

–: – –

– – –

– – – – –

–: – –

–: – –

– – –

+/–/ENTER/CANCEL/MENU

DATE

START

END

CH

-

26(SU)

-:--

-:--

---

------

-:--

-:--

---

-

------

-:--

-:--

---

-

------

-:--

-:--

---

-

------

-:--

-:--

---

-

------

-:--

-:--

---

-

------

-:--

-:--

---

-

------

-:--

-:--

---

-

+/–/ENTER/CANCEL/MENU

Watching one program while recording another

During recording…

If you connect the TV and the VCR only using the RF connection to view pictures from the VCR, press TV/VCR on the Remote so that TV/VCR indicator goes off. (The TV broadcast being recorded disappears.)

If you are using the AV connection to view pictures from the VCR, change the TV’s input mode from AV to TV. Then, select the channel you want to watch, on the TV.

To use the VCR while it is in timer recording standby mode Press TIMER. After you use the VCR, press TIMER again to put the VCR into timer recording standby mode.

Page 9
Image 9
JVC HR-J4009UM manual Timer Recording, Watching one program while recording another, Enter

HR-J4009UM specifications

The JVC HR-J4009UM is a remarkable addition to the JVC line of VCRs, combining classic video recording technologies with features that cater to modern user needs. This model showcases JVC's commitment to delivering high-quality video playback and recording, making it a sought-after device for enthusiasts of vintage and analog media.

One of the primary features of the JVC HR-J4009UM is its Super VHS capability, which allows for enhanced picture quality over standard VHS. This technology improves the resolution, providing clearer images and reducing visual artifacts during playback. For users who are nostalgic about their old recordings, this feature can be particularly appealing, as it allows for a much more enjoyable viewing experience.

The HR-J4009UM is equipped with various playback options, including the ability to play back standard VHS tapes alongside Super VHS tapes. This versatility ensures that users can enjoy their entire collection without needing to switch devices. Additionally, the inclusion of a VCR Plus+ feature simplifies the process of programming recordings, allowing users to input a code for their desired program and schedule recordings with ease.

Another noteworthy characteristic of this model is its enhanced audio capabilities. It supports stereo sound, meaning that playback offers a richer audio experience that complements the high-quality video. This feature is particularly advantageous for users who value the overall media experience, ensuring that both the visual and auditory aspects of their recordings are of premium quality.

In terms of design, the JVC HR-J4009UM sports a user-friendly interface, making it accessible for both seasoned VCR users and newcomers alike. Its intuitive control layout and easy-to-read display facilitate straightforward operation, enhancing the overall user experience.

Connectivity is also a key aspect of the JVC HR-J4009UM. The presence of multiple input and output options, including RCA connectors and S-Video output, allows for seamless integration with other devices such as televisions and audio systems. This connectivity ensures that users can enjoy their favorite VHS tapes on modern equipment without compromising on quality.

In summary, the JVC HR-J4009UM is a well-rounded VCR that honors the legacy of video cassette technology while incorporating features that enhance usability and audio-visual quality. Its Super VHS capability, VCR Plus+ programming, stereo audio support, and user-friendly design make it an excellent choice for anyone looking to revisit their VHS collection with a device that stands out in both functionality and performance.